
Table of Contents
Intro
Digimon Battle Evolution (DBE) is a Digimon card game for two players made by Alice White. Based on the Playstation 1 title Digimon World: Digital Card Battles with all the heart-pounding strategy and outguessing you love about the combat system, the hard choices of the support sytstem; and several changes to the rules, many altered cards (plus new cards) and completely new game features and concepts.
Pick a powerful partner Digimon. Play a deck containing any of eight types of Digimon, or mix-and-match types. Play, evolve, battle!
Object of the Game:
Each player will send out their Digimon, evolve, and support them with their own cards. The Digimon battle until one player defeats their opponent 4 times! Become the victor with superior deck construction, planning, bluffing, and outplaying. Digimon Battle Evolution is an Expandable Card Game, (ECG) and is free for life. Several expansion sets are currently implemented, with more on the way.
Anatomy of Cards
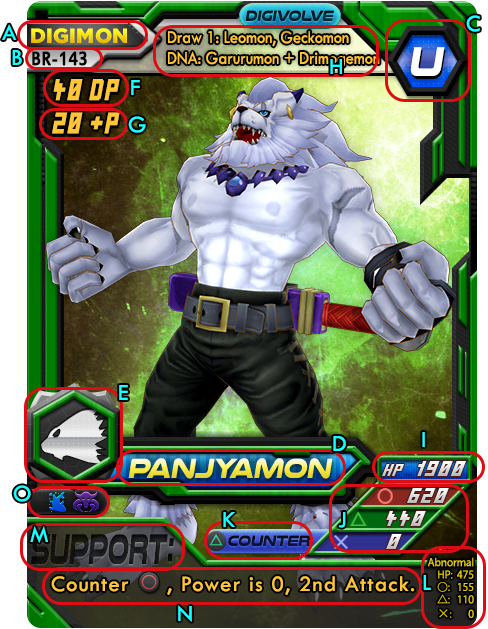
- Card Type – May be DIGIMON / OPTION / EVOLUTION / DATA / MASTERY
- Set Number – Used in deck construction to determine uniqueness of card for legality
- Level – Used for evolution requirements. May be R (rookie), C (champion), U (ultimate), or M (mega). Level M cards do not go in your main deck.
- Name – Name of the card. Not a unique identifier.
- Type – If the card is a Digimon, it will have one of the following primary types, which are used primarily for evolution: Nature, Dragon, Enigma, Wind, Nightmare, Metal, Jungle, Marine, or Ruler
- DP cost – Amount of DP you must have at minimum during evolution
- +P – Amount of DP this provides when in the DP zone. May be negative
- Evolution Box or Evo-box – Contains evolutions that can bypass type and level requirements, as well as “bonuses” obtained when evolving from the named Digimon
- HP – A permanently raising/lowering stat that KOs the Digimon when it reaches zero
- Circle / Triangle / Cross Power – Power of all 3 attacks. This is subtracted from enemy’s HP. This is semipermanent; can be changed but reverts back when the turn ends.
- Attack ability – All Cross attacks have an ability which resolves during Support. Some Triangle attacks also have these.
- Abnormal stats – Just a reminder for Level C and Level U Digimon. Level C stats are halved, Level U stats are quartered. “Abnormal” Digimon are active without being evolved to. When these stats are wrong, calcuate them yourself
- Timing – When the card is normally allowed to be played. SUPPORT / EVOLVE refer to phases. ACTIVATE is used at any phase’s step 0. EFFECT has its timing specified. DATA is a synonym of EFFECT. PASSIVE is always occuring.
- Card text. Do this in order at the correct timing. May also specify timings. Proceed left to right, top to bottom, one sentence (full stop) at a time. Each sentence is one effect. A whole card does not have to resolve for an effect to resolve.
- Subtypes bar – Specifies additional types this card has beyond its primary type. This is the same as a primary type for all effects and evolutions. Cards are not multi-colored frames because there are triple type cards which may be confusing to players.
Pre-Game Setup
Each player performs the following Pre-Game Setup steps once before the game can begin.
- Preamble: Bring a 50 card, legal deck. All Destiny Zone cards are counted in this limit, but still remain in their separate zone. (See “Deck Construction”)
- Inspect: Offers your opponent a chance to see each card in your Destiny Zone. Declares your Partner Digimon (show the card to your opponent). Both players should now put their Mastery card (if any) from the Destiny Zone on top of that zone so its effects are visible during the game.
- Side Piles: Create your Side Pile by removing any cards from your deck, face down (opponent cannot check), until your deck contains 40 cards exactly. Opponent may check the count to ensure it’s correct based on Destiny Zone size. If you have any cards with a gem symbol on them remaining in your deck, take up to 4 of them and place them on the side pile face-up showing the opponent.
- Opening hand: Shuffle your 40-card deck, ignoring your Side Pile, and draw an opening hand of 5 cards.
- Opening mulligan: Choose any number of your opening hand cards, place them face down (opponent cannot check) on top of your Side Pile. Then, draw until your hand is 5 again.
- Create the deck: Combine your Side Pile, mulliganed cards, and deck together and shuffle.
- Start player: Determine who will go first. It becomes that player’s first turn. Proceed to “Phases of Play — Prep Phase”
Prep Phase
FIRST-TIME SETUP
Before the game begins for the first time, please see the “Pre-Game Setup” and follow its steps. Then proceed to “EACH TURN” here.
EACH TURN
These are the steps you will perform each turn (including the first turn)
- “Draw Phase:” and “Prep Phase:” abilities on cards in play activate now.
- Draw: Turn player draws 1 card. If your hand is 2 or lower, draw 2 cards instead!
- If the turn player has any cards in their Dark Area, they must take each (not counted as drawing cards).
- Dark Area is a hidden zone like hands—a player may look at and rearrange their own Dark Area at any time but may not remove cards or play cards from it unless explicitly instructed.
- Full mulligans: If the turn player has 3 or more cards in hand at this point, they may perform a “full mulligan” as many times as they wish. This is discarding the ENTIRE hand and adding that many cards to their hand from the top of the deck (same as drawing but does not trigger effects).
- Play new Digimon: If active zone is empty, turn player plays an R, C or U from hand
- If the turn player cannot place any Digimon on the active zone at this point, that player loses the game immediately (see FAQ for forced mulligans if hand is too low to mulligan and no Digimon in hand).
- Playing an un-evolved Level C or U changes to “Abnormal” status. See: Glossary “Abnormal”
- Partner Evolution: If the active Digimon is the deck’s “Partner” Level R, you may partner-evolve immediately. Choose one Partner Level C from the Destiny Zone and place it on the Evolution Zone as a new Future Digimon, then immediately trigger any evo-bonuses as normal during evolution, then place it on the Active Zone.
Evolution Phase
- “Evolution Phase:” or “Evolve Phase:” abilities on cards in play activate now.
- Rack up DP: You may place up to ONE card into DP Zone for its “+P” amount from hand. This is called “Racking DP” and is the “Rack-Up” step. Some non-Digimon cards have +P and may be racked unless prohibited.
- If current active Digimon is abnormal or the active was partner evolved this turn:
- If abnormal: You may reveal a valid Evolution type card from hand (yellow border) and proceed to step 4 and play the revealed card. “EVOLVE” timing cards are not valid for Abnormal Digimon, only the actual card type.
- (Example: You reveal “Download”, which is an Evolution card that does not prohibit evolving from abnormal but you may not reveal Penguinmon which is EVOLVE timing or a DNA material.)
- In many cases, the Evolution card may not allow evolution for abnormal Digimon in which case, you would still resolve all of its other effects.
- Skip the rest of this Phase (do not evolve by DP, DNA, or any other method than Evolution type cards)
- If you partner evolved: Skip the rest of this phase.
- If abnormal: You may reveal a valid Evolution type card from hand (yellow border) and proceed to step 4 and play the revealed card. “EVOLVE” timing cards are not valid for Abnormal Digimon, only the actual card type.
- Evolution terminology:This is a list of potentially confusing terms you may encounter during this section or on evolution-relevant cards. Each one is explained with examples or in detail.
- Future: The Digimon one has chosen to evolve to is called the “future” and it’s evo-box bonuses and DNA specifications are called the “future evo-box”. This is used for applying bonus effects during evolution or for defining how DNA evolution functions.
- Evo-box or Evo-bonus: The box is where bonuses are located. Bonuses are effects that trigger when this card evolves or sometimes when placed as a Future. May become forcibly activated by other effects, in which case each effect now applies (including permanent effects that modify card stats).
- Partial names in evo-box: As with all effects, partial card names may be referenced, such as “-dramon” or “kok-” or “-devi-” which any names that fill in the dash. Example: Draw 2: -“dramon” (C). This means any Level C Digimon ending in dramon such as Seadramon, Strikedramon, any Level C with its name changed to “-dramon” all count for drawing 2. Example: Take 1 “-devi-” card in deck: “kok-“. This means any Digimon starting with Kok including Kokabuterimon and Kokuwamon are valid to take any 1 card containing a fragment “devi” in its name from the deck. They could take Devimon, Ladydevimon, Devidramon, or even Devil Chip!
- DNA: This is in evo-boxes but not considered a “bonus” and cannot be “activated” like a bonus by card effects. (DNA represents Jogress, Gattai, Fusion, Xros, Digimental, or any other material synthesis for evolution.)
- DP or DP? On the Future, “X0 DP” refers to its cost, whereas a player’s DP refers to the amount they have in the DP zone, provided by the sum of +P on cards in there. “in DP” refers to the zone itself.
- “Evolution”, “EVOLVE”, “Evolve:”, “as evolved”, “evolve to” – Each of these terms is slightly different. Evolution cards are yellow bordered. EVOLVE is a card timing to note it is played during this Phase, usually from hand. Evolve: means a card in play triggers during Step 0 of this phase or when appropriate. “As evolved” is a term that means change the active and reset its stats to the printed amounts without being considered the act of evolving itself. “Evolve to” means attempt to use the 1 normal act of evolution per turn to change the active Digimon.
- Ignore: Means completely disregard this aspect of evolution if it would normally be applied, do not touch it, do not modify it. “Ignore DP” is common and means DP is not required or touched. “Ignore type” is common and means type requirements are not used.
- DP -X0 or -X0 DP? Each referrs to a different thing. “DP -X0” is a shorthand way to lower the DP cost requirements of a future, including in its evo-bonuses. “-X0 DP” is likely not used, but “-X0 +P” can occur in which case the DP a player has is lowered, even to negative numbers.
- “When evolving”: This card effect only occurs if there is a valid future in the evolution zone.
- “When evolving by DP“: This card effect enforces evolution by DP to receive its effects. Example: Super Tag says “When evolving by DP, … delete this card instead of discarding all own DP.” which means this effect is not enabling abnormals to evolve because abnormals cannot evolve by DP. Simply playing this card will not evolve by “Evolution card”. Think of these Evolution cards as ways to bolster the method of evolving by DP, rather than typical evolutions!
- “After evolving,”: Once the future is on the active zone and the stats have been changed for the active Digimon, this effect activates.
- 0 DP (cost): Each Level R has printed “0 DP” in its cost. This is simply to remind players they do not have to evolve to Level R. But unlike Digmon with no DP cost (which are not allowed to evolve by DP), they can be evolved to by DP for 0 if a card effect allows this.
- Downgrade: Evolution in reverse Level order (M, U, C, R). This card effect ignores DP by default.
- Enables…: Indicates some change to the normal procedure. Example: Enables evolution to the same level. This means the normal level procedure is skipped if a player wants and the new one is used.
- Requires DP: Means you would not evolve “by DP” as usual on an evolution card, but this one still requires that you could meet the future’s DP cost, then still discards all DP in the slot. This is similar, but for the purposes of effects and abnormal evolution, is separate from evolving “by DP”.
- Evolution/Evolve Zone: Zone restricted for use during this phase naturally. Place futures and evolve timing cards here to resolve effects without confusion.
- Choose an Evolution Method: Turn player will choose an “Evolving by…” method from below and proceed with only that method’s steps. The non-turn player may not do anything unless explicitly allowed by a card or rule here. If a method redirects to a different one partway, start on the new method from the beginning. When following these steps, in case players get confused, keep in mind two important facts: 1. A given player may only evolve once per turn, regardless of method. Effects that change the active “as evolved” do not count toward this limit, as they are not the act of evolving itself and instead reset stats and change the active Digimon. 2. A given player, by default only the turn player, may only play ONE card with the EVOLVE timing or “Evolve: / Evolve Phase:” from their hand each turn. Effects that activate others are allowed. Cards in play that trigger effects during this time are not limited.
- Evolving by Evolution card: [AKA “by card”] Turn player must play an Evolution card into the evolve zone. When an Evolution (yellow border) card is played, by default the player is now evolving “by Evolution card”. These are powerful effects meant to ignore some default requirements. Warning: if this card states “evolving by DP”, it would be better to start at that method and count this as the one EVOLVE timing card per turn unless other effects are present that may ignore the “by DP” parts.
- After playing the Evolution card, play the Future card from hand (by default; but from Destiny Zone if going to Level M) onto the evolve zone.
- By default, the following is respected: Level, Type, DP cost.
- If not ignoring Level, it must progress one step at a time in the order (R, C, U, M).
- When “ignoring level”, Digimon may evolve backward (to a lower level, e.g. C -> R), to the same level (C -> C) or to any other higher level that’s allowed by the effect (C -> M).
- If not ignoring Type, one must be shared on the current and Future Digimon.
- Instead, if the future contains the previous Digimon’s name in its evo-box, ignore type and level but not DP.
- A player must have at least the DP listed on the future Digimon’s cost, if it has one printed (after applying evo-bonuses to discount requirements). Player DP is not limited only to +P shown in the DP Zone and other effects may have caused them to gain or lose some DP. Players may wish to track DP separately from cards with dice or other counters when this occurs.
- By default, the following is ignored: Abnormal status, evolution-prohibiting effects.
- Begin to resolve any effects on the Evolution card. Any effects that resolve “When evolving by…” such as “by DP” or “by DNA”, DO NOT COUNT as evolving by an Evolution card. Skip the rest of this process if using those effects and move to the correct “evolving by…” process and step below.
- If not ignoring DP: Determine the DP cost to evolve by checking the “XX DP” section of the future, any cost reducing effects from evolve card effects, and gain any DP -XX effects that are on the future’s evo-box which the active’s name matches and qualifies for.
- If any requirements are unmet and not ignored by an effect, the player takes the future back into its previous zone, evolution has failed, the Evolution card finishes resolving any valid effects, and skip the rest of this phase. (Never delete a Level M if it leaves the evolve zone)
- If the cost is achieved (greater or equal DP after all reductions) or ignored by an effect, may activate any non-permanent evo-bonuses on the future that qualify based on name (Draw cards, HP +100, Take 1 in deck, etc.). Since you “may”, you may also activate the remaining effects later in this phase.
- If every requirement is met, place the Future Digimon onto active, evolving it.
- This uses the 1 act of evolving per turn.
- Reset the new active’s HP, Power, types, and all other properties to the new card’s printed amounts.
- Activate any permanent effects in the evo-box that qualify based on name. Activate any qualified, remaining, unactivated evolution box bonuses. Resolve any “after evolving” effects.
- Discard all DP unless “Ignoring DP”. Note, this is not “paying DP”. Costs in DBE are not paid, they are conditions that players are prompted to meet. This is a separate rule.
- Complete. Skip the rest of this phase.
- Evolving by DNA: DNA evolution takes a Future Digimon and counts it as 1 “Evolve” timing card and uses the Evolve zone. Turn player must place a valid Future onto the evolve zone.
- Valid Future: A valid future for DNA (placed onto the evolve zone) is any future with “DNA” in the evo-box. This is played from hand by default. Players may temporarily place invalid ones and attempt to use later cards to influnce its validity. Level M futures may be placed from the Destiny Zone.
- DNA Materials: Digimon listed in a future evo-box after “DNA: ” are split by a plus sign (+) and are the required “DNA materials”. Some cards may substitute a + for commas, to indicate they have DNA as an option for any of those listed names but not any specific ones, or may be alternative ways to evolve. Each DNA evolution is comprised of at least two material cards. Normally, Digimon cards are materials but DNA only requires the card names match. Sometimes, Evolution cards or other types may make themselves valid materials.
- Materials may be specified by name, type, level, or some combination.
- Material requirements with more than one specification require all of them (e.g. DNA: Airdramon + Metal Level C; requires an Airdramon card and any Level C Digimon with the Metal type).
- “DATA” cards count as DNA materials that match their name, as with all cards that have a matching name.
- Since a DNA future card counts as “Evolve” timing, they cannot be used with abnormal actives and are the 1 “Evolve” timing played per turn by default.
- Must also have either of the required material names as the active Digimon.
- Place a card from hand onto the evolve zone, as “material” for evolution by DNA.
- Some cards may count “as materials” which also have other effects. Resolve them now. Example: BIT-058 Jogress counts as a DNA material and has effects that will activate later. That is one way to subvert the “1 Evolve card per turn” rule becase it is played as a material.
- If after all effects resolve, there is no combination of valid future in evolve zone, valid material in evolve zone, and valid material as active, evolution fails. Skip the rest of this phase and put the invalid future back in its previous zone. Finish resolving any effects or cards on the evolve zone. Trash the remaining cards on the evolve zone, do not put the material(s) back into hand! Some materials are not Digimon cards and taking them back may allow re-use of effects.
- Ignore DP. DNA does not evolve by DP and ignores the DP zone.
- All other Digimon properties are ignored except the evo-box DNA requirements and any lingering effects that affect DNA evolution.
- If every requirement is met, place the Future Digimon onto active, evolving it.
- This uses the 1 act of evolving per turn.
- Reset the new active’s HP, Power, types, and all other properties to the new card’s printed amounts.
- Evolving by DNA does not activate an evo-bonus on its own, regardless of names present in evo-bonus effects.
- Resolve any “when evolving” or “after evolving” effects.
- Complete. Skip the rest of this phase.
- Evolving by DP:This is the most common and most available evolution method for all Digimon. When in doubt, use this method. Delcare evolution by DP.
- Play Evolve card: If not already played, the turn player may play 1 EVOLVE timing card from their hand to the evolve zone; or another card with an effect that has “Evolve” timing. Evolution cards (yellow border) are allowed here but not recommended for this method unless it says “when evolving by DP”.
- Play the Future Digimon card from hand (by default; but from Destiny Zone if going to Level M) onto the evolve zone.
- By default, the following is respected: Level, Type, not abnormal, DP cost.
- If not ignoring Level, it must progress one step at a time in the order (R, C, U, M).
- When “ignoring level”, Digimon may evolve backward (to a lower level, e.g. C -> R), to the same level (C -> C) or to any other higher level that’s allowed by the effect (C -> M).
- If not ignoring Type, one must be shared on the current and Future Digimon.
- Instead, if the future contains the previous Digimon’s name in its evo-box, ignore type and level but not DP.
- If not ignoring abnormal, the active Digimon cannot be abnormal status. This is merely a reminder step as the rules do not allow choosing this method if abnormal.
- If not ignoring DP, A player must have at least the DP listed on the future Digimon’s cost, if it has one printed (after applying evo-bonuses to discount requirements). Player DP is not limited only to +P shown in the DP Zone and other effects may have caused them to gain or lose some DP. Players may wish to track DP separately from cards with dice or other counters when this occurs.
- If not ignoring DP, May optionally reduce own DP total by -10 or discard a “DP” card from anywhere you have counted as DP to remove 1 “flat” token from in front of your active Digimon. (Example: Having DP cards under “Immortalize”, you may discard at least one that counts for at least 10 +P, or simply reduce your own current DP total by -10 permanently. Players may wish to track this with counters). This step differs from Evolving by Evolution card in that it is the only evolution method that naturally allows for removing “flat” tokens.
- Begin to resolve any effects on Evolve timing cards.
- If not ignoring DP: Determine the DP cost to evolve by checking the “XX DP” section of the future, any cost reducing effects from evolve card effects, and gain any DP -XX effects that are on the future’s evo-box which the active’s name matches and qualifies for.
- If any requirements are unmet and not ignored by an effect, the player takes the future back into its previous zone, evolution has failed, the Evolution card finishes resolving any valid effects, and skip the rest of this phase. “Flat” tokens removed are re-added. (Never delete a Level M if it leaves the evolve zone)
- If the cost is achieved (greater or equal DP after all reductions) or ignored by an effect, may activate any non-permanent evo-bonuses on the future that qualify based on name (Draw cards, HP +100, Take 1 in deck, etc.). Since you “may”, you may also activate the remaining effects later in this phase.
- If every requirement is met, place the Future Digimon onto active, evolving it.
- This uses the 1 act of evolving per turn.
- Reset the new active’s HP, Power, types, and all other properties to the new card’s printed amounts.
- Activate any permanent effects in the evo-box that qualify based on name. Activate any qualified, remaining, unactivated evolution box bonuses. Resolve any “after evolving” effects.
- Discard all DP unless “Ignoring DP”. Note, this is not “paying DP”. Costs in DBE are not paid, they are conditions that players are prompted to meet. This is a separate rule.
- Complete. Skip the rest of this phase.
- Evolving by Evolution card: [AKA “by card”] Turn player must play an Evolution card into the evolve zone. When an Evolution (yellow border) card is played, by default the player is now evolving “by Evolution card”. These are powerful effects meant to ignore some default requirements. Warning: if this card states “evolving by DP”, it would be better to start at that method and count this as the one EVOLVE timing card per turn unless other effects are present that may ignore the “by DP” parts.
Effect Evolution
Evolving by Effect: In some cases, the above rules may not apply to the situation in question. Most likely, this is due to a card effect causing evolution. In those cases, the requirements for the act of evolving will be listed on the card. By default, effect evolution is special and has no requirements unless listed (DP is ignored, etc). If the effect requires a “valid” evolution, use “Evolving by DP” rules to determine validity, and apply the effect’s special conditions if any. Do not use the rest of the “by DP” process unless the effect specifically instructs to evolve by DP. Effects that evolve outside of the Evolve Phase are not restricted to the “1 evolution act per turn” rule because they do not use one of the methods. Be sure to always reset the stats as normal for “as evolved” and evolving.
Strategy Phase
FIRST-TIME SETUP
Skip this entire phase during the first turn of the game.
- “Strategy Phase:” or “Strategy:” abilities on cards in play activate now.
- Skip to Support Phase if opponent player does not have an active Digimon
- If skipped, opponent Trashes 2 cards and turn player Draws 1 card. This is an unopposed victory bonus!
- Both players choose one of: Circle / Triangle / Cross attacks simultaneously and secretly. Attacks aren’t revealed until Step 2 of the Battle Phase.
- Use markers in a bag, behind a barrier or under a table (do not place cards in hand in these locations)
- If using the attack cards, simply place them (facedown) into the Attack Zone.
- Tip: Try to bluff your opponent and be aware of their most deadly attack, most reliable attack, and their special attack!
Support Phase
FIRST-TIME SETUP
Skip this entire phase during the first turn of the game.
- “Support Phase:”abilities on cards in play may be activated now.
- Supporting: Support-timing cards (usually Digimon or Options) may be played either from hand or the top of the deck (face down!), in this order:
- Non-turn player plays 1 Support card (or lack thereof) first.
- Turn player then plays 1 Support (or none). Your advantage for being the turn player is playing second and knowing what is coming!
- Resolve Support cards starting with the TURN-player. They play last but resolve first! Just remember: last-in, first-out.
- “Void” timings are *always* checked before all other effects. Voiding means to nullify the card but sometimes can only nullify some effects on a card.
- If there are more than one Void effect, always refer to Step 4: Resolve the turn-player’s first!
- Voids cannot nullify other void effects, only effects on the other card that do not void.
- If an effect fails to apply, such as blind supporting from the deck resulting in an impossible play, or an “If/When” statement failing, it’s considered a “misfire” and has the same affect as self-Voiding.
- At this time, if a player chose Cross while they have a “Jamming” attack ability, and their opponent used a Digimon card to Support, they may reveal their chosen attack and Void the Digimon support. If they do not do that before moving to the Battle Phase, it is considered a missed opportunity and “misfires”.
- After both supports are used (fully resolved), if there are any remaining unused supports (placed there by card effects), continue by restarting the resolution step from the beginning.
- “Void” timings are *always* checked before all other effects. Voiding means to nullify the card but sometimes can only nullify some effects on a card.
Battle Phase
FIRST-TIME SETUP
Skip this entire phase during the first turn of the game.
- “Battle Phase:” and “Battle:” abilities on cards in play activate now.
- Reveal both chosen attacks simultaneously.
- The turn-player gains “1st Attack” meaning they will attack first by default.
- Now apply both Digimons’ special “attack abilities” simultaneously if any. These are usually found on Cross attacks, but sometimes Triangle.
- If a player has “Jamming”, apply that effect immediately and void the opponent’s Cross abilities. Immediately stop processing rules for voided attack abilities. Jamming can never void Jamming.
- If there is any timing conflict at this point, the turn player begins with priority to resolve first but may choose to pass it and resolve second.
- In the case of “1st Attack” conflicts, priority of attack goes to the player with the most instances of “1st Attack” gianed, including the turn player’s default assignment from Step 1.1. In the case that there is a tie, the player who gained a “1st Attack” ability *most recently* will attack first.
- This means that the turn-player starts with 1 point of 1st Attack. If the opponent gains a point, they would attack first since there is a tie and they gained the ability last. If the turn-player then gained another, they would have more instances and attack first again.
- If a player gains “2nd Attack” outside of Counter, simply remove a stack of 1st Attack they have first until they have none left and attack in that order (2nd Attack simply cancels a stack of 1st Attack)
- If a player “cannot gain 1st Attack” due to some card effect, all instances are stripped and they attack Second.
- If ANY player has “Counter Attack” they always attack second no matter what other effects exist. Counter requires this to be the case. If both players have Counter, both attacks fail and no damage is dealt (even if both players used Cross with Cross Counter).
- At this step, things like “Counter [Attack]” can become more/less powerful and “[Attack] to 0/Guard” can reduce all gains. Outguessing is considered more valuable than playing a card for the same effect.
- Reduce 2nd-attacker’s HP by the damage of the 1st-Attacker’s Power (or according to a Crash-user’s *current* HP).
- Apply residual effects (e.g. Drain to gain HP, Crash’s “HP to 10”)
- Always apply Crash’s HP reduction before Drain’s HP recovery
- If a Digimon’s HP reaches 0, skip immediately to Step 6 and proceed with KO scoring. The other player does not get an attack.
- Apply residual effects (e.g. Drain to gain HP, Crash’s “HP to 10”)
- Reduce 1st-attacker’s HP by 2nd attacker’s Power, unless they are using Counter or Crash:
- If using counter, directly apply damage equal to the opponent’s *current* Power. Remember to “misfire” the counter instead if its conditions failed. For Crash, do the same as above and apply the *current* HP of the 2nd Attacker as damage instead of their Power.
- Apply residual effects (e.g. Drain, Crash) as in 3.1
- Always apply Crash’s HP reduction before Drain’s HP recovery
- Check for a Digimon KO (HP is reduced to 0)
- Discard the active KO’d Digimon and all cards under it. Keep all DP zone cards. Eject all its attachments to the trash. Skip this step if Revival was set and instead reset the active as evolved.
- Before awarding ANY KO points, check if any Digimon was previously Revived (see Glossary: Revive). Revived Digimon are always worth 1 KO and ignore all other changes to its KO points.
- KO’d R-level “Partner” goes to deck (shuffle) as long as it’s anywhere in the active zone stack.
- KO’d Partner’s Level C from Destiny Zone is deleted instead of discarded, as long as it’s anywhere in the active zone.
- KO’d Level M is deleted and the opponent gains 2 KO points in the next step instead of 1.
- Player that achieved the KO gains 1 KO point for victory. If a Level M was KO’d, 2 KO points are awarded instead.
- Check if a player can win the game: If a player has 4 KO points (or more), they win!
End Phase
- “End Phase:” abilities on cards in play activate now.
- The turn-player (only) discards down to 6 cards in hand.
- Remove ALL “lingering” effects, such as Power boosting. Exceptions:
- Type-changes/gains as well as name changes are somewhat permanent. They are treated as part of the Digimon card (not printed), not an effect once they resolve.
- Current HP is always carried over, this is not considered an “effect”.
- “Passive” effects remain and continue to activate
- Permanent evo-box bonuses such as “Power +40” or “Opponent’s DP -10” are considered are as 2.1 permanent changes.
- Discard all Support cards, reset attack selections.
- The turn passes to the next player.
Glossary
(Parenthesis text) or symbol– Text in parenthesis are passively applied at all times and unvoidable in any way. They are referred to as permanent effects or sometimes arguments. Consider them permanent parts of the card. Some reminder text is in parenthesis as well. These effects only ever apply when the card is a permanent on the field in some way (Attachment, Active Zone, or Support).The (permanent) symbol is a special case used for evo-box bonuses.
[1/Turn] – Some effects may have [1/Turn] written in them, which are almost always Passives. These effects are only able to be used 1 time per turn (each player’s) and a player may choose whether or not to activate them as long as they contain a colon ( : ), indicating that the “once per turn” is paid as a cost. As many different once per turn costs may be paid as possible.
Abnormal – A state of the active Digimon where the abnormal stat block is used for its starting HP and its Power. Abnormal Digimon can’t evolve by DP, can only play Evolution (yellow border) cards instead of any Evolve timing card, and may have other restrictions as defined by cards. Abnormal states are checked when the active is played as abnormal and again when evolving (but not effects that are “as evolved”). If a card enters the active zone except on top (example: Kamemon), check if the zone now has enough cards under the active to remove abnormal status. The following are the required number of cards: R (0), C (1), U (2), M (3). If any card leaves the active zone except on top, check again for abnormal status. If an active becomes abnormal through an effect or loss/addition of a card under the active stack, it is treated as abnormal for all effects and evolutions from that point onward. Abnormal is NOT continuously checked by the game!
ACTIVATE – Play timing. See FAQ – ACTIVATE timing.
Access – Follows the form “Access [type]:”. Access is a keyword meaning “Reveal [card] in own hand:” where [card] can be any type or property.
Active Digimon/Zone/Stack – Active Zone is a game zone that includes a set of Digimon, the topmost of which being the “Active Digimon”, an attachment slot (possibly more, possibly with cards filled), and a possible stack of Digimon under the active. Active Stack or Pile refers to all Digimon stacked on top of each other, but not the attachment slots or cards. Active Digimon or “active” only refers to the topmost Digimon. A non-Digimon cannot be the active (trash any that would appear in the active spot).
Also counts as [Name] Same as “Alias [Name]”. This card is permanently considered this name in addition to its printed name.
Any Phase – May use this card during any of the Phase’s Step 1, when “[Timing] Effects Activate” or whenever a player could normally play a card (this doesn’t stop them from playing that card such as playing a card as Support for example). In some cases, it’s not possible to use an effect at the correct time, in which case simply use it at the correct time.
Attach – Place this card next to your active Digimon as “attached”, sometimes with conditions. Some cards may have a magenta hexagon and/or magenta text which further clarifies that the card is an attachment and the colored text determines what effects are gained when attached (if this is not present, the card may not be new enough to have this feature but it can still be an attachment). If “D/T/H” is specified, it is taken from the respective zone (Deck / Trash / Hand). Cards CAN NOT be attached without this word indicating it and only with its specified conditions if any. Attachments stay out permanently until KO’d and usually have effects that change the game. Digimon can only have one attach unless otherwise specified or extra slots are added by an effect. Attaching can only target your own Digimon unless otherwise specified. If a player has an attachment, and another card would be attached, eject (one of) the current one(s) to replace it.
Attach Slot – By default, players receive only one attach slot. The symbol for extra slots is a gray hexagon. This is a place when Attachments can be placed next to the active zone. Eject all attached (to trash) when that Digimon is KO’d.
Boost – Usually with text that specifies a player (sometimes an attack) and the word “Power”, this means to increase your *current* Power (as a lingering effect) by the indicated amount. Boost never needs to specify Power since it is a Power-only term, though it usually does for clarity sake. Reminder that all cards target “Own/Self” unless otherwise specified.
Call [players] [direction] X; Effect – This is a shortening of the following: Name X cards in [players] [direction] deck, for each named (check); do Effect. Defaults: The default for [direction] that is assumed is top of deck. Location can also be top/bottom of deck. The default for [players] is just own. Players can also be own/opponent/both. Don’t shuffle these revealed cards unless instructed. Examples:
- Call 3; Draw 1. Meaning: Name 3 cards, for each named in top 3 of own deck; draw 1.
- Call bottom 5; Boost own Power +200. Meaning: Name 5 cards, for each named in bottom 5 of own deck; Boost own Power +200.
- Call 1 in both 3; [1/Turn] Boost own Power +600 OR Recover own HP +700. Meaning: Name 1 card, for each (but once only) named in top 3 of both decks; Boost own Power +600 OR Recover own HP +700. {This is Lucky Banquet}
Corrupt X – Look at the top X cards of your opponent’s deck, put any of them on the top or bottom in any order.
Dark [action] – Perform the [action] but the destination location is that player’s Dark Area. Example: Dark Draw 1 means “draw 1 to own Dark Area”. Dark Discard 1 means “discard 1 to own Dark Area”.
DATA – A special timing plus deck construction legality rule card. DATA timing counts as three other use cases, making it essentially the same as “EFFECT” timing: DNA (for use during Evolve when DNA evolving), Any Phase for use any time you like, and Data Break which has the same timing as ACTIVATE (see Glossary – “Data Break”).
Data Break Another term for “ACTIVATE” and has that timing, but with the included cost of deleting your Level M from your Destiny Zone. If the Level M is not present, or the cost isn’t paid, the Data Break cannot be activated.
Delete – Remove the specified card from the game permanently, terminate all lingering effects, void all other effects of the card. It no longer affects any possible game state. Any card that leaves its new zone if it came from the Destiny Zone is *always* deleted after leaving that zone (e.g. Mega is KO’d, it is deleted. Partner C levels are deleted upon KO. Proxy card is deleted after use)
Discard – Move the specified number of cards from the indicated player’s hand to their trash zone.
EFFECT – Timing on a card that will be specified in the card’s effect box. Usually indicates multiple timings or “Any Phase”.
Eject – Keyword for removing cards in play and placing them in the trash (or delete them if required). Older cards sometimes use “discard” or “trash” instead, but treat them as if they used eject. Attaches and DP cards are the primary targets for eject.
Turbo – Has the same form as an effect like: “Any Phase(Optional Timing): [Cost/Condition/Risk specified after Turbo] Change another Support timing on this card to Any (Optional Timing) Phase“. The word Turbo on a card is an optional way to make one of the other card’s Support effect an “Any Phase” timing. Not all Turbo are exactly “Any Phase”. Turbo may specify a timing after, such as “Turbo Support” in which case, treat that as “Any Support Phase” (play when you could play a card during that phase on any player’s turn, i.e. during the 2 moments of the support phase). Turbo may take any of the following forms, depending on if it changes the main effect by a cost, condition, or extra (risky) effect.
- Turbo: Discard 1. — To play this card as “Any Phase” instead of its other timing, discard 1 as a cost.
- Turbo Evolve, if own level is lower. — To play this card as “Any Evolve Phase” instead of its other timing, meet the condition after the comma and have a lower level.
- Turbo Support and Boost opponent’s Power +200. — Play as Any Support Phase without the restrictions from #1 and #2, but with the added risk from the “and” effect.
Fast / Slow – “Fast” means “If this support resolves first,” and “Slow” means “If this support doesn’t resolve first”. These are keywords which stand in for those conditions. Note Slow does not mean it resolves 2nd, since some support phases can have 3 or more supports due to other effects, therefore it means not first. Generally Fast effects are valid on a player’s own turn and Slow effects are valid on their opponent’s turn, barring other effects.
Flatten / Flat [Type, Level, Attack, other condition] – May be attack ability or card effect. In general, if any required condition is met, (unless otherwise specified) add a token representing 1 instance of Flat in front of their active. Here are some points to keep in mind:
- After your Digimon deals damage with an active “Flat” attack ability during the Battle Phase, add a flat token to the opponent’s Digimon.
- If an active Digimon would ever have 4 flat tokens, KO it immediately.
- While the opponent has 3 flats and if you attacked first, KO that Digimon once you deal damage. This condition for KO is checked after damage is already dealt and any other on-damage effects trigger.
- Flat tokens do not go away on their own when that Digimon evolves. The only time they are removed by default is when it is KO’d.
- When Digimon with flat tokens evolves by DP, that player can reduce their DP total by -10 to remove 1 flat token. The DP reduction can be from anywhere they control card that provide DP such as “Immortalize”.
Flip / Flip Cards / Star / Moon / Initial side – Flip cards have unique icons designating which side is currently active. The flip action causes the card to turn over to other side (which may be specified by an icon). The initial side is designated by an up arrow and should be the first side of the card. Cards without an initial side begin in the deck on any side of the player’s choice, but only before the game begins. Only flip cards when instructed. See Intro to Flip Cards for detailed rules.
Level – Possible levels are R, C, U, and M. Rookie, Champion, Ultimate, and Mega respectively. “Level _” may be subtistuted by its full name instead, such as “Ultimate” instead of “Level U”.
Nova counter – Cards may instruct players to add or remove a number of nova counters. These are simple quantities players should track with a die or pen. They are not placed onto cards and are instead a permanent quantity owned by the player who activated the effect. On their own, they do nothing; other card effects may reference nova counters. Players can have a maximum of 10 nova counters during the game (excess are lost).
Proxy – The “P” symbol on a card indicates it can be placed into the Destiny Zone as a Proxy card. Players may choose to discard a Partner in the appropriate circumstance (usually Support for Option cards) and add this card to the appropriate zone from the Destiny Zone. Remember to delete it after resolution if it leaves the Destiny Zone.
Recode X – Look at the top X cards of your deck, put any of them on the top or bottom in any order.
Recover – Usually with text that specifies a player and the word “HP”, this means to increase your *current* HP semi-permanently by the indicated amount. Recover never needs to specify HP since it is an HP-only term, though it usually does for clarity sake. Reminder that all cards target “Own/Self” unless otherwise specified.
Recycle X – Move the top X cards (one at a time) from the indicated player’s trash to the top of their deck. DO NOT shuffle. Not the same as the Attack Ability “Recycle X”, which requires shuffling.
Recycle any – Move any card of your choice from your Trash to the top of your deck. DO NOT shuffle unless specified.
Revive – Always means to “Set Revival”. Set Revival is a lingering effect that is carried out after and if a Digimon is KO’d that turn, and will specify which Digimon it is checking for. If for some reason Revive doesn’t specify, it is always your own Digimon by default. Revive should always specifies an amount of HP, but if for some reason it doesn’t: Revive with 10 HP as default. Because Revive is “set”, this means for that specified target, all other previous Revive amounts and conditions (if any) are ignored and only the latest Revive effect played is counted. Resolve Revive by leaving the active zone intact (including any cards that *would* have been deleted) instead of discarding or deleting them. KO points are still awarded as usual. Reset the current active as though it had just evolved, including removing Abnormal status. Revival does not stop from being considered a “KO”. “Set Revival” also changes the future KO points (after the current) the Digimon is worth to exactly 1, regardless of all Passives, other lingering effects, or permanent effects. This becomes a new permanent effect and overrides rules such as Megas providing 2 KOs, or a Digimon that changes the number of KOs it is worth including effects that would lower KO values. Any conflicts that add or remove KO points are ignored as long as the current Digimon has been revived. If there is any conflict between a permanent/passive effect with “Revive” on a Digimon and another Revive that is set at another time that turn, the player who controls that Digimon will decide which Revive applies if they own both, and the turn player if not—as long as the non-Permanent Revive is not overriden later. If there is any conflict between two permanent/passive Revives on the same Digimon, be sure to treat this as simultaneous activation: the owner chooses which one to use if they own both effects, the turn player chooses if the effect isn’t owned by the same player. In the case of the Grudge attack ability, it sets Revival as a passive effect that checks afterward, so remember to choose between that or a floating Revive if you own both.
Slow – See “Fast / Slow” in Glossary.
Static X – Delete the bottom X cards in opponent’s Trash.
Take – Same as “pick”: simply choose a card of whatever conditions are provided from the specified zone and place it into your hand. Be sure to follow the Cherrypicking Rule (FAQ) and shuffle if the card is taken from a hidden zone.
Type (Primary and Subtype) A Digimon’s primary type is the one printed largest on the card frame. The subtype(s) may be printed on a small area under the primary type. All the card’s types count for matching any given type. When a card tries to validate a type such as “If own type is….”, subtypes count unless it says “If own primary type is…” or similar. The possible types are: Dragon, Enigma, Marine, Metal, Jungle, Nature, Nightmare, Wind. Note: “Ruler” is not a type. Digimon with the Ruler property have no type at all until they gain types with “Dominion”.
Trash X – Move the top X cards (one at a time) from the top of the specified player’s deck into their Trash Zone.
Void – Means to nullify, cancel, and make blank the specified effects/card/value as though it didn’t happen and doesn’t exist.
symbol – Means “opponent”. Substitute symbol to shorten the word.Attack Abilities
Attack abilities refer to abilities printed on a card’s attack, usually. Sometimes they may appear on a green bar next to the ability. Often times, they will be conferred (either in general or to specific attacks) by card effects.
1st Attack: Attack first. This can “stack” with other instances of getting 1st Attack and can be removed by instances of getting “2nd Attack”. See Battle Phase for more details on conflicts.
/ / Guard (old: “to zero”): Means this attack of the opponent’s becomes 0 Power (even if it was not used).
Corrupt X: Corrupt X cards. Check the top X of the opponent’s deck secretly, put any of them on top or bottom of the deck in any order. See Glossary.
Counter / / : Your own current attack (the one with this ability) has its Power set to 0. You get 2nd Attack (meaning, you lose any 1st Attack and attack second). If, during damage calculation, if your opponent is using the specified attack, it is voided and you use that attack including all their power, abilities, and effects instead of your opponent, against your opponent, plus your own counter damage. (You will recover HP from Drain etc.) Note, this means you can only deal extra damage from your own counter’s power if increased after the “counter” effect is activated. See FAQ for details.
Crash: Your own Power is ignored. You will deal damage equal to your own HP to your opponent at the time of your damage calculation. Thus, Crash can become less damaging if you are hit first. Once you deal your Crash damage, your HP is reduced to 10. This takes priority over Drain, so you can gain both and recover.
Drain: Recover HP equal to the damage that this attack dealt, after dealing the damage. Do not recover any that would send an opponent below zero, only until they reach zero HP.
Flatten [Type, Level, Attack, other condition]: May be attack ability or card effect. If any required condition is met, (unless otherwise specified) add a “flat” token in front of the opponent’s active. If an active Digimon would ever have 4 flat or if HP is reduced any time while at 3 flat and you don’t have 2nd Attack, KO the active and remove its flats. When a flattened active evolves by DP, there is a process that allows them to remove 1 flat if they increase their DP cost by 10.
Grudge / / : An attack ability or effect (granted similarly to Counter), which makes you attack second, double your Power against the specified attack, and revive with your Power as HP if you’re KO’d by that attack. The steps are as follows:
- If used the attack targeted by own Grudge, double own Power and get 2nd attack.
- Set Revival equal to own power (on the attack you used, which has Grudge). This means, If KO’d when an opponent used the attack targeted by own Grudge, revive with HP equal to your Grudge attack’s Power (at the time of KO). Do not revive if that Power is 0. Note, you would not normally still get to attack after revival since that timing has passed. KO causes you to skip your attack phase, so normally Revival happens after all attacks.
Jamming: Void opponent’s Support if the card type is a Digimon (void opponent’s Digimon support) and their Cross ability, even if they did not choose that attack. This *does not* Jam/Void non-Cross attack abilities, such as rare Triangle abilities! (See FAQ for conflicts.) Opponent’s Digimon support must be voided before it is resolved and the Support Phase has a procedure to perform this if revealing your chosen attack is required to prove you can use Jamming.
Killer / / : If opponent used the specified attack, Boost own Power +300 and get 1st Attack. (This resembles Garnet Gem, Peridot Gem, Aquamarine Gem)
Mimic / / : This ability starts with 0 printed Power. When both players have finished playing Supports but before they resolve (same speed as Jamming), the Mimic ability and Power changes simultaneously. Reveal your attack to prove you chose Mimic. The Power becomes the same as the opponent’s attack specified next to “Mimic” on the card & the ability becomes the same as the attack ability in the same slot as Mimic of the opponent’s (if any). Examples:
- Your cross has Mimic. Opponent cross has Jamming with 160 Power. After you reveal your attack, your Mimic Power becomes 160 and its ability becomes Jamming and immediately activates (does not void opponent’s cross ability, since both are Jamming) voiding the opponent’s Digimon support (and they void yours).
- Your cross has Mimic. Opponent cross has 1st Attack with 200 Power. Opponent triangle has Draw 1 with 400 Power. After you reveal your attack, your Mimic Power becomes 400 and its ability becomes 1st Attack. This is because you copy the ability in the same attack “slot” as Mimic but the Power from the specified.
- Your cross has Mimic. Opponent cross has Counter, 0 Power. After you reveal your attack, your Mimic Power becomes 0 (no change) and its ability becomes cross Counter. Follow the normal rules for double cross Counter.
- Your triangle has Mimic. Opponent cross has Crash with 0 Power. Opponent triangle has no ability with 350 Power. Opponent circle has 420 Power. After you reveal your attack, your Mimic Power becomes 420 and its ability becomes none. This is because you copy the ability in the same attack “slot” as Mimic but the Power from the specified. Note you did not need to know the opponent’s cross.
Shatter: When activated, reduce all opponent power by own shatter attack’s printed power (do not count power changes, higher or lower). This rule was changed from before.
[Type] x3 VS (or x3 for short): If opponent has a type that matches at least of the specified types, triple own power. Don’t repeat this for multiple matching types. Occasionally may have other conditions such as attack or level; treat these as conditions for the opponents status—whether they used the specified attack or are the specified level, for instance.
Draw X: Draw X cards.
Trash X: *Opponent* Trashes X cards. See Glossary.
Recode X: Recode X cards. Check the top X of own deck secretly, put any of them on top or bottom of the deck in any order. See Glossary.
Recycle X: Recycle X cards and shuffle. See Glossary.
Attach D/T/H: Attach a card of your choice from the specified zone (Deck/Trash/Hand). The card must be attachable and you must meet all requirements for the attachment as though it were played normally (but you don’t get any extra play effects, only attach the card). When choosing an attachment, ACEs, Firewalls, Evolutions, your Partner and DATA cards are prohibited targets. See Glossary.
Static X: Delete the bottom X cards in opponent’s Trash. When used as a card effect, means the same as the attack ability by default, but may have the target player changed; example: Static 2 own trash.
Deck Construction
- Deck is 50 cards
- Destiny Zone cards are counted in the 50 card deck size maximum. Non-Destiny Zone cards are called “Main Deck”. Destiny Zone + Main Deck must add up to 50.
- Optional up to 1 Mega in Destiny Zone
- Optional up to 1 copy of a partner R level in-deck may be declared before each game (details below)
- Optional up to 2 different partner C’s in Destiny Zone (Must have the name of your Partner in their Evolution Box)
- Optional up to 1 Proxy card in Destiny Zone (Must have a “P” in the upper left corner)
- Optional up to 1 Mastery card in Destiny Zone.
- Up to 4 copies of any Digimon (not Megas), by card number in Main deck
- Up to 3 copies of any Option card, in Main deck
- Up to 2 copies of any Evolution, in Main deck
- Up to 1 copies of any Ace[1] card; and only 1 Ace per deck
- Up to 3 copies of any Firewall[1] cards; and only 3 Firewalls total per deck
- Up to 1 copies of any legal DATA[1] card (see below) per deck, no more than 2 total (different) DATAs per deck
The Destiny Zone has no actual card limit except the amount naturally limited by other deck building rules (e.g. no more than 1 proxy, 1 Level M…etc)
General note: If a card has (Also named Something) or (Alias Something) like this, it’s a rules text not a game effect. That means it can’t be voided and is as good as printed in this document. You can treat the name of the card as whatever “Something” is for deck construction! Example: SF-003 “Blackwargreymon” is (Also named Wargreymon) therefore it can use the “Wargreymon” DATA card.
Flip Cards: If any flip cards (with Star or Moon symbols) appear in your deck, they will have sides that are shared as card numbers. This means they must respect normal deck building rules because they are the same exact card, just another side of it. If any of them have the initial side icon (up arrow), they must begin the game with that side up for your deck. You are free to pick any side for cards without the initial side icon, and may choose as many copies to be any of their possible sides as you wish, but always respect normal card limits. See Intro to Flip Cards for more details.
DATA card Legality: The DATA card’s name must match a name somewhere in your Destiny Zone (e.g. “Mugendramon DATA” can be included in a deck if “Mugendramon” Level M is in your Destiny zone, or “Millenniummon” Level M, which names Mugendramon in its evolution box). Detailed tutorial on DATA cards here
Partner cards: Partners and their associated Destiny Zone cards can be confusing if you’re not using this Rules page as a walkthrough but as a reference. I recommend checking out the detailed post on Partner cards here.