What’s good about it: Royal Meister starts with an unopposed victory bonus (Draw 1 and opponent trashes 2) then follows up with a super version of [card img=”https://www.v-mundi.com/wp-content/uploads/2016/08/078-Piximon.png” name=”Piximon”] support that can be any attack ability (not just ) and any of your active stack, not just the current active. This is especially devastating if you pair with multiple “x3 VS” abilities and swap to the effective type at any given time. If played right, you get more value than any of the Defense Plug-Ins. With a swiss-army knife that can include Drain when you need HP, Grudge for revive, and a variety of attack guards and counters, the possibilities are only limited by your deck and evolution.
What’s bad about it: The possibilities are limited by your deck and evolution. If you aren’t evolving much or have a homogenous deck, Royal Meister is going to give you few choices and may actually become dead in hand.
Tips: The second effect works like a Ruler Dominion effect but for attack abilities. Sometimes, you may use this simply to gain your ability while getting to use and that can be value enough. Pair with a KO on the opponent’s turn (1st Attack or a “Killer” ability) to effectively get two unopposed victory bonuses. A deck with a few Shatter abilities scattered throughout can use Royal Meister as a more affordable way to remove pesky attachments even when they won’t get the damage reduction. You can also use abilities like “Static 3″ and with the mastery Calamity, convert the static into Trash 3 for a total Trash value of 5 plus a draw, which beats [card img=”https://www.v-mundi.com/wp-content/uploads/2016/08/190-DigiGrave.png” name=”Digi-Grave”]. Importantly, this does not change your attack’s ability to one in your stack, it changes Royal Meister to the effect of an attack ability so you can double up on your own ability. That normally isn’t useful except in cases where you double up your x3 VS (x9 VS!) or with something like [card img=”https://www.v-mundi.com/wp-content/uploads/2018/05/044-Dorbickmon.png” name=”Dorbickmon”] for a grand total of Trash 10. Royal Meister can also be very strong if you have 2 different attack Counters in your active stack including one on the active which you use, effectively guaranteeing a counter in most cases. Pair with [card img=”https://www.v-mundi.com/wp-content/uploads/2021/01/008-Metamorph.png” name=”Metamorph”] to basically pick any abilities in your entire deck.
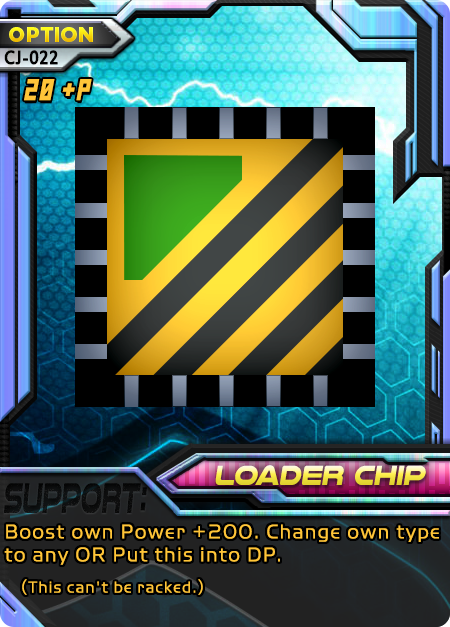
What’s good about it: You get 200 Power, then can pick between any types you want or 20 +P to assist evolution. Simple, flexible, fits in many decks.
What’s bad about it: This can’t be racked, so shouldn’t take the place of a Digimon with 20 +P (you have to wait till next turn to evolve, not immediately). Its primary support is also only +200 Power when that’s the same a Digimon support provides, so most 20+P Digimon with the same support would be comparable. Many decks have no use for type change especially at support speed. Even if you need one of these, since it’s worse than another Option at each effect, you’d need at least 2 before it pays off.
Tips: Use Loader Chip to get tight decks some more room. When a deck has problems evolving but has plenty of Evolution cards, Loader Chip will help since it won’t sacrifice any Power along the way. Can be combined with Ancestry mastery for +100 HP (choose type change) in addition, which works to increase its value. Combine with [card img=”https://www.v-mundi.com/wp-content/uploads/2016/08/090-Rusttyrannomon.png” name=”Rusttyrannomon”] ACTIVATE for big damage (choose DP). Use with [card img=”https://www.v-mundi.com/wp-content/uploads/2017/08/007-Ace-Chip.png” name=”Ace Chip”] for another +100 Power. Combine several helper cards like this for a monster support. In a chip-heavy deck, chain Loader into [card img=”https://www.v-mundi.com/wp-content/uploads/2020/12/011-BoostChip.png” name=”Boost Chip”] when you don’t need the DP to evolve. Compare as a more aggressive version of [card img=”https://www.v-mundi.com/wp-content/uploads/2016/08/016-Puppet-Switch.png” name=”Puppet Switch”].
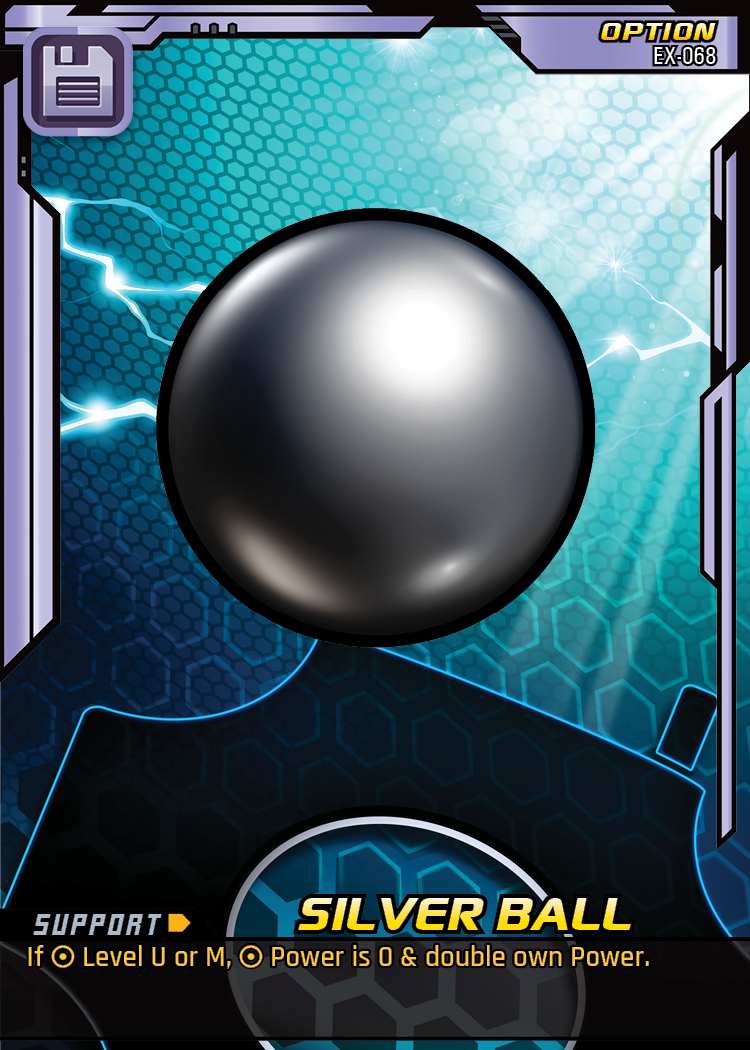
What’s good about it: Doubles your Power and sets the opponent’s to 0. This doesn’t care about level, though it certainly covers Level M just like Silver Ball and any Level C that shares a name with the opponent’s destiny zone. Yes, has the name. Hearts attack specifies “Digimon”, not card number. If it came from there (check their pre-game roster to be sure) or simply matches, you’re getting the effect. It also means decks that use a lot of Level C with “Also named ______” can be in big trouble. Hearts Attack allows you to get ahead early if the opponent starts with a destiny evolve; or you can get 2 KOs much easier in the late game if they get to Level M. If you can’t use the effect, you get a very high quality draw (recode 2 and draw) as replacement.
What’s bad about it: Unlike Silver Ball, the mean hugs do not cover Level U, so you won’t be able to use this as an answer to a sudden threat you had no way of seeing but you also can’t deal with. Level C are not normally huge threats except a few and Level M you can usually see coming. Worse, Level U are typically easier to KO with double power than Level M. This is also entirely opponent-dependent unless you can coerce them into drawing their partner or specific Level C from deck, and then into evolving it; so it may be dead in hand for a while. Even if it’s a high quality draw, the alternate effect is just a replacement for this dead card that used up a valuable support for turn.
Tips: Like Silver Ball, you get a surprising amount of coverage to save your butt. Weigh the options between Level U and destiny-related Digimon. Both give you Level M coverage by their nature. Level U may not fall from a simple power doubling but a Level C could die in a heartbeat. This is especially good for countering any deck that likes to search its partner, use [card img=”https://www.v-mundi.com/wp-content/uploads/2020/10/013-BlueComet.png” name=”Blue Comet”], overuse the same named Level C, or weirdly has cards with the same name as their destiny zone but at different levels somehow (Example: changing their active’s name). Hearts Attack is especially devastating in the common situation where you get a KO and the opponent digs for their partner to quickly come back. Many common partner evolutions are strong since you don’t have to meet DP requirements, so this also offers protection from [card img=”https://www.v-mundi.com/wp-content/uploads/2016/08/090-Devidramon.png” name=”Devidramon”] and similar.
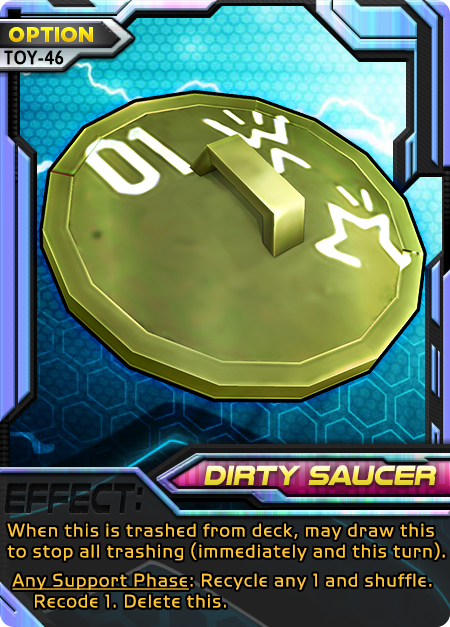
Dirty Saucer—Garbagemon’s signature shield and yours too.
What’s good about it: You get to draw this to hand, so it’s an extra free card. Stops all trashing and I do mean all. Right in the middle of it. Even if you are supposed to Trash 7 but you only trashed like 2, you stop immediately. Even the opponent’s trash costs won’t be able to be paid for the rest of the turn. Now you can use highly detrimental cards like [card img=”https://www.v-mundi.com/wp-content/uploads/2020/11/009-BigMamemon.png” name=”Bigmamemon”] with a much softer blowback. Even the almighty [card img=”https://www.v-mundi.com/wp-content/uploads/2016/08/177-Warp-Dimension.png” name=”Warp Dimension”] becomes a foam dart gun because Dirty Saucer only stops the trashing, it doesn’t void the support that caused the trashing. In fact, many opponent cards may misfire (self-void) even if they are unvoidable, since cards can always void themselves. Once it’s in your hand, you can put anything from your trash back in the deck plus a recode after.
What’s bad about it: Chance. Once you want this to get trashed, you may not get it. Or you might just draw it. A self-destructive or reckless player may find themselves without their shield in a time of need, with tons of cards blown away into their trash zone. It’s also really hard to use in a deck with trash costs. If you say you are trashing 3 for a cost then the second card is dirty saucer, you only count as having trashed 2 cards. Depending on the effect, this can misfire after you’ve already paid. You can suppress the misfire but it means skipping Dirty Saucer. The “Any Support” effect does delete itself, so is very fleeting and must be used wisely. You should check if this actually affects your game anyway, since you might use it a few times in the lifespan of a deck but not actually see the benefits unless you also change how you play. Every slot this takes up in a deck could’ve been a much more powerful card. Options are vying for limited and highly competitive space within a deck, so Dirty Saucer’s lack of “killer app” potential could make it a flop in your deck. Plus, if you really want to stack the recode, the shuffle beforehand is going to hurt all your other recodes.
Tips: Maybe you noticed, but the act of trashing should happen 1 card at a time to keep a player’s trash zone in the correct order (bottom to top). This allows crazy cards like Dirty Saucer to exist and effectively interrupt that process as soon as it shows. Be aware that “both players trash X” effects should happen simultaneously, so make sure to react in a timely manner if your Saucer happens, to prevent any game state rollbacks. While not every deck can use this with maximum copies (and bypass much of the negatives), a deck using the Mantra mastery (for shuffle recode) can exploit the shuffle effect on Dirty Saucer to maximum potential without also increasing its own risk too heavily. Look for effects like Tueryemon that have trash costs but have more than 1 effect so your entire support doesn’t misfire if you get Dirty Saucer. Try using Recycle on it to guarantee you get the nullification next time you would trash, then have some extra draw ready in case you don’t. Recode can be a downside but also help you know when the Saucer is coming. The best part may be getting trashed a lot before seeing this, especially since the “Recycle any 1 and shuffle” part will only be putting your best card back in a much thinner deck and this can be combined with other similar effects for a deadly lean-machine deck. Because Digimon doesn’t really have a “meta”, I wouldn’t recommend Saucer for trash countering but I would suggest a copy or two if your own deck is self-destructive or very weak to such things. Keep an eye on your Ace and you may be able to retrieve it with Saucer and simply mulligan until you get the Ace, if that suits the current game.
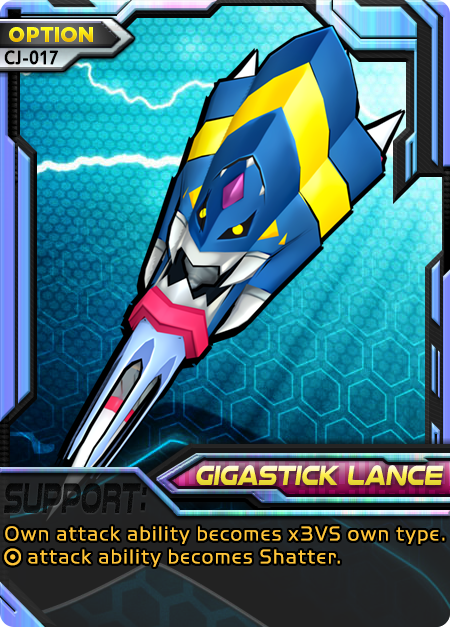
Gigastick Lance—Any sufficiently large power tool is indistinguishable from a mech weapon.
What’s good about it: You get to triple your Power. Yes Power. All attacks have at least an ability of “None”, so this is way less restrictive than first-read. But you can still replace a troublesome ability like Grudge that might kill you for attacking second, with x3 VS which might net you a KO with no HP loss! Plus, when your opponent’s attack ability becomes Shatter, it replaces their existing one. So you can use this to negate a super annoying ability like to zero and use safely. In fact, you can use both together to get a secure triple Power which is very likely a KO. So this card doubles as a way to push for a KO or sort-of void an ability. What’s more important is almost nothing can “void” abilities this way, but Gigastick can!
What’s bad about it: Unfortunately, you may not always use the effects here optimally. For every time you perfectly set up a type-change with [card img=”https://www.v-mundi.com/wp-content/uploads/2016/08/198-Mystery-Egg.png” name=”Mystery Egg”] to get the x3 VS ability, there will be a time when the opponent evolves out of the type change or KOs you for wasting a turn on Mystery Egg. Unlike a true Power triple effect, it voids your own attack ability and you may have wanted triple Power Drain or something. And worst of all, the opponent might want Shatter—which they are guaranteed regardless of their attack! Especially if they are attacking first or will survive your attack when you have an attachment. You basically don’t want to play this with attaches unless you are very sure your opponent will be KO’d.
Tips: If you don’t have a way to type-change, this card is essentially an attempt at lucksack or else a super weak void. Be sure you know what you are doing if you want to use attachments with this (like, more than one). Check your deck for how to best change types, such as [card img=”https://www.v-mundi.com/wp-content/uploads/2021/07/018-XVmon.png” name=”XV-mon”] for which you may want to combine with the [card img=”https://www.v-mundi.com/wp-content/uploads/2021/01/011-Ancestry.png” name=”Ancestry”] Mastery in case you don’t always want your subtypes. On the other hand, more subtypes can be much better since a Digimon with 3 total types has 3/8 coverage, so you would only need a couple of those to make good use of Gigastick. Beware that a multi-type deck for yourself makes you weaker to regular x3VS! Mitigate the problems with this card and now you have the power of [card img=”https://www.v-mundi.com/wp-content/uploads/2021/07/007-Darkdramon.png” name=”Darkdramon”]!
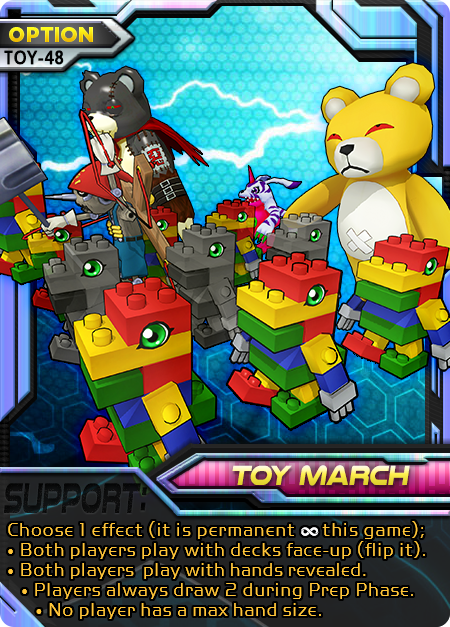
Toy March—They just keep going…and going…and going…
What’s good about it: You pick one of any 4 effects that stay permanently for the game. The flip effect means no need for [card img=”https://www.v-mundi.com/wp-content/uploads/2017/08/017-Gazimon.png” name=”Gazimon”]. This benefits the need to know what card comes next (for either player), for use with cards that lock powerful effects behind that knowledge, plus your own ability to have an extra card for support, and never be surprised by a cornered opponent who uses a top-deck support. The hand reveal effect means no need to attach [card img=”https://www.v-mundi.com/wp-content/uploads/2016/08/014-Research.png” name=”Research”]. Opponents who keep large hands will have a hard time surprising, and changes the strategy phase to remove risk. The draw 2 effect relieves the burden of needing [card img=”https://www.v-mundi.com/wp-content/uploads/2016/08/017-Purity-Crest.png” name=”Purity Crest”] attach or similar. This keeps a medium or high hand staying high all game. The max hand limit remover means not needing to evolve to [card img=”https://www.v-mundi.com/wp-content/uploads/2016/08/096-Jijimon.png” name=”Jijimon”], [card img=”https://www.v-mundi.com/wp-content/uploads/2016/08/095-Ebemon.png” name=”Ebemon”] rapidly. High-hand or conservative decks can continue to accrue better possibilities without hitting a wall. Full Article
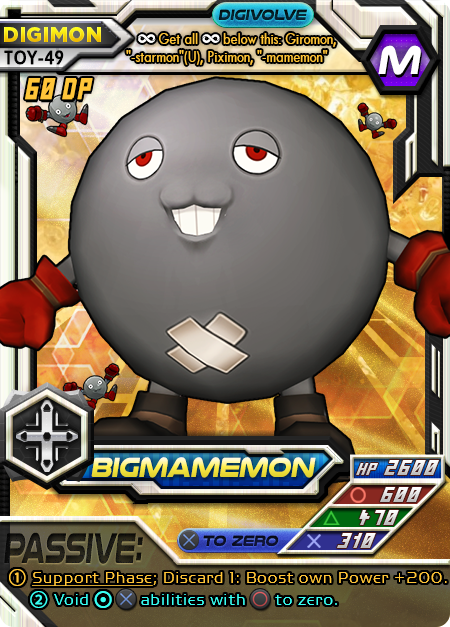
What’s good about it: There’s so much. Their HP is at 2600—a number befitting a massively composite colony of Digimon. Only 4 Digimon have more HP (in order): [card img=”https://www.v-mundi.com/wp-content/uploads/2017/08/018-ZeedMillenniummon.png” name=”Zeedmillenniumon”], [card img=”https://www.v-mundi.com/wp-content/uploads/2016/08/005-MoonMilenniumon.png” name=”Moonmillenniumon”], [card img=”https://www.v-mundi.com/wp-content/uploads/2018/05/020-Plesiomon.png” name=”Plesiomon”], [card img=”https://www.v-mundi.com/wp-content/uploads/2018/05/019-Olegmon.png” name=”Olegmon”]. The first two are dimension-shattering time gods who are DNA-only. The latter two are the upper-limit of the highest-HP type in the game: . The Power distribution of Bigmamemon is also comparable to these same 4 cards, which says something for its status as the god of beans. Notably, everything else close to Bigmamemon costs 70 DP or is DNA-only (Millenniumon, HiAndromon, Diablomon, PR Herculeskabuterimon). But it goes beyond such wearisome comparisons: Bigmamemon has two passives. The bubble number ① effect is available during the support phase and is just a built-in TOY [card img=”https://www.v-mundi.com/wp-content/uploads/2020/11/034-Missile-Pod.png” name=”Missile Pod”]. No need to worry about attaching it! For bubble number ② (the cyan color just sets it apart for you), you passively void all cross abilities with “Circle to zero”. This is really mean. A mean, bean, machine if you will. Bigmamemon already has one of the highest HP in the game and once the ② effect is accounted for, it probably has the highest longevity ratio of any Digimon, since you can swing at full power with huge HP. The cross ability can even stop x3 VS (cross power to 0), assuming you used Dominion to take on a vulnerable type. If that’s not enough for you, it has one of the highest-potential for abuse evo-box bonuses in the game: “Get all below this”. Full Article
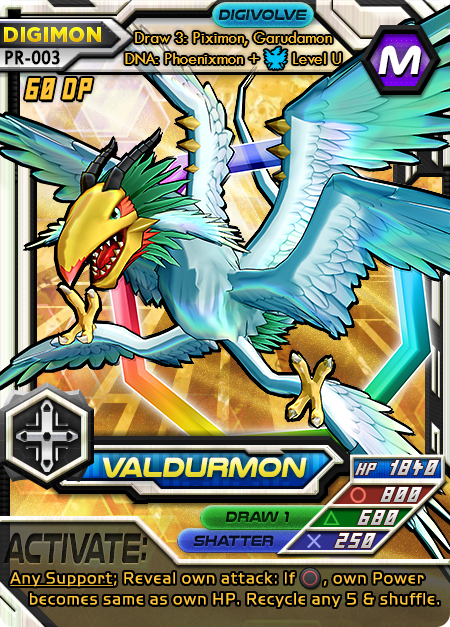
Valdurmon—For when Phoenixmon isn’t intense enough.
What’s good about it: Every Digimon has a ability but very few have a ability. Valdurmon not only has both but also an implicit ability! Evolving in the typical way using its evo-bonus gives a heavy Draw 3, which is an immense advantage while a Mega is live. Valdurmon can even continue to draw using its cross ability, so your hand never dies. This Digimon is incredibly defensive with its 1840 HP and Shatter ability combination. In addition, its ACTIVATE is nearly as powerful as the ACE [card img=”https://www.v-mundi.com/wp-content/uploads/2018/05/063-Ground.png” name=”Ground”], with an additional Recycle any 5, which can be the end-game gambit for filtering your deck into using your best cards ad-nauseum. The ridiculous [card img=”https://www.v-mundi.com/wp-content/uploads/2018/05/002-PhoenixmonDATA.png” name=”Phoenixmon DATA”] card is valid in this deck. Valdurmon also has a generic Level U DNA, making it pretty consistent even for decks that will have trouble racking 60 DP—which Wind rarely has trouble making. Lastly, Valdurmon’s cross is about as strong as most Level M/U triangle power, which is unique.
What’s bad about it: As ACTIVATE abilities go, this one is pretty limited. Being forced to use can delay a safe window for it several turns depending on the opponent. Since its DNA includes a Mega, the Phoenixmon DATA card must be in-hand to skip the 60 DP requirement. Despite being a Ruler, its numbers are overall a bit lower than many 60-cost Megas due to the staggering number of attack abilities and their utility. Despite this, Valdurmon has no recourse (such as Counter or To-Zero) against a stronger Digimon with more powerful attacks.
Tips: If you want to use Valdurmon without being roped into [card img=”https://www.v-mundi.com/wp-content/uploads/2016/08/132-Garudamon.png” name=”Garudamon”], [card img=”https://www.v-mundi.com/wp-content/uploads/2016/08/078-Piximon.png” name=”Piximon”], or DNA try using [card img=”https://www.v-mundi.com/wp-content/uploads/2016/08/038-Penguinmon.png” name=”Penguinmon”], [card img=”https://www.v-mundi.com/wp-content/uploads/2016/08/022-Love-Crest.png” name=”Love Crest”] and [card img=”https://www.v-mundi.com/wp-content/uploads/2018/05/05-Moxie.png” name=”Moxie”] to get extra evo-bonuses ([card img=”https://www.v-mundi.com/wp-content/uploads/2016/08/030-Plug-InA.png” name=”Plug-In A”] isn’t valid for Level M). You could also double the bonus and draw 6 cards! Having a Ruler type means the ability to use Dominion to freely add/remove Types during your turn. Make the best use of this by including Digimon with extra types so as to be able to play [card img=”https://www.v-mundi.com/wp-content/uploads/2018/05/000-PinkD3.png” name=”Pink D3″]. Using Phoenixmon DATA for the Data Break can be an effective way to keep your ultimates live and in the game when losing horribly and the prospect of evolving to Valdurmon seems unlikely. The data’s Any Phase also compliments Valdurmon’s two draw effects by making sure your hand size stays consistent throughout the game. Recovery Supports or Evolutions (around +300 or more) are useful the turn Valdurmon enters the field if 1840 isn’t enough Power, which should then be enough to kill most Level U/M in the game. Love Crest is incredibly devastating with Valdurmon and it may even be recommended to use [card img=”https://www.v-mundi.com/wp-content/uploads/2017/08/024-Incubator.png” name=”Incubator”] to search the turn it enters play. Since the ACTIVATE says “make own Power same as own HP“, it won’t matter if becomes the weakest. What might actually matter is if becomes incredibly strong with Shatter (250)! In addition, Love Crest immediately grants an evo-bonus so you can Draw 3 again. One last tip: Valdurmon’s ACTIVATE has one of the most powerful recycles available, in that you get to choose any 5 to put back into the deck. Wind tends to be able to make use of decks that run 1 copy of multiple powerful or situational Option cards, draw/self-trash a ton of the deck, and then put the best cards back in for re-use later. This can effectively make their late game a kill machine. Valdurmon’s recycle is like a turbo charged version of an entire Wind deck archetype.
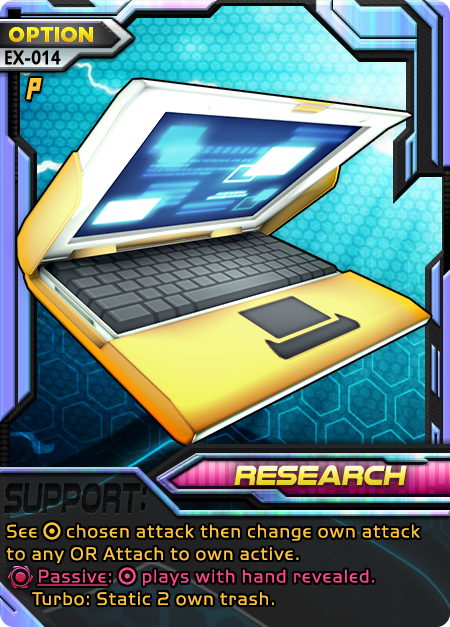
What’s good about it: Changing your attack after seeing the opponent’s, allows you to pick the highest-damage, safest option that can dodge their attack abilities; choose your own cross if you know the opponent used a relevant attack; and you can play this in response to “If both attacks are same”, “different”, or “If opponent used [attack]” to effectively void the card by ruining its condition. Research can also be attached for permanent knowledge of the opponent’s hand—an extremely abusable packet of information. The turbo (cost of static 2) changes the slow support effect timing into “Any Phase”, so you can see the opponent’s attack, change yours, then immediately support with something that takes advantage of what attacks were chosen; or simply attach it and support in a way that takes advantage of hand knowledge immediately. As a proxy, it can be most effectively used with partner-searching effects and on a partner with some battle related support to close up its weaknesses. If one of your own attacks has Jamming, you can void the opponent’s attack ability and Digimon support, then resolve Research to change your attack to something more powerful—effectively giving your strongest attack Jamming.
What’s bad about it: By default, this is support timing and doesn’t help the battle by itself. Even with turbo, you have to static your own trash (which is a cost and can’t be skipped, so is a dead card early game). It’s true that you can make up for a lack of skill at attack prediction, but over-reliance on Research could become a detriment to your own personal growth. Since it doesn’t help with battle, playing it as support can be a waste of a turn.
Tips: Pair the attack changing effect with defensive cross abilities like Jamming, to-zero, counter, grudge; or against those abilities to use your best attack that isn’t being countered. For the same purpose, [card img=”https://www.v-mundi.com/wp-content/uploads/2016/08/003-Datamorph.png” name=”Data Morph”] admittedly tends to be better. There are some unique situations where Research’s attack change is better though, such as an opponent with Counter (all attacks). You could switch to your weakest attack and take as little damage as possible, where Data Morph would be the worst case scenario. Research can go beyond this; Turbo creates powerful combos with cards like: [card img=”https://www.v-mundi.com/wp-content/uploads/2018/05/010-CyberParts.png” name=”Cyber Parts”], [card img=”https://www.v-mundi.com/wp-content/uploads/2016/08/184-Short-Lance.png” name=”Short Lance”], [card img=”https://www.v-mundi.com/wp-content/uploads/2018/05/056-Net-Worm.png” name=”Net Worm”], [card img=”https://www.v-mundi.com/wp-content/uploads/2018/05/013-Uninstall.png” name=”Uninstall”], [card img=”https://www.v-mundi.com/wp-content/uploads/2018/05/011-DeluxeMushroom.png” name=”Deluxe Mushroom”], [card img=”https://www.v-mundi.com/wp-content/uploads/2018/05/066-HappyMushroom.png” name=”Lucky Mushroom”], Coliseum, [card img=”https://www.v-mundi.com/wp-content/uploads/2020/11/041-Starmon.png” name=”Starmon”], [card img=”https://www.v-mundi.com/wp-content/uploads/2018/05/068-MagicWord.png” name=”Magic Word”], [card img=”https://www.v-mundi.com/wp-content/uploads/2018/05/012-LiquidCrystallize.png” name=”Liquid Crystallize”]. Any “both players use [attack]” is also incredible when you can simply change your attack afterward during the first step of the Battle Phase; some examples are: [card img=”https://www.v-mundi.com/wp-content/uploads/2020/11/022-Balmung.png” name=”Balmung”], [card img=”https://www.v-mundi.com/wp-content/uploads/2016/08/198-Mystery-Egg.png” name=”Mystery Egg”], [card img=”https://www.v-mundi.com/wp-content/uploads/2016/08/153-Giromon.png” name=”Giromon”], [card img=”https://www.v-mundi.com/wp-content/uploads/2016/08/037-Impmon.png” name=”Impmon”].
X-ray hand vision is incredibly useful for discerning the best time to play discard effects, especially random discards like: [card img=”https://www.v-mundi.com/wp-content/uploads/2016/08/193-HeapofJunk.png” name=”Heap of Junk”], [card img=”https://www.v-mundi.com/wp-content/uploads/2016/08/185-ScummonCurse.png” name=”Scummon Curse”], [card img=”https://www.v-mundi.com/wp-content/uploads/2020/11/015-Lie.png” name=”Lie”]. Discard-all effects also become far more timely and less damaging to yourself when you know exactly what is being trashed. Examples: [card img=”https://www.v-mundi.com/wp-content/uploads/2020/11/020-Fakedrimogemon.png” name=”Fakedrimogemon”], [card img=”https://www.v-mundi.com/wp-content/uploads/2016/08/127-Deathmeramon.png” name=”Deathmeramon”], [card img=”https://www.v-mundi.com/wp-content/uploads/2016/08/154-Lilithmon.png” name=”Lilithmon”], [card img=”https://www.v-mundi.com/wp-content/uploads/2020/10/008-Chaosdukemon.png” name=”Chaosdukemon”], [card img=”https://www.v-mundi.com/wp-content/uploads/2016/08/129-Superstarmon.png” name=”Superstarmon”], and you’ll know what effect they’d likely pick with [card img=”https://www.v-mundi.com/wp-content/uploads/2020/11/031-Bombnanimon.png” name=”Bombnanimon”]. The combos and possibilities with Research seem endless because it gives the one power that is normally forbidden in Digimon Battle Evolution—and one thing many aspects of the game hinge upon: hidden knowledge.
What’s good about it: Doubles your power and sets the opponent’s to 0, allowing an easy come-from-behind when you lose the evolution race. Since your own Digimon can be any level when used, it can also act as a “get ahead” gambit that preserves your own health while taking a significant chunk out of the opponent. The “If not” case can be really helpful as well, though not as strong as cards dedicated to discarding. Discard 1 can disrupt your opponents ability to evolve, rack DP, Support on the next turn, or even dump them into the dreaded 0-card hand.
What’s bad about it: Silver Ball tends to be least effective when your opponent is stalling or losing, which makes it less effective if there’s a significant gap in deck or player strength. Until such time, it’s a mere discard 1 which can be difficult to time properly or prioritize when you should presumably have more impactful effects. Having multiples of this card is therefore not very recommended.
Tips: Since, most every deck tries to evolve to Ultimate and Mega Digimon—which are big and hit hard, Silver Ball tends to be devastating when played at the right time. Put one of this card in your deck and most of the time it acts like having a second ACE. It should almost always start in the side pile, so as not to clog the opening hand. Key moments to play this card are when the opponent is Level R or C but has 1 card in hand or when they’re U or M and doubling the power would decrease the number of hits-to-KO. Alternatively, when they’re at Level U or M and their attack would KO. When you calculate potential damage for both players, it can sometimes be better to wait for your opponent to reach Mega. If you can tell the current Ultimate won’t deal a knockout blow and the Silver Ball is close enough to KOing their Mega (they haven’t played yet), try saving it for that instance and net two KOs! Silver ball is both a sword and shield against the strongest Digimon in the game; as such, it is a tool from which every deck can benefit.
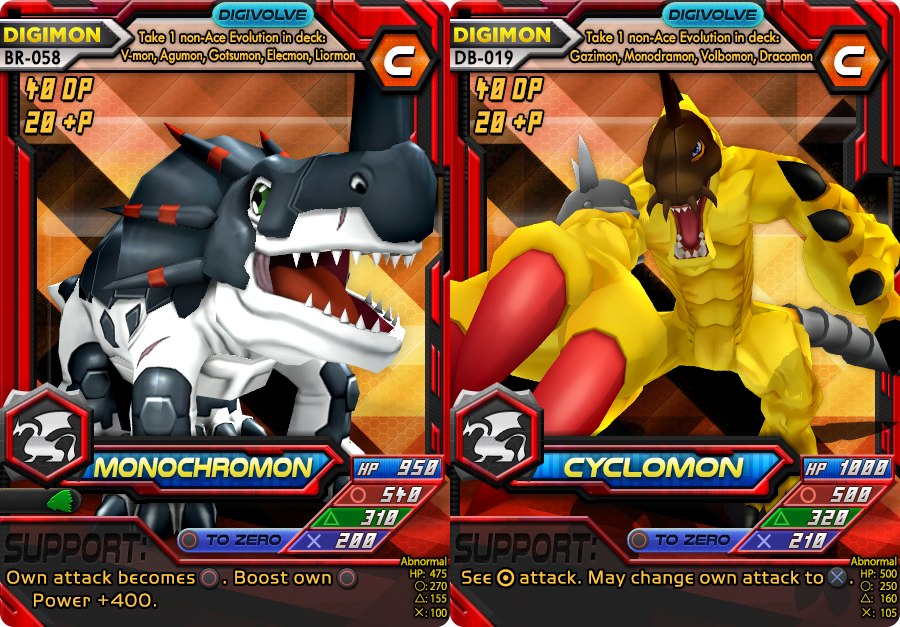
Cyclomon and Monochromon—A Double feature of evo-bonus madness! These two dynamos of evolution are quite similar.
What’s good about them: The evo-bonuses of these two Digimon combine deck searching—one of the strongest effects in the game, with Evolution cards—one of the most powerful cards when used correctly. Their circles are incredibly powerful on such high HP. Monochromon’s strong attack distribution is balanced to an almost ideal body and has one of the best circle-to-HP ratios in Level C, with an aggressive support. Cyclomon is even more of a tank, has the exact ideal attack distribution, with a similar HP ratio. If you can’t predict the opponent’s attack for use with your cross ability, Cyclomon’s support does it for you. Supporting with Cyclomon first means you won’t eat a Coliseum or similar. to Zero is a solid Cross ability both Digimon share and with enough of it in a deck, Cyclomon’s support becomes a menace. You can get the obvious and fast evolutions like [card img=”https://www.v-mundi.com/wp-content/uploads/2016/08/165-Digivice.png” name=”Digivice”] or [card img=”https://www.v-mundi.com/wp-content/uploads/2016/08/099-SuperTag.png” name=”Super Tag”], but also utility evolutions like [card img=”https://www.v-mundi.com/wp-content/uploads/2017/08/036-BurstGrowth.png” name=”Burst Growth”], [card img=”https://www.v-mundi.com/wp-content/uploads/2017/08/023-Meatvolution.png” name=”Meatvolution”], or [card img=”https://www.v-mundi.com/wp-content/uploads/2016/08/030-Plug-InA.png” name=”Plug-In A”]. One of the best targets for this bonus is [card img=”https://www.v-mundi.com/wp-content/uploads/2019/08/000-FatedSpirit.png” name=”Fated Spirit”] since both evolve to several dragons and a few metal—the end result of which is similar in potence to an Ace like [card img=”https://www.v-mundi.com/wp-content/uploads/2018/05/069-SuperEvolve.png” name=”Super Evolve”]. On top of that, it can search the insanely strong Firewall [card img=”https://www.v-mundi.com/wp-content/uploads/2018/05/052-Immortalize.png” name=”Immortalize”]!
What’s bad about them: Independently, Monochromon’s support is situational to a safe use of circle. Cyclomon’s support is situational to even wanting cross but only when you’re unsure—so maybe wanting cross? Playing both in the same deck for their evo-bonuses is quite difficult, because they don’t share Rookies in common. The evo-bonus is very central to these cards so they are lackluster in decks that aren’t tailor-made for their evolution tree, which limits effective deck building. Some Evolutions like [card img=”https://www.v-mundi.com/wp-content/uploads/2016/08/162-Warp-Digivolve.png” name=”Warp Digivolve”] or [card img=”https://www.v-mundi.com/wp-content/uploads/2016/08/000-Data-Hijack.png” name=”Data Hijack”] are a bit less effective simply due to the nature of their level requirements. Using those cards would rely on getting KO’d. You can’t search all cards with the “Evolve” timing, only yellow-border Evolution category cards.
Tips: Don’t try to have Monochromon and Cyclomon together in a deck unless you work around their evo-box names. Losing bonus consistency to gain evolution consistency is pretty counteractive. Use a partner that can evolve to one of these, since you’ll get the Evolution search for free and the partner itself can be searched with [card img=”https://www.v-mundi.com/wp-content/uploads/2016/08/183-Partner-Finder.png” name=”Partner Finder”]. A take any 1 Evolution effect improves the reliability of [card img=”https://www.v-mundi.com/wp-content/uploads/2016/08/163-Hyper-Digivolve.png” name=”Hyper Digivolve”], since it’s an incredibly unique effect, often central to the strategy of a deck, but mercilessly limited to 2 copies. After fixing the reliability problem, you now also meet the Level C requirement, so they can jump straight to Level M later. Don’t forget to re-consider all the Evolutions you normally avoid due to limited usability. If you have 1 copy of several Evolutions like [card img=”https://www.v-mundi.com/wp-content/uploads/2017/08/024-Incubator.png” name=”Incubator”], [card img=”https://www.v-mundi.com/wp-content/uploads/2017/08/025-Sniperdisk.png” name=”Sniper Disk”], [card img=”https://www.v-mundi.com/wp-content/uploads/2017/08/027-Plug-InBackup.png” name=”Plug-In Backup”], you can count on having a very robust next evolution. [card img=”https://www.v-mundi.com/wp-content/uploads/2016/08/166-D-Link.png” name=”D-Link”] allows your Level Us to be a different type, and require less DP. D-Link would therefore open up many new creative combinations not yet explored here. Evolution that “activate an evo-bonus”, such as Plug-In A or [card img=”https://www.v-mundi.com/wp-content/uploads/2018/05/058-Jogress.png” name=”Jogress”] are even better, since you’re able to move away from the rigid evolution tree with Monochromon and Cyclomon.
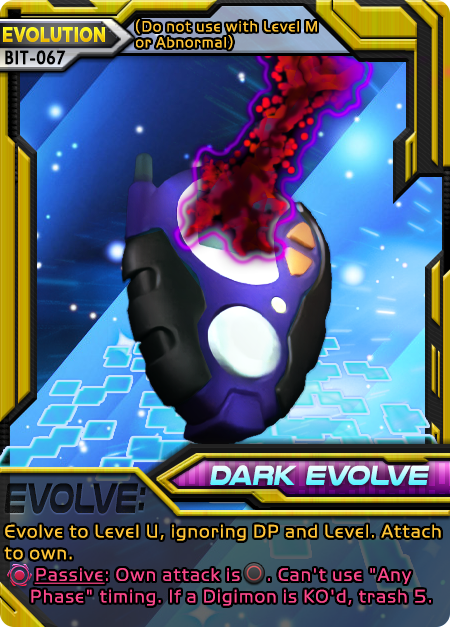
Dark Evolve—The most tooled version of three other Evolutions.
What’s good about it: Dark Evolve works like 3 previously printed evolution cards at the same time: [card img=”https://www.v-mundi.com/wp-content/uploads/2016/08/162-Warp-Digivolve.png” name=”Warp Digivolve”], [card img=”https://www.v-mundi.com/wp-content/uploads/2016/08/165-Digivice.png” name=”Digivice”], and [card img=”https://www.v-mundi.com/wp-content/uploads/2016/08/167-Mutate.png” name=”Mutate”] depending on your current level when played. As a Warp Digivolve replacement, it can take you from R to U (with no DP cost). It’s a Digivice when progressing C to U without DP. Lastly, as a Mutate from U to U and allows abnormal. Since the three aforementioned Evolutions are not always a valid option by themselves, it’s incredibly useful having one in the deck that is always live. Dark Evolve can be used even when you’re abnormal for even more versatility. Since it ignores DP, you get to keep any that was racked. Not for nothing but since it attaches and provides a downside, opposing “Shatter” abilities will backfire, causing opponents to be less likely to use them and also get the damage reduction effect.
What’s bad about it: Plan to replace or detach Dark Evolve. If you don’t, the passive conditions are totally devastating. Without a way to remove this attachment, your shiny new Ultimate is defenseless to Counter, Flatten and To-Zero effects as well as every single prediction-based Support. Having someone support with [card img=”https://www.v-mundi.com/wp-content/uploads/2018/05/056-Net-Worm.png” name=”Net Worm”] and kill your entire hand would be game changing, Ultimate or not. Since it also removes the ability to use “Any Phase” effects, Dark Evolve can significantly limit deck building. It would be difficult to include the ACEs Digi-Diamond and Miracle Ruby, DATA cards (if using the Any Phase primarily), half of Partner Finder and Data Morph (many more), both Super Hit and Moxie will have to be played as Support to attach, and could be voided. While it has one of the use cases from three different evolutions, it doesn’t have every use case. You can’t Mutate C to C or Digivice R to C. This is significant only for the fact that Ultimates tend to be at a lower quantity in the deck and thus less likely than Champions to be in a given hand. Lastly, having to trash 5 when you get KO’d or even when you net a win is pretty steep. That’s a forced full-hand mulligan which essentially means you can’t take a mulligan during a game that Dark Evolve has to stay attached until your Ultimate dies. This is yet another significant restriction but is still a kind of soft-restriction, since you could barrel in head first if you want.
Tips: If you play something like [card img=”https://www.v-mundi.com/wp-content/uploads/2018/05/007-LessonPlan.png” name=”Lesson Plan”] or Nanimon which requires/allows you to discard an attachment as part of its effect, you won’t have to run as many attachments in the main deck to clear a Dark Evolve quickly. In this way, you can technically use those cards (or Support attachments) to trick the opponent into using Circle hate while choosing another attack (don’t get voided!) and Dark Evolve would be removed by the time your attack resolves. Attachment-heavy strategies, like Flatten which uses Letterbox, can make Dark Evolve a tempting Evolution. Be careful of having cards like DarkLizamon, Super Hit, or level Ms that add attachment slots. Since you’re not allowed to remove attachments at-will, these will put you in more danger of having to keep the Dark Evolve. Notice the pattern with deck building and Dark Evolve: don’t bother building an entire deck to cater to it, but many decks can run it without much risk. This goes double for decks that can’t easily search the Dark Evolve since its trash 5 penalty makes it too risky to aggressively find with mulligans. A copy or two in a Monochromon/Cyclomon-heavy deck can be wonderful in theory, due to the evo-box search but consider that a Digivice is strictly better to find in that instance. Cards that change both players’ or your opponent’s attacks like Coliseum and Disrupt Ray help temporarily cover the stopping effects and tend to be good enough to run coincidentally with Dark Evolve instead of as a halfway solution to it. In short, build the deck smart with quick ways to remove the attachment but don’t dedicate a huge chunk of the deck to this card since it’s limited to 2 copies and therefore could weaken the deck overall.
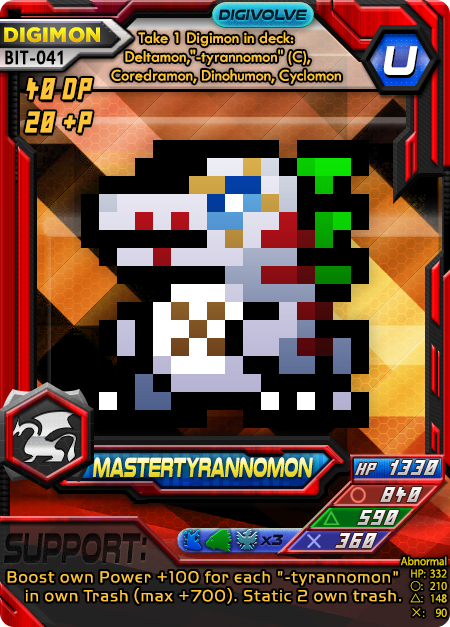
What’s good about it: Mastertyrannomon sports a pretty “square” body of attacks, in that they’re all quite closer together in number than other . In a correctly built deck, its support is stronger than an Attack Chip. The evolution box bonus gives unprecedented toolbox power—take any 1 Digimon from your deck! This is even less restricted than Gold Treasure. The x3 VS gives the ability to hit / / for 1080 at its printed power, which easily OHKOs the vast majority of Jungle and Wind champions and 2-shots all three types’ Ultimates. Drain will not save them. With the evobox containing multiple, tightly-grouped champions, a deck that always gets the bonus is easy to achieve.
What’s bad about it: Like most , Mastertyrannomon suffers from low HP. In fact, his HP is lower than the average in his cost and type. This is so significant, that when accounting for cost, Master is near the bottom tier of all Level U HP. If you’re not facing one of its hate-types, the x3VS is just wasted power, which also means it doesn’t have attack hate and therefore can’t protect himself against enemy , which it’s weak against given the low HP. The vast majority of peers in its level can 2HKO it, same as what it does to the types it has critical power against. You usually want only 1-2 copies of a “hate” card but its support begs you to have 4. The evobox doesn’t include a DP cost reduction unlike most of the carnivorous dinos, meaning most of the time he takes 2 racks or requires an Evolution card. The support, while potentially very powerful, scales slowly and requires a certain amount of time or effects to have passed during the game to be effective. In addition, “-tyrannomon” cards have to be in the deck at high numbers, potentially choking other ideas. The maximum boost from the support is +700, and you have to over-plan for it. The support also eats away at 2 cards in your trash, which might also be tyrannos given their saturation level.
Tips: Choose another Tyrannomon ultimate—it’s not a great idea to solely have Mastertyrannomon. Try using [card img=”https://www.v-mundi.com/wp-content/uploads/2018/05/069-SuperEvolve.png” name=”Super Evolve”] to pick Master out of the deck when its x3 VS would be relevant. If you’re willing to be sacrificial, [card img=”https://www.v-mundi.com/wp-content/uploads/2019/08/000-FatedSpirit.png” name=”Fated Spirit”] is a slightly weaker Super Evolve for the same purpose, but I suggest using this on your alternate Level U tyranno, since you really want Master support. Since the evobox can take another Master from the deck (for support), it’s recommended to pack [card img=”https://www.v-mundi.com/wp-content/uploads/2016/08/183-Partner-Finder.png” name=”Partner Finder”] or [card img=”https://www.v-mundi.com/wp-content/uploads/2020/10/013-BlueComet.png” name=”Blue Comet”], use the destiny evolve (or just [card img=”https://www.v-mundi.com/wp-content/uploads/2016/08/000-Data-Hijack.png” name=”Data Hijack”] from the deck) to get to Deltamon, [card img=”https://www.v-mundi.com/wp-content/uploads/2016/08/046-Tyrannomon.png” name=”Tyrannomon”], [card img=”https://www.v-mundi.com/wp-content/uploads/2016/08/047-DarkTyrannomon.png” name=”Darktyrannomon”], Coredramon (any), Dinohumon, and especially Cyclomon in preparation. Cyclomon is special here since its evo-bonus takes 1 Evolution card in deck, which you can use to guarantee a Master evolve. This should guarantee having your powerful support. Master works well with cards that have trash costs such as [card img=”https://www.v-mundi.com/wp-content/uploads/2016/08/171-Mega-Disk.png” name=”Mega Disk”], [card img=”https://www.v-mundi.com/wp-content/uploads/2016/08/188-Mega-Chip.png” name=”Mega Chip”], and occasionally [card img=”https://www.v-mundi.com/wp-content/uploads/2016/08/181-Giga-Hand.png” name=”Giga Hand”] (though HP can be relatively low in a Tyranno deck). Once a Master’s support Power is high, it would only bleed slowly as long as the opponent doesn’t have access to vast quantities of static. Recycle can utterly kill this deck unless used on Master specifically (use recycle any), so try re-using Master supports over and over again for a quick win. If you’re willing to give up evolution to Mega, try using [card img=”https://www.v-mundi.com/wp-content/uploads/2017/08/018-ZeedMillenniummon.png” name=”Zeedmillenniumon”] with [card img=”https://www.v-mundi.com/wp-content/uploads/2017/08/037-CyberdramonDATA.png” name=”Cyberdramon DATA”] and [card img=”https://www.v-mundi.com/wp-content/uploads/2017/08/040-MillenniumonDATA.png” name=”Millenniumon DATA”]: This gives you access to a +800 Power Data Break and 5 selective recycles to re-use Master’s support. An alternative is [card img=”https://www.v-mundi.com/wp-content/uploads/2017/08/003-Millenniumon.png” name=”Millenniumon”] (with the DATA) and use [card img=”https://www.v-mundi.com/wp-content/uploads/2017/08/004-MugendramonDATA.png” name=”Mugendramon DATA”] to trade Cyberdramon DATA for Drain+Crash (significant healing benefits plus damage, potentially x3 VS), and the ability to add a flat +100 Power with deck corruption and recoding.
Be wary of how limited your other tyrannos can be. [card img=”https://www.v-mundi.com/wp-content/uploads/2018/05/028-Extyrannomon.png” name=”ExTyrannomon”] is a great body for the active zone, but only has a Passive, no support. In a deck that begs for 4 copies of every tyranno, this is pretty suspect. [card img=”https://www.v-mundi.com/wp-content/uploads/2016/08/076-MetalTyrannomon.png” name=”Metaltyrannomon”] is a great pick, but be aware that its DP discount or Draw 3 bonus only covers “Tyrannomon”, the original. Its support is great with Crash, but not amazing unless your HP is lower…oh right. Luckily, Darktyrannomon can also recover HP (only abnormal, so don’t plan on healing Level M or R). While Tyrannomon’s support is great for attach, it’s not much use otherwise. Since you’ll likely have 4, this means Master-focused decks tend to also need several attach cards—and now the deck list is starting to fill up on its own, preventing much flexibility. That can be an asset though, if you work with the flow instead of against it.
Both [card img=”https://www.v-mundi.com/wp-content/uploads/2018/05/043-Goddramon.png” name=”Goddramon”] and [card img=”https://www.v-mundi.com/wp-content/uploads/2018/05/044-Dorbickmon.png” name=”Dorbickmon”] are good Level M picks for their evo-bonuses and other circumstantial support. With Dorbickmon, you can fill the opponent’s trash about as much as yours. Properly used, its first turn on the field can mean trash 7 for the opponent—when that’s a cost, it gives ace-potency effects like HP+1000! Since it also halves everyone’s HP and makes the opponent discard 2, you can use Master support for a guaranteed KO, even against crazy 3000 HP monsters like Zeedmillenniumon or [card img=”https://www.v-mundi.com/wp-content/uploads/2016/08/005-MoonMilenniumon.png” name=”Moonmillenniumon”]; since you can smoothly hit 1500 Power with 810 base, +700 from Master. Goddramon is no slouch either, since the opponent won’t be able to mulligan as you pound their head in with a crazy 960 Power circle. They better have every damn card they want in-hand, right now. On top of that, Goddramon revives you to Master once it gets KO’d, so you don’t even have to start the slow DP-racking over again. The M that really shines is [card img=”https://www.v-mundi.com/wp-content/uploads/2016/08/090-Rusttyrannomon.png” name=”Rusttyrannomon”] since all your tyranno Level Us count for the Draw 3 bonus, which is immensely powerful once the cannon fires. Even better, Rusty fuels its cannon with the mounds of tyranno corpses you’ll be piling into the trash for later Master support!
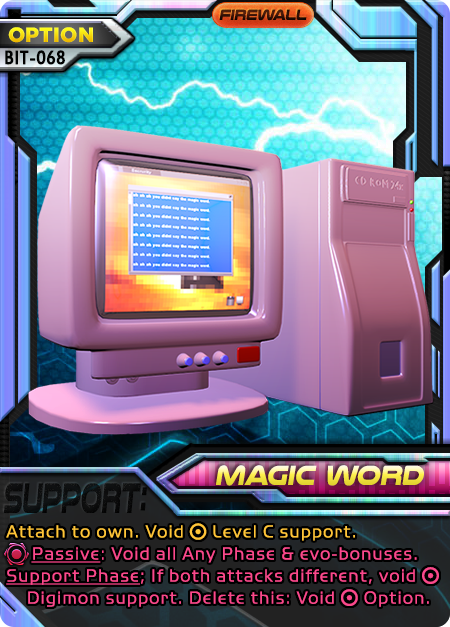
Magic Word—A new firewall that stops Any Phase effects and sticks around to void.
What’s good about it: If you’re good at attack prediction, this card can gain almost endless voiding of Digimon, which is incredible value. Magic Word also heavily punishes decks that use evolution box bonuses to lower DP costs, which can throw off their entire evolution progression. Any Phase effects can be some of the most flexible and hard to deal with effects in the game since they occur outside of normal play. No more sudden use of Digi-Diamond, Kabuterimon, or RedOtamamon, just to name some. They would have to Support with those effects—the Digimon you can continuously void; the Option you can void by merely trashing the Magic Word! Having the ability to trash it at any time to void Options can make opponents play their Options more conservatively, so it’s always threatening.
What’s bad about it: Magic word is a two-edged sword—you don’t get to use “Any Phase” or evolution boxes either. Depending on whose turn it is and what your opponent plays, it can be a played around or voided (on initial Support). Suppose you’re bad at prediction, or the opponent is better: your Magic Word’s usability drops off significantly. This can easily make it worse than any other Firewall. More than one Magic Word at a time is pretty much nonsense unless your opponent supports with an Option so you can trash it. Other firewalls tend to be far more usable one after another. Lastly, Shatter is an attack ability, which this doesn’t void, and it gets rid of Magic Word.
Tips: Try to keep your “Any Phase” effects to a minimum. DATA cards may still be worth it, especially since you can dictate the terms of when it leaves play to some degree. Try to ensure your own deck doesn’t require evolution box bonuses for decreasing DP. Try cards that attach directly from the deck! In this way, Tyrannomons can become extra copies of Magic Word in the deck. Love Crest and Moxie are good for decks that aren’t attempting to “double-dip” on the evoboxes, since the deck should be able to evolve fine without them but can get nice bonuses when these are attached instead of Magic Word. “Research” lets you mismatch your attack, guaranteed.
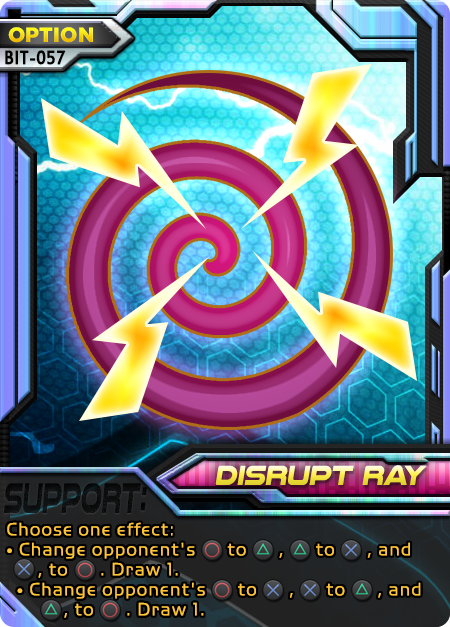
Disrupt Ray—Choose your opponent’s attack, sort of
What’s good about it: If you’re an expert at prediction and attack-choice punishment, Disrupt Ray can be incredibly potent. This card can be used, with significantly higher accuracy than not, to force a Counter or to-Zero effect, or at the very least save you from a deadly . Don’t forget that this can protect you from a powerful opposing like a Counter/Flatten/to-Zero effect which threatens your own attack, in addition to a one-hit-kill Crash/1st Attack/x3 VS. Replacing itself with a draw is a nice bonus too!
What’s bad about it: There’s no fast-and-loose way to specify what attack you want an opponent to use in Digimon. This is on purpose—taking away a player’s choice is heavy handed design and can lead to less mutual exchange of intelligence and tactics; as well as ruining fun for players when you’re making choices for them. Disrupt Ray is therefore limited in its capacity to change attacks by forcing its player to figure out what the opponent would choose and, if the Ray is still the best card to play in that instance, decide what “direction” they want to rotate the attack selection from that presupposed choice. If the deck playing Disrupt Ray is telegraphing that it does attack changes, opponents can play further mind games to disrupt the disruption. In addition, many situations make Disrupt Ray significantly less effective than simply playing a Recovery Disk or other protection from damage. You have to work hard to get the best use of this. It also doesn’t stop Jamming. If an opponent wants to reveal with Jamming before this Option resolves, they can do it and still Jam your attack ability (not this Option), then their attack will change. This means Jamming effectively gets better if Disrupted.
Tips: Don’t tip your hand by being incredibly obvious about your ability to counter or nullify attacks. But the mere existence of Disrupt Ray can also effectively disrupt how an opponent chooses attacks if they know you have it, or suspect, and you respond by not playing it. In that case, you still have the card to play and predicted accordingly. If you absolutely must force a specific attack, usually for Counter, Flatten, or to-Zero, make sure you understand the situation and opponent’s current payoffs. If they are none the wiser and have the ability to one-hit-kill your Digimon with either or , and you have Counter on your , you can safely assume Cross is your best attack, support with Disrupt Ray, choose the bottom option (which assumes they went for the “safer” Traingle-kill) and roll them up to Circle for your counter! Now you take no damage and they take it all. Notice that by being in a weaker position (both Circle and Triangle can KO instead of just the typical Circle), there’s no need to guess what they’re playing. If it’s a Circle one-hit KO and Triangle two-hit KO, you still have to guess whether your opponent values taking you out now, can afford to take you out next turn, or prefers to be unpredictable. Keep these things in mind. Disrupt Ray is also a good choice for decks that need to hit with commonly—and it supports protecting your attack as well as a Coliseum. Often this protects from a Counter/to-Zero/Flatten to your favored attack.