Only read the bullet-point lists if you just came here for the rules themselves. My ramblings are not necessary but provide some insights.
Epic Card Game is a pretty wonderful game and has proven that it’s willing to change over time. But one of the things it seems to encourage pretty heavily is extra variants. They add a lot of replay value to the game while we wait for additional sets. Lightning Epic is a variant that came about by pure accident. Back when I first obtained my original copy of base set in 2015 and read the terrible rulebook, we were pretty confused on many of the rules. Thus, it led us to playing several rules slightly incorrectly for some time. The game seemed to be charged with lightning and amazingly deadly—packed with strategy. When we finally learned the real rules about 10 games later, Epic flopped around like a cold, dead fish. See, the problem was that Epic always favors the defender, by allowing them the last word on practically everything. If you play a card and attack, the defender can respond. If they block and you play a card, they can respond. If they pass and you play a card, they can respond. No matter how you try to wiggle in some extra aggro, the defender can always play the control game perfectly.
Lightning Epic changes this. After playing Epic for two solid years with several hundred games under my belt, I’m confident in saying this is my absolute favorite variant of the rules. Only a few changes were made to the core of the game, most of them extremely play tested for compatibility and balance. After seeing the damage that stalling forever until you win is doing to this game, I think Lightning Epic is needed now more than ever. Let’s eliminate the slog! Full Article
If you haven’t, check out part 1. It’s time for more OPINIONS oh no! Let’s preview the rest of Uprising and then I’ll give my thoughts on the design of it at the end. This article might contain negativity maybe?
It’s been a while since the last article, so I just wanted everyone to know we’re alive here. Now that the preview season for Uprising is well underway, I just wanted to give some thoughts to the cards inside. Unfortunately, this article is going to have some negativity basically all over it so if you’re sensitive to that, you might want to skip it or get ready.
Uprising’s pack structure will mirror Tyrants exactly. While it’s currently unknown how many draft rares will be in each alignment or how many champions to events to silvers will be in each, what is known is that the same dual tokens will be present among the 4-pack structure, each containing 12 cards. Getting 144 cards will again be the constructed goal and the pack prices are the same retail. It’s yet unclear if there will be any print complications as with Tyrants or if that has been permanently addressed. Now, on to the previews!
Gold and draw are the most powerful resources in all of Epic. Without draw, you could only play 5 cards per game. Without gold, you could only play free ⓪ cards. Without either, even a deck running as many silvers as possible will only be able to play about two to three cards per game. So these are completely essential parts of Epic—the game doesn’t even work without them. Therefore, wouldn’t you like to maximize them as much as possible? I think most Epic players would’ve been on board if I said that from the start. But it’s crucial to outline exactly how powerful these effects are. Let’s go over some general logic. Full Article
You cannot typically perform an OTK (one turn kill) in Epic, from full health. Dealing 30 damage in one turn, is very difficult; or even dealing very close to it like 25 after some health is lost. It can be done and usually relies on attacking while using some sort of sure-fire boost like Battle Cry or Deadly Raid on a massive token field. This deck shares only one real thing in common with that approach: tokens. In this deck, we are going to use pure burn to kill someone in as close to one turn as possible. How? First, we need to establish two engines: draw and zombie production. If you get a Drinker of Blood early in the game, the draw engine is less important. Here’s how it works: draw Drinker of Blood and some sort of board wipe, preferrably a silver-costed wipe so you can do this without giving the opponent two responses. A gold will have to wait until their turn, which is 2 responses (one on yours, one on theirs) so silvers like Hands From Below will not provoke a response. A 0-response solution would be Wither or Flash Fire. Due to the attacking rules that give attackers priority to play first, Spike Trap and Hands From Below operate without provoking any response.
Okay, now that you have your weenie board wipe and Drinker and your zombies are all out (including opponent zombies or both players having weak other champions depending on your possible out), now the magic begins. Nuke. Win. Drinker of Blood will make each opponent lose[es] two life and you gain two life for each champion that breaks at this time. If you’re responseless at the time, you auto-win.
This means, it cannot be stopped by The Gudgeon because it does not target, is not useless in multiplayer since everyone loses the life, and cannot be punished even when it fails to force a loss of all the remaining life because you will gain all that ridiculous amount of life for yourself. So even if you fail to get all 30 or 28 or whatever the situation, even if you do 18-20, you’re getting that much and they’re losing that much. Such a gap usually leaves opponents unable to defeat you before you do something minor and win. Don’t forget that one of your outs is Flash Fire which will do 2 more damage on top of that. Special note here: even though some cards in this deck give zombies to the opponent, which is technically usable by our Drinker of Blood OTK gambit, the decklist notes will not count them as usable since you never know what an opponent will do with it once it’s theirs.
Here are a list of play flow tips that should help you:
If you don’t have Drinker of Blood, mulligan aggressively. 5 cards if no Drinker and no Flash Fire (best finisher). 4 if one of them. Mulligan 5 gives a 42% chance of opening a Drinker, with one being in the next 9 cards on average if you fail
Set up zombies slowly early on, so as not to provoke a board wipe
Do not attack with early zombies for the same reason (plus you don’t want them dying off)
You will have way more silver board wipe wincons than you know what to do with. Don’t be afraid to waste a few Hands From Below for extra tokens
Make sure you always respond with Plentiful Dead before your intended response! You need multiple activations of this
Don’t pay attention to life costs as you will gain the life back, but don’t uselessly spam Plentiful Dead or you’ll die
Make sure to use Necrovirus as early as possible to set up zombie “extensions” (where you get more than you visibly had available later)
Use The Gudgeon not just to draw a ton but to stop discard control from ruining your Plentiful Deads and Necrovirus
Legend for deck keypoints:
OPP – Counts as playable on the opponent’s turn. This is essential to keeping good rhythm and affecting game play every single turn. Doesn’t count re-usable.
DRW – Draws at least 2 cards, or is a draw engine. Required to keep playing cards every turn including on the opponent’s turn, especially if you’re board wiping.
TKN – Produces zombie tokens.
RMV – Any type of removal whether spot or board wipe, including weenie removal since our deck profits here.
MVP – Don’t squander these as they’re your best cards. (ACE for Events)
Zombie Counter: For tracking average zombies per card at the end.
Za Warudo
Silver 0: 18
3 Plentiful Dead – Constant source of free zombies you don’t realize will be incredibly necessary. Since you can play it before your gold, then play a gold, then do the same thing on your opponent’s turn, it’s easy to manufacture 4 per round per copy of this card. So this will count as +4 zombies. TKN
3 Wither – Second-easiest way to start the OTK in the deck and best of all, it still gets all zombies regardless of whose you target first. ACERMV
3 Hands From Below – Used when your own zombies attack in a mass group to kill them all (or demons/wolves given by your opponent) while Drinker is on the field. Can alternatively be used to just get 2 extra zombies when needed if you have a different out. +2 Zombies. TKNRMV
3 Arcane Research – Used to fish very deeply for Drinker of Blood. Even if you fail, that can be around 5 cards deeper than you were. Totally invaluable for this deck and always at least replaces itself. Be careful of your greyboxes in the discard. Run Spike Trap instead if you have more trouble getting finishers (you probably won’t). Because of the intense amount of digging, it’s listed as DRW despite not giving a +1, please remember this! The DRW is for Drinker anyway. OPPDRW
3 Muse – Draw engine. Cheeky 2 damage in the air which can reduce the amount of zombies required to OTK by 1 each time (with some risk). DRW
3 Flash Fire – Primary and easiest way to perform the OTK in the deck. ACEOPPDRWRMV
Gold 1: 42
Removal: 12 3 Hurricane – Reminder do not play this on an opponent’s turn immediately after dropping Drinker. You won’t need to anyway but this is mostly to field clear weird stuff your opponent drops. OPPDRWRMV
3 Transform – Works really well for giving you yet another token to kill to Drinker as well as spot removal for anything that’s unbreakable or unbanishable (the former of which this deck is weak to). OPPDRWRMV
3 Zombie Apocalypse – A real horrorshow. +X Zombies. OPPDRWTKNRMV
3 Necrovirus – This spot removal puts 2 new zombies on the field and makes 3 more the moment you play an ally. Counts as +4 zombies total (1 goes to the opponent). OPPTKNRMV
Zombie Army: 9 3 Zealous Necromancer – Always good to have ambush draw, plus you can slow-roll a zombie army when your opponent’s stuff dies. +4 Zombies on average in testing. OPPDRWTKN
3 Reap or Sow – Always take the zombies. You should have plenty of board wipes otherwise. This is best used as OPP, especially if Necrovirus is in the discard, as that creates huge armies quickly. +4 Zombies. OPPTKNRMV
3 The Risen – Unlike a typical zombie deck or spammy evil token deck, it’s not used for swinging with some zombies. Mostly it’s used to build an army on OPP so you can surprise OTK on your turn. Use as needed however. +3 Zombies. OPPDRWTKN
Utility: 21
3 Drinker of Blood – Make sure this will either kill or permanently cripple an opponent when finally dropped. It’s too precious to squander. Look for creative and weird ways to extend your damage as hard as possible (Flash Fire, Muse, opponent’s weaklings, etc.) Draw until you get this as it’s required to win. Be clever and sneaky about what you’re doing, so you don’t provoke an enemy board wipe. I can usually get away with 4-6 zombie tokens completely right before I spend my gold on my opponent’s turn before I play Drinker, and yet still end up extending my zombie generation between that time period to an OTK. MVP
3 The Gudgeon – Precious discard protection. Precious draw. Ping every turn to reduce our zombie army requirements by 1 each time it attacks. DRW
3 Final Task – This is just for emergencies to bring back a dead Drinker. By that point late in the game, with all your draw engine, you’ll have one just fine (and it can swing in the air with unbreakable, which extends the damage that turn). Also used to grab draw engines. OPPDRW
3 Thoughtplucker – Draw engine and hand control. OPPDRW
3 Crystal Golem – Minor draw, some needed OPP and fills the Sage slot better than anything else. OPPDRW
3 Battle Cry – (If lack of champions bothers you, run Triceratops, Jungle Queen, or Sea Hydra instead.) Used as an alternate out for your zombie army when you have to swing early. Almost always just used to defend and draw 2 on an opponent’s turn, though. Remember that with an all-breakthrough field you want to swing as a group for maximum damage and minimum responses. OPPDRW
Key Point stats
Keypoint totals:
OPP – 42 total cards. 70% of the deck works well on the opponent’s turn.
TKN – 21 total cards. 35% of the deck is used to generate tokens for your finisher.
DRW – 42 total cards. 70% of the deck can give net hand advantage after it’s played. Arcane Research is for digging.
RMV – 24 total cards. 40% of the deck can be used as removal.
Intersection – 215% total, spillover (intersection) of 215%. Cards, on average have 2 of the deck’s key points on each card. Therefore each draw in this deck has a quality rating of 2.
Draw quality (+10). Reminder this is extra over the normal 100%.
Plus the above!
Please note that card quality does not mean anything objective. It’s a subjective self-measure of how well the deck does what it says it wants to. It measures synergy.
Zombie Counter: 18 total produced from unique cards
This means the average number of zombies per card is 18/20 or 0.9. That’s pretty intense. For every card you play, you get around 1 zombie. After 10 cards, you have 9 zombies on average. Though that would be assuming you were playing random cards from your hand with no goal in mind so really it ends up being far more. Essentially, a hand of 7 will have 6.3 zombies per card available to it. Adjust this on the fly to account for your particular game’s quirks, and for the value of Zombie Apocalypse in your game.
This deck is by far the strongest most consistent deck I have been able to make since I started playing Epic upon its release (over a year ago at the time of writing). That’s a very powerful statement given exactly how deep and complex Epic is as a game. Neverthless, its strong potential for non-respondable wins while working consistently and having multiple outs as well as defense makes this deck intensely hard to contend against. Even when using direct counters such as banish removal and discard control, the deck has protection and a plan. Once I come up with a weakness, I’ll be posting it here. This deck can win even when it gets a bad hand, though a bad start is always going to cripple you
It’s not even punishable. In the rare cases where the deck must go for OTK and cannot make it all the way, it’s gaining over 20 life and reducing the opponent that much too. Even in the upper teens of damage, you’re still making a gap that puts the opponent in critical condition and you way up in untouchable areas. If you think you’re not going to draw your win condition, you’re dead wrong. This deck is all gas and draw engines. Your biggest hiccup is against heavy life-gain decks but that was already covered in the part where you cripple the opponent with a less-than-full OTK. In the future, I hope to make the Wild gold choices stronger, but that will either require new insights or a new set release. I hope you all take this and stomp your local competition into the dust! Have fun.
By the way, the name comes from the stand of DIO from JoJo’s Bizarre Adventure, who is an all-powerful vampire that stops time to pummel you so you can’t respond. It seemed appropriate.
Often, most decks will try to combine alignments at least in part. For a Dragon deck, we must define exactly what we want the deck to do and let the colors flow organically into the deck from there. When considering what it means to have a “dragon” deck, first consider what they do well: Thundarus buffs them, they all have airborne, they are all big bodies. So the primary method of winning in this deck will be to get out Thundarus and go to town with powerful finisher effects. Getting Thundarus isn’t as easy as it sounds, so the deck will require a massive draw engine. This will have the side-effect of increasing our hand quality immensely and making us able to use any dragon effect we need in a given situation.
One of the major ways to win is going to be over-extending a successful hit with Mighty Blow or Rage. This will make the strong air the deck has stand out even more and push further than an opponent expected. Setting up one of several draw engines will be the deck’s early game goal, along with fielding some preliminary dragons to get in a few bites of damage while forcing their spot-removal out. Thundarus is one of the hardest to remove cards natively in the game since it’s so huge and unbanishable. It basically requires pure break, so a well-timed Mighty Blow is going to foil any attempts at removal short of bounce. Since every dragon is pure threat, you can easily whittle down an opponent’s spot-removal ahead of time, and since many of them are also flashes, you will likely get quality out of every dragon that died.
Legend for deck keypoints:
OPP – Counts as playable on the opponent’s turn. This is essential to keeping good rhythm and affecting game play every single turn. Doesn’t count re-usable.
DRW – Draws at least 2 cards, or is a draw engine. Required to keep playing cards every turn including on the opponent’s turn, especially if you’re board wiping.
AIR – Can actually do some damage in the air. Primary win strategy.
RMV – Removal, whether spot or board wipe.
MVP – Don’t squander these as they’re your best cards. (ACE for Events)
サーンダルスが倒せない (I cannot defeat Thundarus)
Silver 0: 9
3 Muse – Draw engine. DRW
3 Keeper of Secrets – Draw engine. Discard control. Use best with Ancient Chant in discard. DRW
3 Rage – Protect dragons from Hurricane, use to extend damage for the turn, get over bigger air, use to draw. OPPDRW
Gold 1: 51
Removal: 12 3 Hurricane – Hurricane is a risky board wipe but sadly necessary to keep up the Wild loyalty and you need an OPP board wipe. The good news is many dragons can be saved with Rage, and Thundarus won’t die from it. OPPDRWRMV
3 Transform – Best spot-removal in the game bar-none. Banishes the unbanishable, ignored unbreakable, only gives the controller a wolf, has draw 2 just in case. You’re all-air so wolves mean nothing. OPPDRWRMV
3 Lying in Wait – Just being used as an extra Transform. OPPDRWRMV
3 Stand Alone – Typically your best stuff is better. OPPDRWRMV
Dragons: 21 3 Thundarus – Your target. Always draw engine until you get the Dragon Lord of the North. After that, you can pump dragons at your leisure and it’s very hard to remove. MVPAIR
3 Gold Dragon – Gives itself and Thundarus Righteous, which should really provoke a scoop if an opponent can’t board wipe. The blitz and high defense make it excellent for instant pressure. AIR
3 Draka, Dragon Tyrant – THE strongest blitz air in the game as of Tyrants, even beating out a fully loaded Djinn of the Sands. Better still, on the attack it deals 3 damage to everything, wiping the board of smaller stuff, chump air blockers, and forcing any block in the air to generally favor Draka outside of Thundarus. AIR
3 Strafing Dragon – Gives the highest speed of any dragon in the game, and of most airs in the game. Also has a nasty burn built in, allowing it to block anything up to 11 and still kill, plus when it enters into an empty air field, that’s an instant 11 damage to the face. OPPAIRRMV
3 Draka’s Enforcer – Ambush draw for a body that can usually kill any air it blocks. Insane card advantage and turns into a mean attacker. OPPDRWAIR
3 Ice Drake – High defense and creates a mildly useful freeze effect (normally you can just use your air) but very important ambush blocking. OPPAIR
3 Blue Dragon – Important draw and ping engine. DRWAIR
Utility: 18
3 Mighty Blow – Such a ridiculous air attacker that can go in anything. Could technically be used on an opponent’s turn to protect something or surprise kill with a block but that is at the expense of a game-winning gambit, so doesn’t count as OPP but the draw does. Using on Thundarus makes it the most difficult to remove easiest damaging champion in the game, but using it on something Thundarus is boosting will split the opponent’s decision on what removal to use, thus increasing your chances of hitting. This is not to be played lightly and will often win games. ACEOPPDRW
3 Winter Fairy – Pure draw engine, but because of its effect, can swing wildly in the air not caring. DRWAIR
3 Thoughtplucker – Draw engine, hand control, and can be played on the opponent’s turn. What’s not to love? OPPDRW
3 Raging T-Rex – One of the best turn 1 plays and one heck of a draw. Putting this out there, like thoughtplucker, is so threatening that it ends up protecting your dragons in the long run. DRW
3 Surprise Attack – Make all those non-ambush dragons come in early. This is best used on Thundarus for the block, as you’ll get a kill and can then immediately begin your army of dragons on your turn. OPP
3 Army of the Apocalypse – Sit on it until you need to throw down some dragons. Because most won’t have blitz, I currently run Ancient Chant instead to act as an anti-discard (since it works after being discarded) and pseudo draw engine. Though Army gives another win condition. OPPDRW
Key Point stats
Keypoint totals:
OPP – 36 total cards. 60% of the deck works well on the opponent’s turn.
AIR – 24 total cards. 40% of the deck is used to attack or present a large body.
DRW – 42 total cards. 70% of the deck can give net hand advantage after it’s played.
RMV – 15 total cards. 25% of the deck can directly damage.
Intersection – 195% total, spillover (intersection) of 95%. Cards, on average have 1.9 of the deck’s key points on each card. Therefore each draw in this deck has a quality rating of 1.9.
Draw quality (+10). Reminder this is extra over the normal 100%.
Please note that card quality does not mean anything objective. It’s a subjective self-measure of how well the deck does what it says it wants to. It measures synergy.
Good tends to normally have some pretty weak ground bodies but some things change in Tyrants! Let’s take a look at each new Good card and see how they stack up, what they add the alignment, or the game as a whole.
Before, Good was hurting for a “killer” silver. Where Evil has Corpse Taker, Sage has Muse, and Wild has Rage, Good really relied on simply throwing a few silvers together and hoping they came up when needed. Not to say any were bad, but they’re not holding a candle to the general purpose use of Blind Faith. With Blind Faith, you can recycle (so very often replacing itself, making it a free card) and blank out the textboxes on your opponent’s champions. “Abilities” and “Powers” refer to both the general textbox rules, the shaded areas (while it is in the discard pile), and the bold strip of keywords at the top (Airborne, Ambush, Blitz, etc).
This isn’t to say that an opponent just has to sit there helplessly, but you can make it so they can’t do things like use Jungle Queen to play cards as Ambush. This is extremely useful for removing Breakthrough from an incoming attack if you only have weak human tokens. A well-timed blind faith also lets you block some air attacker, maybe kill it, and turns off its potential Righteous. This is what advanced gamers were looking for. I promise you’ll find so many uses for Blind Faith you won’t want to leave home without it!
Often times in this cruel, cruel world, an opponent is going to start with a Thoughtplucker, Psionic Assault, Knight of Shadows or other levels of annoyance in their opening hand. Any time they get some incidental discard (or set up an engine), of hand control, you can find yourself annoyed, hosed, ready to rage-quit or all three! Markus, Watch Captain has your back.
As the Good tyrant, he at least had the common decency to be one of the top bodies in Good overall. As the Tenshinhan of humans, Markus starts big and can get big. Given this fact, the ability to essentially get free gold any time an opponent uses a discard effect (which is extremely common, regardless of your meta), is pretty amazing. With proper loyalty, he’s just a Triceratops that replaces Breakthrough for the ability to stop token spam. That’s if he’s not being incredibly anti-meta with his discard protection. Markus may find himself being slotted into every deck, even at 1 copy, just to threaten the “no fun allowed” crowd.
Really what we want to look at with Rabble Rouser is human spamming in general. Base set Good had some pretty nice human token spamming and support. However, it doesn’t hold a candle to the horror of Tyrants human token support. Rabble Rouser himself comes down with blitz and the ability to not only grant humans but double them like some sort of insane Krenko Mob Boss on crack. With the stupidly high number of ways to get human tokens (and give them all blitz) this is going to turn into a nightmare.
Insurgency gives us that nightmare. Let’s say that instead of six humans with blitz, you got four humans with blitz, unbreakable and +1 offense each. What if all your human tokens got those buffs? That’s Insurgency, which granted has no alternate draw 2, but a properly built deck can make that work. I won’t be spending much time talking about alternate versions of existing cards and their trade-offs (such as Forced Exile) but Insurgency warrants a mention simply for its buffing. Revolt is another that, ignoring Rally the People‘s “Recall” text, is strictly better, buffing everything by +2 after.
Paros, Rebel Leader is yet more buffing along with production! This gets quickly out of hand, turns on your Inheritance of the Meek and the new Quell for a major one-sided board wipe. Much of what helps a human token deck also have unbanishable, such as the new Noble Martyr (who can put six into play when allied from the discard, plus facechecks for 7 blitz immediately) and People’s Champion.
Throwing in a High King and Thundarus gives you more partial one-sided board wipes to the aforementioned plusDivine Judgement.
Evil had a shaky start in set one with very poor champion bodies and a total lack of support for their best strategy—demon tokens. All of that changes in Tyrants, with a major overhaul to Evil’s arsenal.
Starting off strong with amazing demon token support is the Evil tyrant himself: Raxxa. Raxxa is narcissistic and what he wants most in the world is to make every demon like himself. He brings along his own two personal demon token bodyguards and then gives every one of them +2/+2, so they can all be 6/6 like him. Oh and he can totally nuke weenies with 2 defense. This is a growing trend with demon tokens: far more of them. Remember how he can weenie-nuke? Try that after a Zombie Apocalypse or Wave of Transformation.
Spawning Demon was the savior of the demon token strategy. Despite having to compete with some amazing silvers, Spawning Demon provides the same effect as Infernal Gatekeeper without the gold cost, and at event speed! Of course you can pull some fun stuff, such as ambushing this in, paying your gold on the response, getting that demon for a life, and blocking with both your silvers for 8/8, though who wants to lose their engine? Everything like this pairs nicely with Raxxa’s Curse, which kills a silver and gives a demon token (totally invaluable with your own Reaper live). And of course, you have a coup de grâce in the form of Raxxa’s Displeasure which is the most one-sided board wipe (demons never die) I’ve ever seen in Epic.
Reaper is really just a free kill every turn, since you don’t care that what you kill turns into a demon token. You have far more of those. Reaper even doubles the output of spot-removal like Medusa and Bitten. Pairing it with Raxxa’s Curse means “no, actually you don’t have one but I do” after you kill something. This is one of Evil’s biggest on-board threats.
Combining it with things like Zealous Necromancer means a zombie token with every single kill from Reaper, to even out the trade of demons. More than that, it means Reaper can convert your own zombies into demons when necessary, which is usually a great idea the moment Raxxa makes his appearance.
I was a bit skeptical of Zealous Necromancer’s potential before I actually investigated him more and played a few games out. Once I did though, I fell in love. This card single-handedly wins games. The first clue that it’s solid as hell should be the Ambush + Draw. Any time you have OPP+DRW on a champion for free, you’re starting off on solid ground. But on top of that, the ability is so loosely worded that you can do all kinds of crazy things.
Imagine, if you will, a demon token engine. I know, hard to fathom. Imagine that you never swing with them and only keep them up for blocking purposes, usually trying to kill on the block. Every time you lose a demon token and every time the attacker dies, you get a zombie. This becomes absolutely outrageous in a very short period of time. Any opponent not packing weenie-nuke is going to have a hard day. Wiping the field of 2, 5, or 9 defense at a time (there are board wipes for each) is absolutely imperative once Zealous Necromancer makes the scene. I’ve used this to repeatedly stall out for the perfect card, even a second copy of it. I’ve used it to appear like I’m building up a huge zombie defense wall only to swing with all of them plus him, then play Raxxa’s Displeasure and swing into an empty field with demon tokens. Truly a champion of nightmares.
I don’t even understand how White Wizard design team keeps pumping out excellent cards without the game taking off as an international craze like this. The Gudgeon is one such amazing card with many uses. Let’s take for a moment that he protects you from burn, all freeze (except unblockable), discard control, just a surprisingly large number of cards that target players.
Obviously, not all burn (Draka’s Fire comes to mind) and not all of everything, but the protection is worth mentioning. The Gudgeon essentially forces a response. With it being unblockable, it’s not something an opponent is going to remove with most existing board states. Any time it provokes a hand response, it’s essentially operating like a true net +2. Which is absolutely great. Don’t deal with him? Well eat your 2 damage every turn. And sure, he’s easy to kill but it’s much harder when he’s untargetable too due to the effect of Royal Escort. Which is in an alignment that buffs humans. Like The Gudgeon.
Sage started off the strongest in set one, relative to all the possible categories, making them the most solid pure color as well as the most splashable. Tyrants, by comparison, isn’t making that significant of a leap but still manages to keep Sage in the game, maybe even still in a station slightly above others.
Starting off with the Tyrant: Helion the Dominator. At first, I was unimpressed by Helion. He’s flashy but seemed to be a bit too niche for me. However, there are some things you boys, girls and others need to know. “Gain control” can target things you already control. I confirmed this with Nathan Davis at White Wizard personally. So right away, we have an 8/8 (respectable) Ambush, that can loyalty to take away the toys and even get those toys killed after an attack is declared. Just his existence will make you rethink attacking with your strong champions first. On top of this, if he’s played on your turn after playing a nice big silver champion like Ankylosaurus, that champion gets to attack with blitz. Yes, you can do the same thing with Turn but allowing your existing gold champions to double attack. Pro tip: Target Helion with his own effect to give him blitz the turn he enters play!
We’re not done. Let’s take Forcemage Apprentice, one of the best cards for consistent damage in the game, and give him that effect twice. Okay, so he doesn’t have blitz or re-prep but Helion can at least take out multiple utilities/tokens at a time or just hit face at his leisure.
Shadow Imp is a treasure. “Pinging” to death with 2 damage is usually the job of Forcemage Apprentice but now you get to double down on that. Shadow Imp is unblockable, so that 2 is hitting, has blitz, so it’s hitting every time it comes in, and has ambush so it can eat a hit in a pinch or come down at really weird times. On top of that, you can attack, pay a gold to ally it back to hand, play it and attack again. This combined with the “gain control, prep it, blitz it” effects are causing Sage to have a very blitzkrieg style of offense which allows them to just constantly re-use attacks.
One of the better attacks to re-use are unblockables and the biggest unblockable is Knight of Shadows. As a 9/4 with the same effect as Thoughtplucker on Tribute, he threatens to come out swinging. Granted, he’s speedless but can be paired with Turn once he does get rolling. Nine to the face every turn is nothing to laugh off. Especially when paired with a +2 effect.
It’s the year of the unblockable! Temporal Enforcer isn’t screwing around. All those amazing time cops in Sage are back but this time with the body of an unblockable rogue. So much utility was never had in one card! Paint this picture in your mind: setting up an unblockable on your opponent’s turn, making them lose a gold via bounce, and setting up re-usable silver bounce (token kill too) all in one card. How does that sound for a deal?
Obviously, the downside is “dies to removal” but don’t most things? The extreme level of bounce in Sage makes it worth mentioning though that bounce does not always lead to a gold advantage. Make sure you’re not doing something weird like bouncing a silver, a blitz, or an incredibly powerful Tribute/Loyalty. You really don’t want opponents to repeatedly use cards like Raging T-Rex and draw up a storm. That having been said, it makes speedless cards all the weaker as true removal is no longer even necessary. And it means speedless cards without any sort of re-usable entry effects are more dangerous to run. Anything with Blitz or an entry effect of yours is going to be amazing with Temporal Enforcer, even making Frost Titan a re-usable freeze without opponents being able to take him out.
Wild has never screwed around. The fun doesn’t stop in Tyrants. Remember when Wild had very little it could do with airborne? That changes.
“You’re a god. If you want two Drakas on the planet, then you make two Drakas.” —Nathan Davis
Draka, Dragon Tyrant is now the largest blitz airborne in the game. Before, that prize went to Djinn of the Sands with his full counter armament. On top of that, Draka sports a weenie-nuke that can wipe the entire field of tokens, utilities, multiple silvers, and says to opposing air blockers “you better have 13 defense if you want to live through this”. Just as horrifying is Draka’s Enforcer which gives such a respectable 7/7 ambush body you’d think it wouldn’t also have airborne. That means the Enforcer can kill most of the average airbornes it ambushes in to block, without dying. On top of that, drawing a card.
Any time you have OPP+DRW on a champion, you’re in good hands. Wild getting such over-the-top airbornes really helps determine what two colors a “dragon” themed deck would want to be. Given the loyalties required on all three Wild dragons and both Sage dragons, the deck maps itself. Good dragons are mostly poptarts anyway.
Have you heard of our lord and savior, Brachiosaurus? This is the first legal card that can add gold in the game. Despite being restricted to Wild, the gold itself automatically sets Brachio up as a completely free field development most of the time on a super respectable breakthrough body. Can life get any sweeter? It’s a dinosaur, which means Chomp! and Great Horned Lizard can buff it. The latter of which is extremely respectable in its own right with ambush, blitz, breakthrough.
Adding to the massive pool of breakthrough is Ankylosaurus. This little 7/7 silver is as close to maxed out as a silver can get. With the highest (non-legal) silver body in the game being 8/8, no breakthrough, Ankylosaurus is really pushing the limit. It’s excellent when added into a pure breakthrough group attack, since it makes that group one of the scariest things in all of Epic. It’s difficult to block effectively and everything is contributing to the final push for damage. However, it should probably only be used in addition to Wurm Hatchling, not as a replacement even in a dino-buff deck. Growth is worth something by itself.
Helion the MindsculptorAnything I haven’t directly covered either with pictures or even as a reference, I consider to be sort of “background”. Maybe you run it, maybe you don’t. Not to say that any of those are bad. Forced Exile is an amazing card on par with Bitten for near-staple removal, but those cards are, for the most part, already understood to a large degree and a non-novice player will be able to see exactly where they fit into their deck.
Other cards such as Dark Offering are too reliant on deck design to say anything general about (especially with the awful rule 5.0: which states that unbreakable champions cannot be targeted by “break” effects, even though there is no such rule for unbanishable!). With this in mind, let’s move to a product review.
What do I think of Tyrants? Maybe I gave something away with my take on The Gudgeon, but the card design is absolutely brilliant. Every single alignment got exactly what they were missing. I don’t want to betray White Wizard’s attention to detail, so let me list all of them:
Evil gets demon tokens, token buff, zombie token spam, more proper draw, and more proper OPP
Good gets better bodies, more cohesive human support, more human token support, nice utility and protection, more life gain, more speed
Wild gets more airborne, dinosaur support, more breakthrough, more severely needed blitz, more incidental effects
Sage gets more technical and specific support, more hand control, more unblockable, more permanent bounce, more ping damage
Here is what each still lack in my opinion, and I look forward to seeing in the next set (Uprising):
Evil needs bigger bodies and more airborne. This should stay their weakness but doesn’t have to be this weak
Good needs bigger ground bodies and better silvers. This should also stay their weakness but needs improvement
Wild needs a few more airborne and more focus on blitz. Again, having blitz as a weakness is okay but blitz is far too important to have this few/weak bodies of
Sage needs even more ping damage. It has basically everything else covered right now and therefore could use a new direction after ping damage is achieved
Here’s what I think Tyrants did poorly, despite loving the card design of the set:
The production values were not up to my standard. Star Realms and Epic set 1 were almost there in card stock and right on the money everywhere else. But this card stock is flimsier and a bad “matte” feel instead of waxy smooth like other games White Wizard has released. This is a noticeable drop in quality.
Some of my copies and many of friends of mine had bad miscuts. Not within their own bleed, more like into the very next card.
The ink run sometimes had different layers run incorrectly. My Raxxa Tyrant for example looks like a cheap 3D glasses effect (slightly) because of the tiny misalignment of the cyan ink.
Again with the ink, the black was far too dark (in fact all darks looked like they weren’t proofed in CMYK mode), at least on every print run I’ve personally seen. The text therefore looks way too bold relative to the clean thin look of set 1.
The $5 SRP makes sense for turning a profit margin but no sense given the production quality. I understand that as a smaller print run than base (less cards, maybe less funding), they must have had higher costs, however it’s not okay to also have worse quality on the print run if your price point is higher.
Also, I believe that they did some things right that were absolutely an improvement. Just, for example, the spread of new tactics despite having a minor fraction of the card pool of base set, is rather impressive. Allowing us to re-use old cards to a significantly more complex degree is the hallmark of great design. The new token art was a vast improvement over the old and getting a free token in every pack finally made the extreme token decks I’ve built feasible. Despite all the imperfections on the physical front, Tyrants remains such an excellent sequel to the Epic base set and will really put naysayers to shame.
White Wizard is clearly a company with a love for competitive card games and with some smart minds behind them. I recommend getting three of everything so you can compete to the fullest in Epic constructed. Combined with base set, it’s cheaper and more fun than any TCG on the market.
Unlike some other alignments, Wild is actually capable of not only fitting in other decks but being pure by itself and still holding up. A pure Wild deck can in fact compete with a unique strategy that’s difficult to pull off with any other type. By sitting behind very large and threatening bodies, then lobbing burn damage directly to the opponent’s face, it can essentially create one of the safest win conditions. The general idea is there, though some of the specifics are slightly different. Packing cards like Lash or Rage helps to surprise damage someone who decided to throw a blocker under the bus.
The logic goes as follows: drop a threat, usually one which also doubles as a flash, then on the opponent’s turn, simply lob fireballs and lightning at them. The threat exists to draw removal from their hand, preventing the opponent from drawing 2 off an event (one of the worst things you can let an opponent do). This keeps the opponent’s hand size dwindling instead of increasing and frees up your gold to deal direct damage. You never really run out of threats so the moment they run out of removal, you’ve essentially got an easy game. Use any living or blitzing attackers with Lash and Rage to cause massive damage on the sly. Bonus points: use Mighty Blow after declaring Lash/Rage for +14 Unbreakable Breakthrough. This is usually a game ender and Mighty Blow is therefore an Ace.
If you’re drawing on schedule, you should be able to see 0.3 burn cards per card, which is 4 burns in about 13 cards. Thirteen cards are easy to draw (you start with 6 unless you went first, simply play two cards that draw 2 and wait three turns). Since the average burn damage in this deck is slightly under 6 damage per each (counting the permanents like Fire Shaman twice each), this means you’d only need 5 burns to win the game on average. If you can pull off a surprise Breakthrough, you might need anywhere from 3-4 burns to win. Herein lies why you only need to dig through 13 cards for 4 burns. Adjust that strategy within the game as you go based on how much total burn you can rack up after about your 8th card. You may have to rely more or less on your offense champions. Make sure you’re using primary drawing techniques like Raging T-Rexsince he can go through 2 cards while also setting up a threat. The same goes for Triceratops to a different degree, as he has his “Lash/Rage” built in but at a lower draw amount.
Your basic weaknesses are freeze and airborne, with a lot of spot-removal. This means Wild has a really tough matchup against vanilla Sage. It can really suck when you plop down all these huge bodies and the opponent just ignores them with airborne. The good news is that unless they both have ground blockers and you don’t have the ability to get Breakthrough, you can still out-damage them if they try to race you. The bad news is that when they combine spot-removal with airborne, it’s very difficult for you to win out, especially if you’re coming up dry on burn. Not as common but a player that can block with a lot of champions to break yours while drawing a lot of cards can outpace you without any downside. That’s where you would need to use your surprise cards.
Legend for deck keypoints:
OPP – Counts as playable on the opponent’s turn. This is essential to keeping good rhythm and affecting game play every single turn. Doesn’t count re-usable.
DRW – Draws at least 2 cards, or is a draw engine. Required to keep playing cards every turn including on the opponent’s turn, especially if you’re board wiping.
OFF – Anything with a body above the Wild average of 9/9 OR above a 4/5 airborne. Counts for cards that can lend huge things breakthrough or huge power.
BRN – Fling directly at face.
MVP – Don’t squander these as they’re your best cards. (ACE for Events)
Power Overwhelming
Silver 0: 15
3 Fire Shaman – Constant source of 3 burn every turn. You will get 6 burn every round, meaning if an opponent doesn’t kill it Shaman wins games. BRN
3 Lash – Used to grant something breakthrough, and the +4 is nice too. Punishes weak blockers like crazy with effective face damage. Technically you can use the 1 damage to kill annoying champions like High King, Forcemage Apprentice, Necromancer Lord, or Thoughtplucker. Don’t forget you can get this back if you start running out of cards or options. That said, it doesn’t work well enough on OPP. OFF
3 Rage – Same as Lash but with the added bonus of draw. Doesn’t work as well on OPP. OFFDRW
3 Fireball – Easy extra damage. Usually you want to keep these in hand to slap down with something like Flame Strike for game so the opponent can’t predict when you have a win ready. This also frees it up to be used to board wipe weak tokens and utility champions. OPPBRN
3 Wurm Hatchling – Grows into a big breakthrough champion, usually requiring the expenditure of gold from an opponent. OFF
Gold 1: 45
Removal: 6 3 Hurricane – Most of your own stuff won’t get hit but beware your silvers and Hunting Raptors. Hurricane is often a mostly one-sided board wipe when timed correctly. OPPDRW
3 Transform – Best spot-removal in the game bar-none. Banishes the unbanishable, ignored unbreakable, only gives the controller a wolf, has draw 2 just in case. Ridiculous. OPPDRW
Offense: 30 3 Burrowing Wurm – Extreme levels of body on this one with the upside that all of it counts when it turns sideways. OFF
3 Rampaging Wurm – Used to put immediate pressure on the opponent and get surprise damage off from the breakthrough granting cards. OFF
3 Hunting Raptors – Burn card which, as with any burn, also works as removal. Try aiming it at faces as much as possible. Can easily do 4 damage per round as long as it doesn’t die. On the first round, it can get a nice 8 damage due to ambush. OPPBRN
3 Lurking Giant – Used purely as a big-body OPP to throw down and surprise-block for a kill. OPPOFF
3 Raging T-Rex – One of your most reliable sources of draw as it also leaves a threat behind. DRWOFF
3 Strafing Dragon – Easily your best champion. This often does 5 to face and then hits for 6 damage in the air, dealing way more than other champions. MVPOPPBRNOFF
3 Triceratops – Extremely threatening card that is hard to kill and gives a net+1 immediately when played. OFFDRW
3 Rain of Fire – Almost always used to burn directly for 5 and then hit other champions for 4 and 3, however there’s no shame in changing that up if you have to. Just remember you must have 3 different targets. OPPDRWBRN
3 Flame Strike – It burns. For 8. OPPBRN
3 Mighty Blow – Such a ridiculous air attacker that can go in anything. Could technically be used on an opponent’s turn to protect something or surprise kill with a block but that is at the expense of a game-winning gambit, so doesn’t count as OPP but the draw does. ACEOPPDRWOFF
Utility: 9
3 Jungle Queen – Her buff is practically tertiary, the main use for Queen is to ambush in things like Burrowing Wurm and to add OPP to all your champions. (Not OPP itself but makes everything else.) OPPDRW
3 Surprise Attack – Works exactly the same as Jungle Queen but faster. OPP
3 Army of the Apocalypse – Most of the time, your big bodies will die. Bring them back for a game-winning push with this. OPPDRWOFF
Key Point stats
Keypoint totals:
OPP – 11 unique, 33 total cards. 55% of the deck works well on the opponent’s turn.
OFF – 11 unique, 33 total cards. 55% of the deck is used to attack or present a large body.
DRW – 9 unique, 27 total cards. 45% of the deck can give net hand advantage after it’s played.
BRN – 6 unique, 18 total cards. 30% of the deck can directly damage.
Intersection – 185% total, spillover (intersection) of 85%. Cards, on average have 1.8 of the deck’s key points on each card. Therefore each draw in this deck has a quality rating of 1.8.
Draw quality (+10). Reminder this is extra over the normal 100%.
Please note that card quality does not mean anything objective. It’s a subjective self-measure of how well the deck does what it says it wants to. It measures synergy.
As mono-color decks go, pure Wild works out quite well. Any given card is going to have a lot of quality to do what it needs to do. Complete with lots of poptarts, burn and offense, Wild is tough to beat. It takes a lot of airborne, removal and freeze. Though most alignments are also weak to the last two. It does suffer from a great lack of pure removal, relying only on its burn in dire situations, which is still often not enough. Despite that, the strategy of sitting behind big (card drawing or otherwise) threats while lobbing fire overhead is very “power overhwelming” indeed. The greatest strength of this deck is the not-so-apparent moments it can go for game. I find myself often being able to win while the opponent is at 11 or less just by having Fireball and Flame Strike in hand, neither to which an opponent can respond.
There’s this sort of life threshold the opponent approaches somewhere around 15 remaining to 8 remaining (a huge range) where they are in danger of immediately losing. This is especially powerful when combined with an opponent who takes a mulligan. Any opponent daring to mull 3 against this deck will find itself dying at 18 life to 11 life, usually without a way to stop it reliably. The most powerful combination you can try in this deck is Mighty Blow + Lash/Rage/Breakthrough + 10+ Power champion. Even if blocked, it can easily do around 15 damage. In combination with a blitzkrieg approach and lots of draw, while forcing the opponent to not draw, I have to say this deck is extremely difficult to deal with.
Wild cards feature dinosaurs, savage beasts, flames, lightning and other chaotic forces of nature. Wild has the best ground bodies in the game and the most direct damage via burn. Of course, this combination is completely unfair since it lets you sit behind huge threats (and walls) while throwing lightning bolts at someone’s face. Many of the Wild champions are so huge, they basically scream “kill me now or you die”, making them significant threats.
In addition, they can swing with those huge bodies, have an opponent throw something weak under the bus, and then the Wild player drop Lash or Rage to suddenly start dealing breakthrough at asinine numbers. More ridiculous is when you combo this with +10 Unbreakable from Mighty Blow and just kill someone in one turn. It happens. The huge threats, fireballs and surprise factor make Wild a serious opponent for anyone to face. In addition, because many of their huge bodies are flashes, which means they often get to serve as unstoppable effects plus having innate threat. This is a powerful combination when you drop a Kong or Raging T-Rex (or similar) and then just sit behind that threatening body, forcing some control from your opponent. This is an easy way to get ahead since you give up nothing.
What’s especially effective when using Wild is throwing down Champions on your own turn (usually creating a threat plus gaining a flash) then while your opponent is busy fumbling with responses, on their turn you’re waiting to drop 5-8 direct damage per card, with some of your cards being free. This is exacerbated by Fire Shaman which allys for 3 damage to a target. This is similar to, but not necessarily better than, Sage’s Forcemage Apprentice. You can usually guarantee about 6 extra damage per round out of this champion and if you play Flame Strike on one of those turns, you’ve dealt 14 easy damage. On top of that, you’re usually going to draw into at least one Fireball per game which you can save for a turn where you chain that in there and deal a total of 17 damage. This alone is 57% of someone’s starting life total! When combined with other sources of burn and an opponent screwed enough to mulligan against Wild you can easily deal so much damage that an opponent dies in 3 turns or less.
So in short, distract with big things (maybe they’ll even hit), smack them with direct. It’s a lot like Good’s Airborne strategy but with a backup.
One of their most glaring weaknesses is the absolutely poor spot-removal. All of it deals numerical damage which isn’t just subject to the unbreakable problem but also managing Defense numbers. This means that their removal is entirely opponent-dependent, which is effectively probability-dependent. Worse, they only have one board-wipe—Hurricane! You might think of Wild as being hyper-destructive and wielding all the forces of nature against you but not really, they simply don’t have the removal to stack up like that. It can be said that cards like Kong and Chomp! are “effectively unlimited” but really it glosses over the fact that you will have things you just cannot kill, such as Thundurus and many things in Wild.
Speaking of things they have very little of, Wild has only one airborne champion—Strafing Dragon. Granted this guy will give you nightmares and make you paranoid as hell but he’s the only one Wild has in the base release. He has respectable offense, defense, is extremely fast (both Blitz and Ambush) and can hit something or someone for 5. This means that Wild’s only real offensive strategy is to use surprise huge-bodies or surprise-burn. Speaking of speed…
If you look at card speed, you’ll note that cards might have Blitz or Ambush. For Wild champions, 7/13 of them can attack or expend on your first turn since putting them into play (e.g. Blitz or Ambush) which is incredibly important for tempo. However, about 3 of these cards aren’t very playable in base set (Pyromancer, Pack Alpha, Bellowing Minotaur) so you’re left with an effective 4/13 which is only 31% of your total roster. Evil isn’t faring a lot better with its 6/12 absolute but 5/12 (Dark Leader) effective, which is 42%. Good has a crazy 10/15 with respectable 9/15 (White Knight) being reasonably playable, coming to 60%! Sage sports absolute speed 9/13 cards with all being playable, coming out to 69%! Every color has better speed unit selections than Wild, so please try not to fall for the trap of thinking that Wild is fast. By volume, Sage and Good are tied for the fastest and relative-wise, Sage is the fastest.
Obviously Wild isn’t all bad but it does have some glaring weaknesses for a mindful player to exploit. Basically everything not mentioned here will tear your face off though.
Best champions are always going to be partially subjective but after picking criteria, you can at least try to be impartial. So here are Strafing Dragon and Burrowing Wurm.
I challenge you to make a Wild deck better because these two are not in it. That’s a challenge you will fail for sure. Strafing Dragon is easily one of the best champions in the game’s card pool and completely restricted to Wild. The ability to ambush this in to block something while also hitting to the face is ridiculous. On top of being able to bring it out, immediately hit for 5 to the face, then swing in the air for 6 and you’re basically looking at a part-flash-part-threat champion. Any time you see something like that bundled together, it’s just a poptart.
Burrowing Wurm is horrifying and will cause people to wish they wore their brown pants that day. Sporting the highest offense and defense in the game (legally playable) along with Breakthrough so no one can escape its wrath, you should no longer care that it isn’t fast. Essenitally, this thing is going to swing and when it does, you’re getting hurt a lot. It’s probably the biggest threat card in the game alongside Avenging Angel. The best part is that it’s not color-locked at all.
Honorable mentions: Raging T-Rex and Jungle Queen.
I’ve never built a Wild deck to date without Raging T-Rex. The easy source of cards for something you want to put on the field anyway is just like free candy. Dropping this card is an excellent early play because it can bait out removal you’d rather not have spent on your other big stompy champions. Also, it sets your hand up for all of the diminishing that will happen to it in Wild.
Jungle Queen is horribly mean. If your opponent plays this card, they have something in mind for ambushing in, most likely a Kong or Burrowing Wurm. Basically assume horrible things will happen to you if you attack while she’s up. The fact that Queen forces the use of removal before an attack (or suffer the consequences) makes her so excellent for controlling someone who has control. The best part is that when she dies, you’ve already gotten a card out of her for your troubles. Both Raging T-Rex and Jungle Queen serve that similar purpose. Her ability to buff all of your already huge Wild champions is just extra.
To summarize, Wild has a lot of serious pressure it can place on opponent’s along with its threats being backed up by painful promises. At the same time, it lacks speed, air strategies (though burn could be argued to be as good) and decent removal. Supplementing Sage Freeze such as Frost Titan can really help Wild make the best use of some of its biggest things. The combination of champions being used to get flash effects while doubling as threats can easily give advantages to Wild that are hard to match. Even with perfect 1:1 control, Wild can come out ahead qualitatively.
While decks are not required to stay “pure” colored, Sage does pretty well by itself just as a pure alignment. In fact, a pure Sage deck is pretty hard to mess up, since the cards to make a winning strategy are just so obvious. See, Sage can choose several of the winning strategies in Epic and not really lose out on anything. It can easily do freeze, simplify the game for opportunity swings, breakthrough (+blitz) on the ground, or burn, or airborne.
Please be aware that Sage does not have a lot of credible threats, which means your opponent gets to advance their field more, causing you to use more spot-removal and board-wipes. The deck accounts for this as best it can by including as many threats and removal cards as possible without sacrificing synergy but ultimately every deck will have at least one weakness otherwise it won’t do anything quite well.
The basic field you’ll be going for is huge pressure with stuff like Juggernaut or Steel Golem, which rarely hit directly but have their own benefits besides. While setting up air superiority with your Avenging Angel, Djinn of the Sands, or Blue Dragon. Make sure to never have more than 2 champions on the field until you go for game. Ping with burn damage and do a few small damaging gambits while drawing as hard as possible. You’re aiming to draw into one of the following 3 finishers: Frost Giant, Ice Drake, or Deadly Raid. At that point, rack up a field, hope they don’t take the 1-turn window to board wipe (bait one early if you can) and slap down your winning-move. If you fail, wait for a board wipe and start over and try again. You should see a finisher approximately every 7 cards, meaning your opening hand might even have one. This is important because if you fail, it’s just a short 8 cards from the opening hand to another one. This deck has so much draw that it’s easy to facilitate this gambit happening 3 times in one game. If not, you can likely just use gap-play just like Good.
Another weakness of this deck is the lack of silvers. Which can also be a strength since each card from hand is going to be worth more. However, Sage can draw pretty much as much as it wants and doesn’t care about losing a few silvers. The problem is that so few really fit with the deck that it makes it very difficult to squeeze them in. There also is enough multi-color room for Corpse Taker, so you do have that going for you, especially if it gets you back Frost Giant or Ice Drake and lets you go for game.
Legend for deck keypoints:
OPP – Counts as playable on the opponent’s turn. This is essential to keeping good rhythm and affecting game play every single turn. Doesn’t count re-usable.
DRW – Draws at least 2 cards, or is a draw engine. Required to keep playing cards every turn including on the opponent’s turn, especially if you’re board wiping.
OFF – In a bizarre twist of fate this includes anything the deck considers a main offensive play including freeze, burn, airborne, and so on. Getting any of these regardless of how you mix and match it will still be game-tilting.
CTL – Removal (Control). Spot-removal used to control threats on the field and filter the opponent’s best Champions away.
MVP – Don’t squander these as they’re your best cards.
Schrödinger's Wizard
Silver 0: 12
3 Forcemage Apprentice – A source of repeatable and easy burn which can sometimes be used to control smaller things. Great for dealing an easy 6 direct damage per round if not killed. OFF
3 Muse – Purely used to ambush in at the end of an opponent’s turn so you can start drawing more. OPPDRW
3 Amnesia – Mostly used for the draw 2 but is great to stop banishment costs for recycle as well as discard control since you use nothing from your opponent’s discard. This can hurt Evil and Wild really hard, or Good if they’re going for Angel of Mercy/Resurrection. OPPDRW
3 Corpse Taker (Evil) – Absolutely premium especially for getting back our freeze champions. Also controls the opponent’s discard like Amnesia.
Gold 1: 51
Removal: 21 3 Turn – Probably the best removal that works on your initiative in the game! Taking permanent control is way too excellent to pass up since that deprives the opponent of a gold and essentially gives you one in the process. Using it on the opponent’s turn is very unoptimal (though sometimes necessary) so it doesn’t get an OPP tag. CTL
3 Transform – Best spot-removal in the game bar-none. Banishes the unbanishable, ignored unbreakable, only gives the controller a wolf, has draw 2 just in case. Ridiculous. OPPDRWCTL
3 Wave of Transformation – Board-wipe that’s usable on the opponent’s turn. Creates a wolf-conomy (wolf economy) wherein players who know how to anticipate this board wipe can profit with more wolves. In this sage deck, we attack directly most of the time with burn, freeze, and airborne so we don’t care if the opponent gets wolves. OPPDRW
3 Zombie Apocalypse (Evil) – Same reason as Wave of Transformation. OPPDRW
3 Lying in Wait – Chosen for its status similarly to Transform, though it can only be used when you don’t have initiative. OPPDRWCTL
3 Time Bender – A great way to suddenly screw over an opponent who played a gold early on their turn, plus it’s re-usable! If it doesn’t die, Time Bender can cause serious problems for a player and works as a credible threat, drawing their removal cards away from key attackers. OPPCTL
3 Bitten (Evil) – Generic control but works best on the opponent’s turn with minimal downside. Most control will likely be played on the opponent’s turn. OPPDRWCTL
Offense: 27 3 Avenging Angel (Good) – Such a ridiculous air attacker that can go in anything. OFF
3 Djinn of the Sands – Another ridiculous air attacker that can go in anything, just with the potential to draw if you run out (you won’t ever) and much higher starting body. Doesn’t qualify for DRW tag. OFF
3 Deadly Raid – One of the game-ending gambit cards. MVPOPPDRW
3 Memory Spirit – Can deal decent airborne damage, net+1s an event from the discard (grab whatever you need, especially Deadly Raid), and has ambush. OFFOPPDRW
3 Frost Giant – One of the game-ending gambit cards. MVPOFF
3 Ice Drake – A game-ending gambit card with the added bonus of being set-up on the opponent’s turn so you can play something with blitz and add to your assault next turn. MVPOPPOFF
3 Juggernaut – Extremely threatening card that is hard to kill and gives a net+1 immediately when played. OFFDRW
3 Blue Dragon – Same as Juggernaut but even harder to stop from damaging plus a re-usable source of burn. Combos insanely with Forcemage Apprentice. OFF
3 Steel Golem – An optional blitzing threat that works well for immediate pressure and baiting board-wipes so you can use your big swingy turns more easily. OFF
Key Point stats
Keypoint totals:
OPP – 11 unique, 33 total cards. 55% of the deck works well on the opponent’s turn.
OFF – 9 unique, 27 total cards. 45% of the deck is used to deal damage.
DRW – 10 unique, 30 total cards. 50% of the deck can give net hand advantage after it’s played.
CTL – 5 unique, 15 total cards. 25% of the deck can filter the field and answer threats.
Intersection – 175% total, spillover (intersection) of 75%. Cards, on average have 1.7 of the deck’s key points on each card. Therefore each draw in this deck has a quality rating of 1.7.
Draw quality (+10). Reminder this is extra over the normal 100%.
Please note that card quality does not mean anything objective. It’s a subjective self-measure of how well the deck does what it says it wants to. It measures synergy.
Card Changes
Right now, there are only 6 cards (10% of the deck, or 1/10 draws) that can confound loyalty/ally.
Loyalty/Ally – 5 unique, 15 total cards. 25% of the deck requires at least two other Sages.
Removable – 2 unique, 6 total cards. 10% of the loyals can be removed if something better is used.
Confound – 4 unique, 12 total cards. 20% of the deck screws up 25% of the deck. Decently low screw rate but sometimes might need the 4 cards in hand to guarantee loyalty, however we have enough draw for it to be trivial.
Removable Cards:
Steel Golem. Removable if you can find better offense and control stacked into one. Just remember that this is a less killable Rampaging Wurm, so it’s pretty risky to remove but control might be favored in this spot as the deck has a lot of offense.
Time Bender. Basically the poor person’s High King/Dark Assassin but for Sage. Nevertheless, it does do its job, albeit at a less permanent value. Removable as long as more control replaces it.
Amnesia. It’s a pretty optional silver mostly here for the draw, banish control and a cool combo with Zombie Apocalypse. You can put anything that will fit here especially Keeper of Secrets. If you somehow get 6 more Evils, Thrasher Demon is something you can’t go wrong with as it usually draws gold advantage.
Lying in Wait. If you get rid of this, I highly suggest Stand Alone. This made it in since we usually go for draw or removal on the opponent’s turn anyway and try to play something like a threat or flash on our own turn. If you feel that there is a lack of board-wipes in your meta, go for Stand Alone as it will make keeping your progress easier and you can deal with whatever they have left usually.
Currently there are no replacement suggestions which is in large part due to the way the deck works. A base mono(ish) Sage deck is going to work essentially like this every time. There’s a permutation I didn’t go for that includes Sea Titan and Erase, which seeks to maximize as much gold advantage as possible. This one instead goes for the most consistent take on a swing-for-game win. There is a viable version that grind-games for as much gold advantage as possible that uses the aforementioned two cards as well as this deck’s Time Bender. Essentially baiting the opponent into playing champions and then punishing them while keeping its own advantage and field presence. It never hard-stops the opponent though and relies on hand removal (Psionic Attack, Thoughplucker) which this deck also cannot fit.
Enough about what the deck isn’t, here’s what it is: A crush-rushing aggro as hell Sage deck. I bet you didn’t see that one coming. We’re abusing the ridiculous library of offensive champions Sage has access to with the equally-stupid access to direct attacks and damage. While we’re at it, our hand will usually never go below 4, often staying around 6-7 in my experience. You can blindly play right into board wipes no problem as long as your champions are getting something extra when they come into play (flashes). You almost always have the right answer in any situation too. This deck seems to wreck the pants off of Good, go about even with my Evil and Wild decks. Whether that’s because I’ve built a good Sage deck or bad other decks I can’t really say but nevetheless this is your signature aggro Sage deck.
As discussed in the Sage alignment analysis, it can easily go toe-to toe with Good’s airborne, beats all other airborne, and beats the bodies of both Good and Evil. Its biggest problems are the lack of threat targets to stave off spot-removal of its attackers, lack of silvers for multi-play turns, and difficult time sometimes dealing with wide Token spam swings unless you run Lying in Wait and some more board-wipes.
Sage cards feature wizards, magic, crystals, ice, magic constructs and other arcane concepts. They control the most out of all alignments and have unblockable offensive habits. Using a combination of literally “unblockable” Champions, burn damage, freezing, and control, Sage can easily swing for game in very large chunks of damage albeit far between. Sage usually has an answer for any situation.
The biggest weakness of Sage is likely to be their lack of threats. While they can usually answer any threat or just work around it, Sage themselves generally do not have Champions that force action from the opponent, at least not on a spot-removal basis. This is because their Champions tend to be flashes rather than of the permanent type.
The few permanents they have, such as Steel Golem tend to be hard to remove anyway as they have Untargetable. Only about 5 Champions in Sage qualify (2 of which are hard to get rid of, but not impossible like Steel Golem and Sea Titan) and of those five, most hardly qualify as threats at all, usually just sporting big Airborne bodies or the ability to deal small burn damage. Their strength then, is in the ability to use lots of powerful flashes usually at Event-speed. Let’s take a look at the Power distribution for Sage.
Condition
Data
Sum gold Sage champion power
84
Avg gold Sage champion power
8.4
Sum silver Sage champion power
12
Avg silver Sage champion power
3
This table’s data shows that Sage is 84/116 (Wild total) or 72% of the max, making Sage the second-highest Power card pool available. Their average is also 8.4 which is very close to Wild’s 8.9, so their averages don’t even suffer degradation. With such high Power bodies, 5 very usable airborne, 3 very usable big bodies (10+), 3 freeze cards, and even a breakthrough, Sage adds a ton of very usable offensive Champions to its library of high-control and high-draw. With so many “clean” methods of offensive strategy, which to choose? Generally, you want to maximize as many of those as possible without sacrificing other things the alignment is good at.
Two champions were discounted as it confounds the data. Thought Plucker has 1 Power and Time Bender has 2 Power but operates more like a reusable Event, so it was left out. Forcemage Apprentice was ignored in Silvers as it has 0 Power and is only used for direct damage (of which it can reliably get 6 each round).
Despite the high average power of Sage Silver champions, they cannot do the same kinds of hurt as Evil due to the fact that Evil Silvers have better abilities. They can grow, break things that block them, are unbreakable, more of them have blitz, and can control discards. Remember that all of these statistics come with caveats. For example, Sage has some interesting dynamics in their Airborne champions, which warrants a comparison with Good’s.
Alignment
Sum
Avg
Max
Good
36 / 49
6.0 / 8.2
10 / 15
Sage
29 / 27
5.8 / 5.4
8 / 8
Evil
17 / 14
5.7 / 4.7
6 / 5
Wild
6 / 6
6.0 / 6.0
6 / 6
So can Sage do better than Good if they try for an Airborne strategy? From the data, it’s pretty obvious that Sage is better than Wild and Evil all around with airborne. However, it’s a bit fuzzy with its ability to compete with Good in the air. The max absolutely can’t, but if one tailors one’s Sage deck specifically to deal with Good, you can include a 6/8 to deal with their 6/8, an 8/8 for their 6/6, a 6/4 to their 5/6, and a 5/4 to their 4/5. All having superiority in these mappings (or at least a tie). Good still has a 10/15 and a 5/9 that you can’t answer. What I’m saying is that Winter Fairy can’t really compete with Good at all but the rest of your stuff can do same or better as long as you can kill Thundurus and Angelic Protector (good luck).
As Sage can clearly rival Good in the air, is better than anything but Wild on the ground, and can freeze anything it can’t pierce right through, it’s actually one of the stronger offensive strategies, requiring very little defense to make up for it.
Offense
Defensive strategies in Epic have to eventually service an offensive strategy and somehow deal 30 damage. Sage’s offense is already spectacular both on the ground and in the air, and anywhere it doesn’t presently have superiority. Therefore, it can be lax about defense. But it isn’t. Sage sports some pretty great defense.
Including some Untargetable champions as well as four things above 9 defense (a 10, 12, 13, and 14). Nine is a specific number in epic that refers to the best average, which is a 9/9 as well as two prominent kill events Hurricane and Drain Essence which deal 9 damage. Though two of those are actually immune to the targetting of Drain Essence anyway.
Condition
Data
Sum gold Sage champion defense
89
Avg gold Sage champion defense
8.9
Sum silver Sage champion defense
10
Avg silver Sage champion defense
2.5
While Sage’s Silver defense is so bad it rivals Evil, the Gold defense rivals Wild! With an 89/123 it has 72% of Wild’s 123 defense sum. The same as its offense ratio. So this means the average body of Sage is 8/9, while Wild is 9/9. Obviously these are rounded and both alignments can increase their average by omitting weaker cards. Just by running some of your best offensive strategies in Sage, you get good defenders for free. This means your biggest battle against things like Evil and Wild will be your ability to control the outliers. Evil is going to control you and you have to control Wild. In the air, you have to control Good’s outliers. This makes a powerful one-two punch of body-control for Sage.
Its control is serious business too. Transform is strictly better than Bitten, possibly better than Inner Demon (depending on whose turn you have to use it on) and also potentially better than Banishment (again depending on whose turn). The same goes for Wave of Transformation. It also has powerful hand control in the forms of Thought Plucker and Psionic Assault which can easily be 2 discards each, plus both can be recurring.
Time Bender is a recurring ability to banish your opponent’s best Silvers or bounce their Golds every turn. Sea Titan comes in with the same bounce, netting you gold advantage. Time Bender can boardwipe with bounce, netting either a loss or gain with gold depending on how you time it. Turn gives you control of something, and the conditions change based on whose turn it is but you can get it permanently, which is +1 gold use for you, -1 for the opponent if it’s permanent! Stand Alone is one of the best board wipes when you have supremacy, usually air supremacy. All of the Sage control is very high quality; they aren’t scrounging for effects here. If anything, it’s difficult to decide what not to put into a deck.
Defense
Best champions are always going to be partially subjective but after picking criteria, you can at least try to be impartial. So here is Djinn of the Sands and Ice Drake.
Sage’s best champions are very serious indeed. Djinn of the Sands is the best airborne+blitz in the game, sporting an 8/8 body immediately due to its counters, with the option to draw when you’re in desperate need. This can beat out any air champion besides Thundurus or Angelic Protector, the latter of which can’t kill Djinn either. It’s a truly horrific card that gets slapped down and immediately threatens 27% of your life total, then threatens to do it again next turn. For this reason, Djinn of the Sands has to be dealt with immediately. He’s not even color locked!
Ice Drake is a game winning card. With a body that goes toe-to-toe with the average Good air champion, he can ambushed in at the end of the opponent’s turn to freeze all their stuff from blocking you, then immediately be part of the upcoming mass-attack. Even if your opponent is playing some control, he’s a flash not a permanent and so it’s not possible to stop that freeze with control. The best an opponent can hope to do is board wipe since you telegraphed your big attack. Ceasefire was actually an annoying one to run into since they can stop the kill-shot and still draw. When you see Ice Drake in your hand, plan for your endgame.
Honorable mentions: Juggernaut and Frost Giant.
Juggernaut sports breakthrough+blitz which is practically unheard of. In fact, it’s the only champion in base set with this combination. That means it gets to throw 9 damage out immediately, which is 30% of someone’s life, and they can only mitigate it, not stop it. Since it’s unbreakable, it’s truly unstoppable too. Juggernaut is a threat of the highest caliber and must be responded to on the next turn or with banishment immediately. This is basically Djinn of the Sands-lite, as blitz+breakthrough is roughly equivalent to blitz+air most of the time. The draw a card tops the crazy cake with a fuck-you candle and since it’s the only part behind loyalty, it could technically go in non-Sage main decks. Frost Giant is sported here for the exact same reasons as the Ice Drake, except he isn’t color-locked at all, just doesn’t have as good a backup plan (airborne) and can only be used on your turn. Nevertheless, he wins games.
In summary, Sage has great offense, great defense, excellent control, sometimes higher quality cards than other alignments, what little burn it has is great, not extremely color locked, great draw, and basically great everything. Its only real weakness is a below average number of threats to draw required opponent control like a lightning rod, which means its attackers get hit with the control (which is not what you want), however some of its attackers are unbreakable or untargetable which makes up for it.
Sage generally has an answer for everything during play. Opponent plays a bunch of silvers? Make them discard so they can’t recover easily, skipping gold turns. Opponent can summon a bunch of huge things to block? Freeze them or burn directly. Opponent’s groundlings are too much to handle? Air superiority. Opponent has lots of blitz? You have lots of control that works well on their turn. Unbreakables? You have banish. There aren’t a lot of situations that can be drummed up that Sage can’t somehow escape if the player is good enough or conservative enough leading up to it.
Epic decks are not required to stay “pure” colored. So when you talk about having an “Evil” deck, what you must know is what it means to be Evil. Evil is all about messing with your opponent so that you can strike back. Weaken them, minimize their plays and use your own to make a stand. You must choose an offensive strategy in this game and there are only really a few: you can swing in the air, freeze, swing wide, simplify the game for opportunity swings, breakthrough (+blitz) on the ground, or burn.
Evil has a lot of options including burn (Soul Hunter and Blood Drinker), airborne (Succubus and Angel of Death), wide (Demon and Zombie token production), breakthrough (Trihorror), and control (myriad of kill cards). However, most of them would fail miserably as there are only 1-2 cards that can participate in the offensive strategy, leaving Evil high and dry most of the time and easily stopped. The strategies that they can most easily and consistently deploy are swinging wide and control. This actually makes for a deadly combination. Each time they use a spot-removal card, the field becomes filtered such that the opponent’s field is relatively weaker. Not just in number but in quality as well, since you as the Evil player want to target what hurts them the most.
As for the wide method, Evil excels at this. With good (and unbreakable) Silver champions as well as tons of token producers, it’s trivial to get this engine going. When attempting, you’ll want an easy way to get 3 Demons or 6 Zombies to try this. Force the opponent to block your unbreakables or big stuff, then attack individually with each token/silver to deal damage over what they can afford to block realistically (using groups to threaten kills where applicable). This method is extremely weak to board wipes. If a board wipe hits, it might not just stagnate your strategy but potentially force you to minus if you overextended to get your tokens and silvers out. In general, each gold is worth 5 zombies or 3 demons. In addition, if you used any of your spot-removal before the next board wipe, that also counts against cards that you minused. Be very aware of this as you play an Evil deck. Try a low-cost way of baiting out the first board wipe early. This can cause an opponent to waste a turn and leave you with free-reign to use your control and tokens for 7-8 turns if the game lasts that long.
However, you always have the ability to respond to threats. Don’t worry if an opponent board wipes after playing a threat and having it broken. This generally indicates that you have wrecked their main play and they’re doing damage control trying to drain your hand. That’s the moment you should immediately stop playing conservatively since you know they’ve used up a threat and a board wipe. Aggro hard.
Note about board wipes and this particular deck: This deck is not weak to board wipes even if its main offensive strategy can be. This is because of its ability to dodge AOEs. Any time you have lots of silvers with Blitz, you can easily recover from a just-played board wipe. The same goes for some golds with blitz and anything unbreakable on your turn. Trihorror also dodges board wipes due to its ability and Final Task can bring back Trihorror, unbreakable stuff or just whatever is needed. Corpse Taker can immediately return something after an opponent board wipes so you can just re-play it. If you play smart, growing your field back from a board wipe is trivial in the deck on purpose.
Legend for deck keypoints:
OPP – Counts as playable on the opponent’s turn. This is essential to keeping good rhythm and affecting game play every single turn. Doesn’t count re-usable.
DRW – Draws at least 2 cards, or is a draw engine. Required to keep playing cards every turn including on the opponent’s turn, especially if you’re board wiping.
TKN – Used for anything that helps you swing wide (or produce Tokens which can also swing wide). Main offensive strategy. Doesn’t necessarily only mean “Tokens”.
CTL – Control. Spot-removal used to control threats on the field and filter the opponent’s best Champions away.
MVP – Don’t squander these as they’re your best cards. Deck has more MVPs than usual due to specific plays.
Demon Nuke
Silver 0: 15
3 Corpse Taker – Dodge a board wipe or opponent’s control, re-use MVPs or Trihorror, situational use. MVP
3 Wither – Used to wipe out other token strategies and 18/22 or 82% of Silvers (includes Tokens), 6/51 or 12% of Golds cards in base set or 33% of Champions total. Can also screw discards. CTLOPP
3 Dark Knight – Great recovery from a board wipe and works for your own as well. Augment your wide swinging with Dark Knight but don’t play it too early. TKNOPP
3 Thrasher Demon – Recovery from a board wipe and always trades up. Used for aggro. TKN
3 Guilt Demon – Recovery from a board wipe and can screw the opponent’s discard so they can’t Recycle. Use that sparingly as you have Necromancer.TKNOPP
Gold 1: 45
Removal: 25 3 Murderous Necromancer – Major threat the opponent must immediately kill. Provides a turn of good defense and repeated kills. Can help with offense potentially. TKNCTL
3 Medusa – Has a blocking body that can ambush for control too. One of the best cards for control.OPPCTL
3 Dark Assassin – Yet another threat like Murderous Necromancer but can be used immediately and doubles as an attacker. CTL
2 Angel of Death – Great AOE if you want and potential Air damage.
3 Apocalypse – Run mostly for the draw but the deck must have AOEs to gain advantage sometimes. Many other decks will out-body you, hence the large amount of board wipes. OPPDRW
2 Drain Essence – Kill spell for all the Silvers in the game and 37/51 or 72% of Golds plus the life gain rivaling that of Inner Peace makes for an excellent poptart. This goes doubly well with your other control cards which will naturally filter out anything that has 10+ defense. OPPCTL
3 Bitten – Generic control but works best on the opponent’s turn unlike Inner Demon. Most control will likely be played on the opponent’s turn. OPPDRWCTL
3 Inheritance of the Meek (Good) – AOE specifically for banishing out anything that isn’t a token, letting you often swing for game. This results in Inheritance of the Meek often being your endgame solution if drawn. Note: You can board wipe with this during an opponent’s turn!OPPDRWTKNCTL
3 Zombie Apocalypse – A great AOE to play when your token population is low, since you don’t get anything back for them. Works well at converting used up Silvers and Trihorror into masses of Zombies. If you have Wither in hand, you can disgustingly wipe out the opponent’s new toys as well. Note: You can board wipe with this during an opponent’s turn! OPPDRWTKN
Offense: 14 3 Trihorror – I would call this “MVP” if it wasn’t usable basically any time. Trihorror is something you actually want to slap down ASAP since it has breakthrough and you lose nothing if it dies, in fact he just splits into equal power and defense worth of Demons. This card is ridiculous and can be used with Final Task for stupidity as well as Corpse Taker to frustrate an opponent. This is also the best body in Evil. TKN
3 Infernal Gatekeeper – Main token generator. Be careful when you play this card as it’s usually a huge target the moment it hits the field. Try to ally every single turn, burning your health with you. If possible, resurrect a Righteous champion or use Drain Essence to replenish this HP. Reconsider if you mulligan 4+ cards in your opening hand how many you can afford to get. Generally rule of thumb is no more than 4 Demons from one Infernal Gatekeeper or you tend to suffer greatly during boardwipe. However, Inheritance of the Meek can turn extras into game. TKNMVP
2 Demon Breach – Used seldomly unless a board wipe was just played. Demon Breach is great on your own turn but only works on an opponent’s if you have no need for draw or have no control cards. On your turn, Demon Breach explodes into 3 demons and can come back any time you have a spare gold laying around to help pay for loyalty and re-play it. OPPTKN
3 The Risen – Can swing for game if there’s a clear field from an AOE set up previous turn. Also useful for a fast 9 extra damage to the wide swinging wall of tokens that turn, plus the extra power for everything else. Doesn’t count as OPP since it’s very bad at that moment. TKNDRW
3 Necromancer Lord – Most important card in the deck and can be used to recover from a board wipe. Use this sparingly and smartly and you can easily go for game. Remember the types of offense strategies (burn/freeze/air/breakthrough) and try those, or just go for blitz. Proper use of this requires dodging opponent’s Recycle attempts and knowing the better cards in the game. MVP
Utility: 6 3 Thought Plucker (Sage) – Pure draw and hand filtering engine. OPPDRW
3 Final Task – Combos with Trihorror effectively and useful with many others. Grab Corpse Taker on an opponent’s turn, then use Taker’s ability to grab a Champion you can permanently call next turn. Use it on an unbreakable. Use on Necromancer Lord to get a permanent Champion of your opponent’s instead of temporary. Thought Plucker on your turn gives you a total of Draw 2 Discard 2(opponent) which is far more than Final Task’s alternate effect. Murderous Necromancer for 3 zombies immediately and a kill. Angel of Death for an AOE with wings. Then there are a myriad of opponent’s cards!. OPPDRW
Key Point stats
Keypoint totals:
OPP – 12 unique, 34 total cards. 57% of the deck works well on the opponent’s turn.
TKN – 10 unique, 29 total cards. 48% of the deck swings wide.
DRW – 7 unique, 21 total cards. 35% of the deck can give net hand advantage after it’s played.
CTL – 7 unique, 20 total cards. 33% of the deck can filter the field and answer threats.
Intersection – 173% total, spillover (intersection) of 73%. Cards, on average have 1.7 of the deck’s key points on each card. Therefore each draw in this deck has a quality rating of 1.7.
Draw quality (+10). Reminder this is extra over the normal 100%.
Please note that card quality does not mean anything objective. It’s a subjective self-measure of how well the deck does what it says it wants to. It measures synergy.
Card Changes
Right now, there are only 6 cards (10% of the deck, or 1/10 draws) that can confound loyalty/ally.
Loyalty/Ally – 6 unique, 17 total cards. 28% of the deck requires at least two other Evils.
Removable – 1 unique, 2 total cards. 5% of the loyals can be removed if something better is used.
Confound – 2 unique, 6 total cards. 10% of the deck screws up 28% of the deck. Low screw rate and basically only ever need the 3 minimum cards to activate a loyalty.
Removable Cards:
Angel of Death. This card is great but basically exists for you to dodge your own AOE as explained before and then get an extra attacker out of it. Not quite synergistic and can be replaced by Avenging Angel (Good).
Drain Essence. It’s pretty extra in this deck but works well for the purposes of healing. If you want something else that can help you stay alive while benefiting from existing control, try Drinker of Blood which also dodges your AOEs.
Demon Breach. While it’s part of your attacking strategy, Demon Breach is just one of those cards that can easily be changed into something else without much loss occurring at all. It’s helpful but can sometimes fall flat. For something that really helps you swing wide, try Deadly Raid (Sage).
Wither. Can be removed for the final copies of Deadly Raid and Avenging Angel if you don’t have all three of each in. Keep any remaining copies.
This is also covered in “Deck Stats” but here is a comprehensive list of the major cards recommended for this deck if you swap anything (within Base Set).
Listed in order of desirability. Check below for what to replace and the updated Deck Stats.
Replace:
Angel of Death
Wither
Deck Stats:
No positive change. Purely for aggro and protection.
Small amount of control omitted.
Replace:
Demon Breach
Wither
Deck Stats:
OPP +5% (both are bad on opponent’s turn but this one has draw)
DRW +5%
Small amount of Control omitted.
Overall +10% (change to intersection/card quality)
Replace:
Drain Essence
Wither
Deck Stats:
OPP -3%
CTL -3%
Overall -6% (change to intersection/card quality)
Change is purely for more bodies, more AOE dodge and draining/direct damage which is consistent
Stats with All Changes
OPP – 59% of the deck works well on the opponent’s turn.
TKN – 48% of the deck swings wide.
DRW – 40% of the deck can give net hand advantage after it’s played.
CTL – 30% of the deck can filter the field and answer threats.
Intersection – 177% total, spillover (intersection) of 77%. Cards, on average have 1.8 of the deck’s key points on each card. Therefore each draw in this deck has a quality rating of 1.8.
Draw quality (+10). Reminder this is extra over the normal 100%.
New loyalty problems:
Loyalty/Ally – 5 unique, 15 total cards. 25% of the deck requires at least two other Evils.
Confound – 4 unique, 12 total cards. 20% of the deck screws up 25% of the deck. Not a horrible screw rate, about a comfortable need of 4 cards in hand for Loyalty.
Recommended change method for maximum deck efficacy. No efficiency changed, only card quality.
Stats with 2 Changes
Using only Avenging Angel and Deadly Raid, the stats become the following:
OPP – 62% of the deck works well on the opponent’s turn.
TKN – 48% of the deck swings wide.
DRW – 40% of the deck can give net hand advantage after it’s played.
CTL – 33% of the deck can filter the field and answer threats.
Intersection – 183% total, spillover (intersection) of 83%. Cards, on average have 1.8 of the deck’s key points on each card. Therefore each draw in this deck has a quality rating of 1.8.
Draw quality (+10). Reminder this is extra over the normal 100%.
New loyalty problems:
Loyalty/Ally – 5 unique, 15 total cards. 25% of the deck requires at least two other Evils.
Confound – 4 unique, 12 total cards. 20% of the deck screws up 25% of the deck. Not a horrible screw rate, about a comfortable need of 4 cards in hand for Loyalty.
Recommended change for less efficacy but the same efficiency as the above with slightly less card quality than the default.
This deck tends to be very fun to play for someone who enjoys field control and tempo-geared decks. Your own champions are about middle-power when they come down and you can filter your opponent down to that level with control cards. You’ll basically never run out of hand either. Always having a board wipe in hand for the right moment is crucial in Epic and this Evil deck has it in spades. Being able to answer any threat feels so safe and comfy. Evil really lacks decent bodies and hardcore Demon support in the base set but we make due with what we have here. Using a few “go for game” cards like Inheritance of the Meet, The Risen, or Deadly Raid can make the game end very quickly and suddenly if the opponent is not prepared.
This deck is easily frustrated by anything that can pull out a lot of healing while successfully fogging it. Thankfully, it’s difficult to actually pull something like that off against this deck. It can also become very easily frustrated by human token spam as it lacks much air or breakthrough.
Evil cards feature many demons, vampires, undead and horror-centric concepts. Their overall theme is to control as hard as possible while punishing over-extension and going in for medium damage. The alignment tends to rely heavily on strong but mass-produced tokens and Blitz on the ground for damage.
Most of their champions are either mass-produced 2/2 Zombies or 4/4 Demons; with several blitzy, unbreakable ground attackers and a couple notable airborne. This leads Evil to rely very heavily on its control mechanics to set the pace of the game and get in damage. It has an easy time responding to any threat card.
Most of Evil’s individual damage attempts are rather weak. Let me illustrate this:
Condition
Data
Sum gold Evil champion power
66
Avg gold Evil champion power
6
Sum silver Evil champion power
18
Avg silver Evil champion power
3
The data in this table shows that Evil gold champions are about the same as Good champions on average, even though there are less Evils. Their averages in both sections are a bit higher when discounting zombie tokens and anything that produces zombie tokens as these are definitely the weakest point in Evil. Don’t count too much on zombies unless you can get a lot of them immediately (Murderous Necromancer/The Risen). They essentially exist to block non-breakthrough champions and render them useless.
*One champion was discounted as it confounds the data. Necromancer Lord has 1 Power but operates more like a reusable Event, so it was left out. Thrasher Demon was counted as a 3/3 for Silvers since it should always attack immediately.
What might be surprising is the relative high power of your Silvers. Most of the time, Silvers are 1/3 or less the power of a Gold champion but in Evil, this is not the case. They are usually around 1/2 or better depending on what you choose to run in your deck. Note that for this data, the Zombie and Demon tokens were counted in Silver simply because Evil uses them as an offensive method
The clearest strategy in Evil seems to be pumping out a lot of little guys while popping your opponent’s big ground stuff so they have a clear field. It’s nearly trivial for you to play a kill every single turn on your opponent’s turn, then drop multiple Demons/Zombies/Silvers and just go to town. This also leaves you with a decent defense wall and many combinations of blocking to get efficient block-kills. Opponents will have to rely on board wipes to start gaining their own advantage while denying yours. “Swinging wide” is actually a completely viable strategy in Epic, it’s usually just not done since board wipes make that very costly. This will be Evil’s greatest strength and weakness.
While their average gold champion power is high, it’s pretty clear that their total is nowhere near Wild’s 116, giving them a ratio of 57%, the lowest in base set. Though it’s not that far off from Good—only 5%.
Offense
Defensive strategies in Epic have to eventually service an offensive strategy and somehow deal 30 damage. Evil’s offense is nothing to write home about, so it needs to have decent defense or its bodies on the field aren’t going to be very good for much at all. Defense can be serviceable in Evil if used to create a massive token wall or use large champions to block off attacks while throwing kill cards at anything it can’t block. In Evil there are 6 reliable single-target kills and 4 board wipes.
With 30 possible copies of something that can kill, you won’t have any trouble figuring out how to stall and build your army, then push the red button to start over. With so many threat cards in Evil (5) you can easily make a deck that forces opponents to run dry while you’re controlling, setting up a wall and then finally going for offense. You could even grind-game using the same tactics.
Condition
Data
Sum gold Evil champion defense
65
Avg gold Evil champion defense
5.9
Sum silver Evil champion defense
14
Avg silver Evil champion defense
2.3
Evil clearly has the worst defense in base set by far. It’s significantly lower than Good and Sage, having only 53% of Wild’s 123 defense sum. That’s easily 20% less than the others and that’s a major problem. The average body on an evil gold is 6/6 and the average silver is 3/2. Obviously all these numbers can slightly increase if you run as many Demon tokens as possible and try not to use, for example Corpse Taker, as an attacker or blocker.
So how do you make these bad Evil bodies on the field workable? The simplest solution is to exploit their gratuitous number of board wipes and kill cards to “filter” the game down for your opponent. For example, if you have a few of your average Evils out (6/6) and a few average Wilds out (9/9), what you can do is tilt the average downward by killing their best stuff (Burrowing Wurm, Kong, etc.) and leaving the weaklings to get trampled by your army. Then you can just expoit the huge number of Demons and Zombies to swing wide and block wide—even blocking for a kill sometimes.
Defense
Once again, “best card” is always going to be a difficult concept to define in a rigorous way. As usual, I’m going with how these cards compare with other cards that do the same job in any alignment. So I present Necromancer Lord and Trihorror.
Evil’s best cards aren’t necessarily in the same candle light as other alignments but they are pretty amazing. Necromancer Lord is a very fast unit that can grab the best units in the game, so it has to be mentioned. I don’t know of any way to construct a working Evil deck without Necromancer Lord since you can get anything you’ve killed (or that has died) which is quite a lot. Take care to use this ability to deny Recycle as well, which can deny your ability right back. As for Trihorror, I’m not saying it should go in every Evil deck but I am saying it’s one of their best cards and outclasses several other huge breakthroughs. A Burrowing Worm with nothing to lose when it dies, ouch. One of the terrifying things you can do with this is Final Task it out for 12/12 blitz+breakthrough and then when it dies at the end of turn you get three 4/4 Demons. Using this in combination with Infernal Gatekeeper is a road to a demon army. The best part is how it survives board wipes.
Honorable mention: Infernal Gatekeeper.
Infernal Gatekeeper just dumps Demons on the field everywhere. Normally, you would be wary of losing 1 life for some trash tokens that can easily be replaced but in a color that has life drain, Infernal Gatekeeper works really well, especially for Demon army decks. At first, it’s a purely defensive card, allowing you to tank the average Wild if you can throw a zombie in there and then pump Demons for a really wide swing.
Overall, despite Good being considered the weakest alignment in base by most fans, Evil is skirting the line pretty close. It lacks any usable form of body on average so most of its strategies rely on the opponent’s champions being targetable and breakable. Some won’t be, so Evil has to come up with some creative ways to remove a lot of badass Sage cards. What’s great about Evil is how it can reach outside its own deck to pull more offense and defense out of the aether with the mass of tokens.
It can easily generate them three at a time, so with Zombies you’re talking 6/6 getting added to the field and with Demons that’s 12/12 (that Trihorror makes more sense to you now I bet). The best part being that they’re split up so if you want, you can attack in a group as though it were one big creature all along!
While Evil’s negative points are really negative, its good points are really good. This alignment has the most kill I’ve seen in any of them and can easily and consistently board wipe and spot-remove all day. Since it can just cripple any deck that relies on permanents over flashes, Evil tends to hamstring winning points while gathering up its own. This makes it decided not the weakest alignment in base set, nor even close despite its low body numbers.
In Epic, you really need to choose one of only a few offensive methods to get in your damage and win. You can go with Airborne, Breakthrough, burn, swing wide, control, or freeze. This deck chooses to exploit the fact that Good has the best airbornes in Epic and use this fact to its advantage to beat out other Airborne strategies, as well as fogging direct damage (and some Breakthrough) with life gain. It can’t really do anything about freezing except for Ceasefire. Make sure you’re wiping the field regularly to stop their damage buildup on the ground from getting too intense.
Common Plays
Use your cards listed in the decklist’s Offense category, to swing in the air, dealing damage. Here’s how you should do this in general, based on a few factors:
Always swing if the opponent has no blockers in the air. Use just one of your champions to attack if you think you might have to block.
With Gold Dragon, swinging into air blockers is fine if you can gain some health back. Try to keep the Dragon up so you don’t lose it.
Ambush in Angelic Protector (or use Brave Squire) on your own turn if they block your air and it would die. It now won’t die.
Don’t try to use removal when attacking as a group. You’ll still be counted as blocked. Use group attacks if you need to reduce the opponent’s opportunities to play gold cards.
Always use “bait” cards before your MVPs. Bait is stuff that the opponent must kill such as High King, or else they’re going to eat dirt every turn.
Thundurus should usually be played before Gold Dragon. It’s bait, Gold has blitz anyway, Thundurus can block for a turn, and it doesn’t matter if it’s telegraphed since Gold Dragon is worth more to you.
Always try to pair Lord of the Arena with Faithful Pegasus over other humans since it gives you 13 damage in the air.
High King and other removal should always target firstly, threats, then air blockers, then other things. Threats are other things similar to High King that force you to respond or the opponent will gain too much ground.
Use Brave Squire on your air attacks when you see an opening, since you get the protection and the (practically) double damage.
Ceasefire is best used when an opponent starts with their weakest champion.
Offense Priority
Play attackers in this order of priority:
Angel of Light/MVP if you will die without gaining the life.
Angel of Mercy if an MVP is dead (grabbing in Offense Priority order)
Thundurus if playing Gold Dragon next turn, or needing bait for either MVP
MVP (Avenging Angel and Gold Dragon)
Angelic Protector if an MVP is attacking on your turn. Or if one is out and it’s the opponent’s turn and they are attacking.
Angel of Light if you have nothing else.
Angel of Mercy if you have nothing else (though at this point, you can probably resurrect any of the above).
Opponent Turn Priority
General case for how to spend your gold on an opponent’s turn:
Inner Peace/Angel of Light if you will die without the life gain.
Stand Alone if you will die without it or as “nuke timing” to open up a blitz attack on your next turn
Ceasefire if the opponent will attack with a total of 10+ damage outside their first attack, especially if they attack with their weakest first.
Banishment if something must die on the opponent’s turn to live/protect something, etc.
Ambush blocker if you will die without it. (Choose the least valuable)
Resurrection/Angel of Mercy if an MVP is dead or will die
Brave Squire/Angelic Protector if an MVP, Thundurus or Angel of Mercy (with those targets) might die
Noble Unicorn
Use various Draw 2 effects if your own hand is 3 or less.
Ambush in an Attacker setup (see Offensive Priority)
Courageous Soul to set up a decent attacking turn.
Other things (Inner Peace because you want to, Angel of Light because why not, etc.)
Legend for deck keypoints:
OPP – Counts as playable on the opponent’s turn. This is essential to keeping good rhythm and affecting game play every single turn. Doesn’t count re-usable.
AIR – Airborne, as is required for this strategy to work. Higher number means the deck has lower overall Power but is more consistent.
DRW – Draws at least 2 cards, or is a draw engine. Required to keep playing cards every turn including on the opponent’s turn, especially if you’re board wiping.
PRO – Protection. This could be anything from unbreakable to untargetable but basically means this unit provides or has protection from enemy cards so that the main strategy won’t crumble.
MVP – Don’t squander these as they’re your best cards.
GOOD Stuff
Silver 0: 12
3 Faithful Pegasus – Replaces itself and can make our non-airborne into fliers so they aren’t uselessly sitting on the ground. Very devastating with Lord of the Arena. AIR
3 Courageous Soul – Playable on opponent’s turn. The buff still happens even if he’s blocked. Can boost our air army in case we get two or more at a time. OPP
3 Brave Squire – Use this to go all-in with an attack, knowing it can’t die, or use it to protect your best cards and block. PROOPP
3 Priestess of Angeline – Life gain every time you play a card and it threatens to block when you’ve used it three times. Just using it three times is sufficient but more is better.
Gold 1: 48
Removal: 18 3 High King – Repeated use of banishment. Using it on the opponent’s turn to react to new things can cause it to be destroyed, so normally you would hold this until needed and only snipe things you can see.
3 Palace Guard – More High King but has a blocker body and can be used with Faithful Pegasus.
3 Banishment – More spot-removal but draws a card if played on your own turn. OPP
3 Lord of the Arena – At first it may seem like an attacker but really it’s a kill spell. Since it’s opponent’s choice, it’s less good than High King but it can be used with Faithful Pegasus for massive damage.
3 Divine Judgment – AOE removal, generally one of the things you wait on to start the field over. Your High Kings and Thundurus will be left alone! OPPDRW
3 Stand Alone (Sage) – Chosen for its specific help to this deck, allowing a selective AOE. Using this while you both have airborne is probably a bad idea. 10% of the deck is AOEs so you get these on average right when you need them. OPPDRW
Offense: 18 3 Thundurus – There’s no synergy in this deck for Thundurus in this version. However, he makes a great unbanishable for your Divine Judgments and can tank just about anything in the air and on the ground. Thundurus is excellent when paired with Gold Dragon and just fine as a single attacker in the air on his own. AIR
3 Gold Dragon – Makes you practically invincible if more than it attacks. Makes you definitely invincible if attacking with Thundurus. AIRMVP
3 Angel of Light – Basically Inner Peace with wings. Play this as an ambush at the end of an opponent’s turn or when you can block safely for 6. AIROPP
3 Avenging Angel – A card so good it can go in almost any Epic deck. This card makes you invincible and practically has to be responded to on the turn it’s played. AIRPROMVP
3 Angelic Protector – Use this card on the opponent’s turn (usually) to stop target/break of your MVPs or your attackers, then it starts becoming an attacker. AIRPROOPP
3 Angel of Mercy – The most disgusting protection. Since you can ambush this in on the opponent’s turn, you can basically just let stuff die and then bring it back. Used on MVPs or attackers. AIRPROOPP
Utility/Defense: 12 3 Noble Unicorn – Draw engine. Bring it out on the opponent’s turn at all costs so you can get the benefits immediately. OPPDRW
3 Inner Peace – Card is ridiculous once you set up a couple blockers. You can get this back over and over and spam it on the opponent’s turn. Potentially removable for Wave of Transformation or Memory Spirit. It’s in this version since it serves as a buffer and OPP. OPP
3 Ceasefire – A very unpopular card that gives mad draw while essentially skipping the rest of the opponent’s turn. Be sure to get a blocker ready to go since you have to throw one under the bus. OPPDRWPRO
3 Resurrection – Less powerful than Angel of Mercy but essentially gives us more copies of her effect. Be sure you save your gold for this if you know you need protection on an MVP. OPPPRODRW
Key Point stats
Keypoint totals:
OPP – 12 unique, 36 total cards. 60% of the deck works on the opponent’s turn.
AIR – 7 unique, 21 total cards. 35% of the deck swings in the air.
DRW – 5 unique, 15 total cards. 25% of the deck can give net hand advantage after it’s played.
PRO – 6 unique, 18 total cards. 30% of the deck can protect you or your cards.
Intersection – 150% total, spillover (intersection) of 50%. Cards, on average have 1.5 of the deck’s key points on each card. Therefore each draw in this deck has a quality rating of 1.5. This could potentially be increased by using some Sage cards but would reduce ally and loyalty probabilities.
Draw quality (+10). Reminder this is extra over the normal 100%.
Please note that card quality does not mean anything objective. It’s a subjective self-measure of how well the deck does what it says it wants to. It measures synergy.
Card Changes
Right now, there are only 3 cards (5% of the deck, or 1/20 draws) that can confound loyalty/ally. Using Memory Spirit which is the first choice, would drop that to 1/10 cards but may not be so bad.
Loyalty/Ally – 6 uniques, 18 total cards. 30% of the deck requires at least two other Goods.
Removable – 3 uniques, 9 total cards. 15% of the loyals can be removed if something better is used.
Confound – 1 unique, 3 total cards. 5% of the deck screws up 30% of the deck. Very low screw rate and basically only ever need the 3 minimum cards to activate a loyalty.
Removable Cards:
Inner Peace. I mentioned this in the deck list but Inner Peace can be removed for something like Memory Spirit (Sage) which hits AIR, OPP and can re-use events such as Ceasefire or your AOEs. Right now, it’s being used to repeatedly trigger Loyalty/Ally over and over, so this may be the last one you attempt to remove. If it does get removed and you want something similar in its place, go for Mighty Blow (Wild, DRW, OPP) which has one keypoint over Inner Peace and can slap down at the right moment to win the game 2 turns earlier. When the opponent is at 14-16 life and you have one attacker, Mighty Blow is excellent. Its uses are going to be mostly limited to openings that you have created, however.
Palace Guard. Basically just here for the body. It’s a great card but if an attacker such as Winter Fairy (Sage, AIR, DRW) goes here, it can give draw. The deck has a lot of removal as-is.
Lord of the Arena. It’s re-usable Palace Guard so you should consider keeping this over it if you remove only one. And definitely remove this before Inner Peace as it’s one of the repeated-use ally cards. While its 2-card combo is really amazing, Lord of the Area is basically just removal you have to work for and is worse than High King most of the time. Though it and Palace Guard are both good blockers and that’s why both are still in the deck. Possibly remove for Winter Fairy, Wave of Transformation, or Kong if you really want something beefy that can kill. I recommend keeping Lord over Kong since it has blitz. Try to replace with something that has ambush or blitz and can be a legit attacker (specifically, Memory Spirit if you don’t have it in already).
Priestess of Angeline. She’s really just here for the extra life on top of Angel of Light and Inner Peace. If you do replace cards such that you now have at least 6 Sage that cost gold, you can run three Muse (Sage, OPP, DRW) over Priestess of Angeline.
This is also covered in “Deck Stats” but here is a comprehensive list of the major cards recommended for this deck if you swap anything (within Base Set).
Listed in order of desirability. Check below for what to replace and the updated Deck Stats.
Replace:
Palace Guard
Lord of the Arena
Deck Stats:
OPP +5%
AIR +5%
Overall +10% (change to intersection/card quality)
Replace (only if using 6 gold Sage):
Priestess of Angeline
Deck Stats:
OPP +5%
DRW +5%
Overall +10% (change to intersection/card quality)
Replace:
Palace Guard
Lord of the Arena
Consider Memory Spirit and Muse first!
Deck Stats:
AIR +5%
DRW +5%
Overall +10% (change to intersection/card quality)
Stats with All Changes
OPP – 14 unique, 42 total cards. 70% of the deck works on the opponent’s turn.
AIR – 9 unique, 27 total cards. 45% of the deck swings in the air.
DRW – 7 unique, 21 total cards. 35% of the deck can give net hand advantage after it’s played.
PRO – 6 unique, 18 total cards. 30% of the deck can protect you or your cards.
Intersection – 180% total, spillover (intersection) of 80%. Cards, on average have 1.8 of the deck’s key points on each card. Therefore each draw in this deck has a quality rating of 1.8.
Draw quality (+10). Reminder this is extra over the normal 100%.
New loyalty problems:
Loyalty/Ally – 4 uniques, 12 total cards. 20% of the deck requires at least two other Goods.
Confound – 4 unique, 12 total cards. 20% of the deck screws up 20% of the deck. Basically, you’ll need 4 cards in hand most of the time to activate one Loyalty.
Reminder that technically Muse doesn’t cause a problem for the Ally cards, only Loyals, so this math is slightly off (looks worse than it is).
Recommended change method for maximum deck efficacy. Less efficient method, but not prohibitively.
Stats with 2 Changes
Using only the first two changes, Memory Spirit and Muse, the stats become the following:
OPP – 15 unique, 45 total cards. 70% of the deck works on the opponent’s turn.
AIR – 8 unique, 24 total cards. 40% of the deck swings in the air.
DRW – 6 unique, 18 total cards. 30% of the deck can give net hand advantage after it’s played.
PRO – 6 unique, 18 total cards. 30% of the deck can protect you or your cards.
Intersection – 170% total, spillover (intersection) of 70%. Cards, on average have 1.7 of the deck’s key points on each card. Therefore each draw in this deck has a quality rating of 1.7.
Draw quality (+10). Reminder this is extra over the normal 100%.
New loyalty problems:
Loyalty/Ally – 4 uniques, 12 total cards. 20% of the deck requires at least two other Goods.
Confound – 3 unique, 9 total cards. 15% of the deck screws up 20% of the deck. You’ll need 4 in hand for some loyalties but not all of them.
Reminder that technically Muse doesn’t cause a problem for the Ally cards, only Loyals, so this math is slightly off (looks worse than it is).
Recommended change if you prefer a middle ground on extra efficacy while only giving up a small amount of efficiency.
My final thoughts on this deck are that it’s very fun to play and when it “goes off” it’s almost sure to win. It has to go off, though. Most specifically, the trends I notice winning the most games are the following:
Using at least 1 MVP for at least 3 of the game’s turns total
Nuking for at least +3
Drawing at least 6 extra cards off things like Noble Unicorn
Using Thundurus’ ability ever
Attacking in the air 5 turns
If you can do any of these, you usually end up winning. If you can do several, you can significantly increase the chances that you win. Though Good is widely regarded as the worst pure alignment in base set (and I can agree with that), the problems it has can be mitigated if constructed and played correctly. This is my attempt to put it as on-par with other decks as possible. By giving it minimum 1.5 card quality, it means the draws in this deck go significantly farther than a generic Good deck. At the 1.7 modified version (which I prefer, actually) the card quality is so significant that you can get 2-3 of those winning points bare minimum every game.
Its goals seem good enough that the card quality is leaning more toward an objective measure of how good it is, rather than a pure synergy assessment. Swinging in the air, drawing cards and playing on the opponent’s turns are some of the most fundamentally necessary things in all of Epic. Protecting the ability to swing in the air is very nearly the same as doing more of it as well.


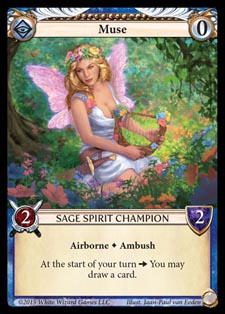
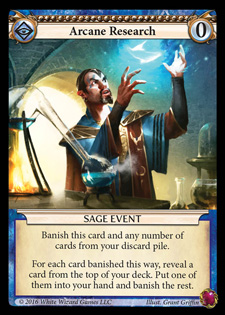
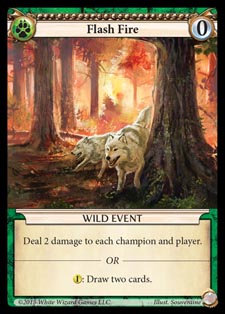
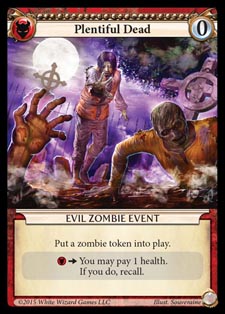
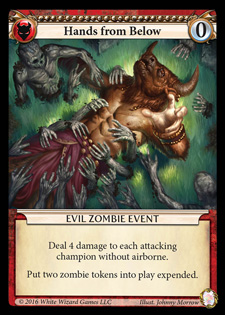
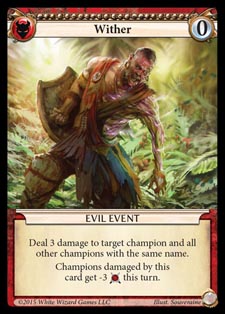


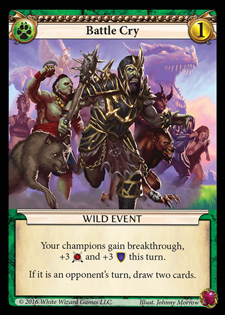
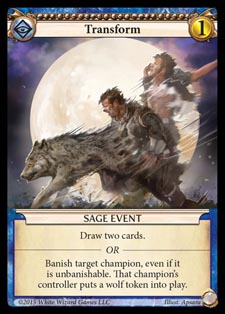
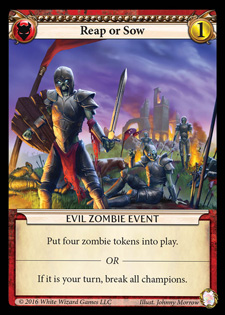
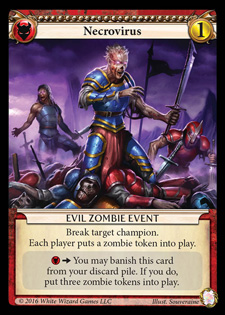
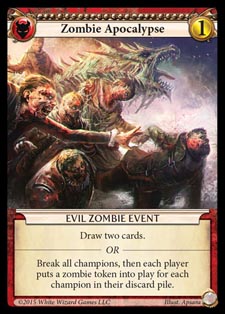
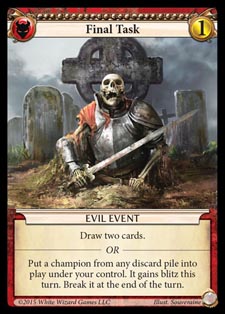
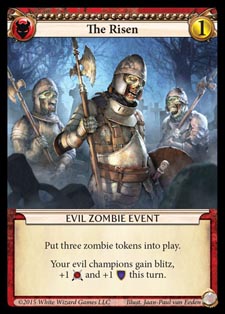

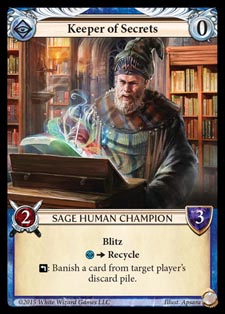
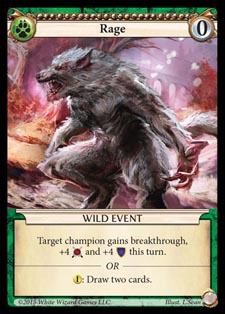
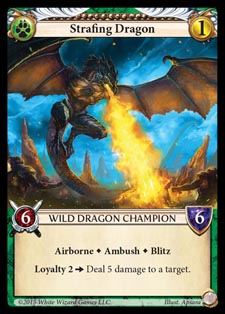

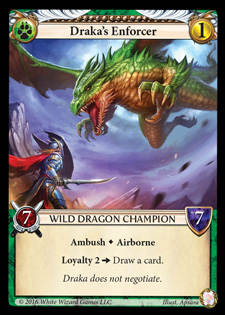
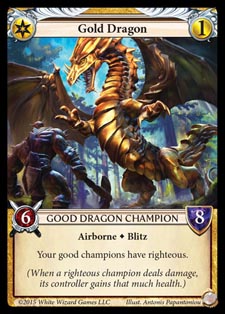
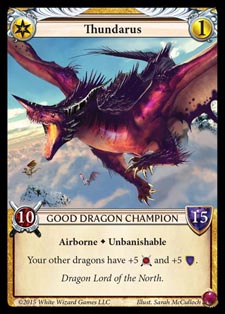
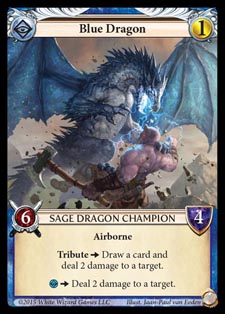
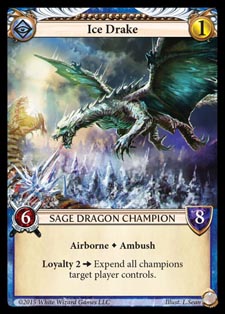
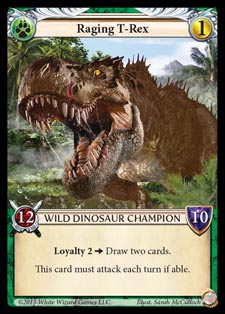
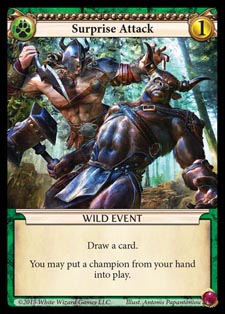
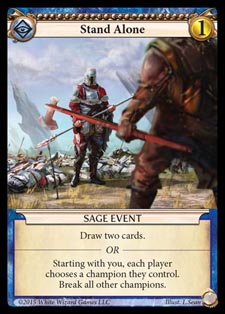
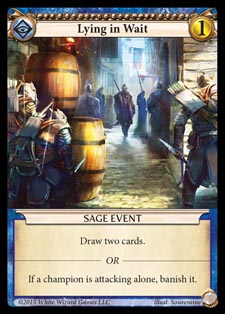
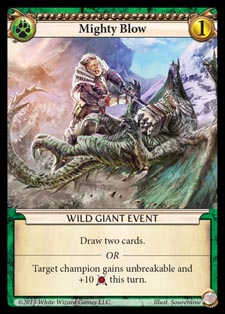

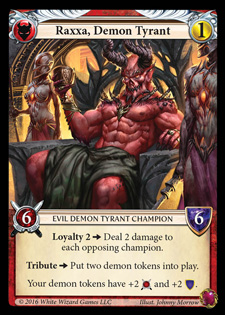
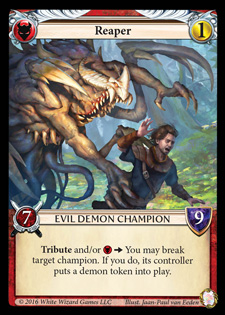
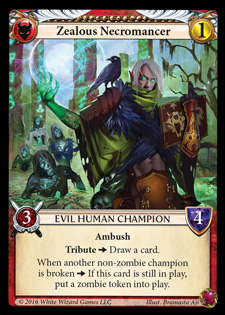
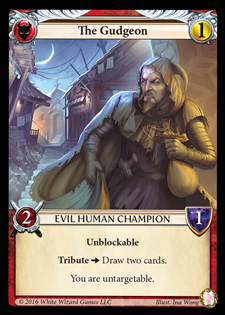


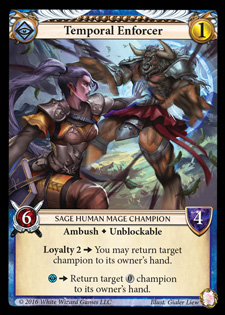
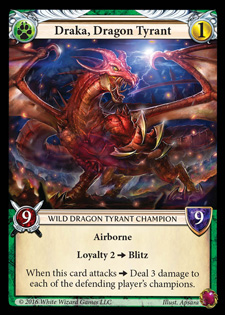
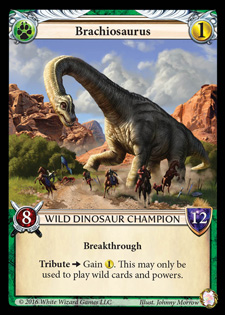


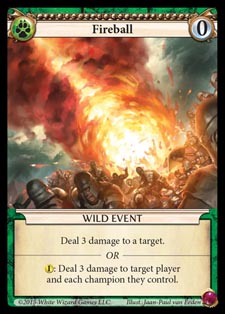

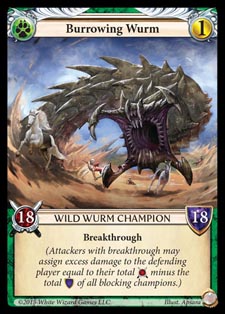
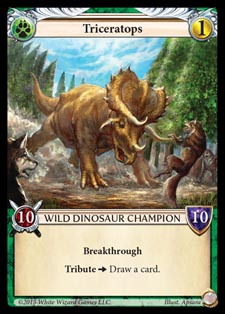
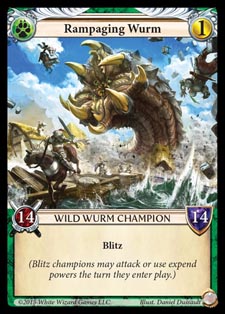

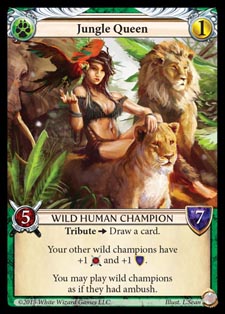
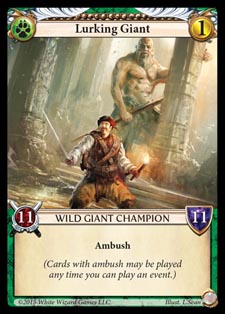
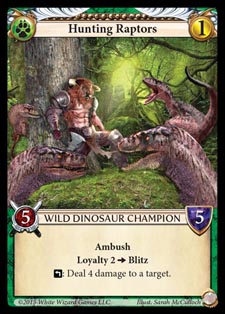
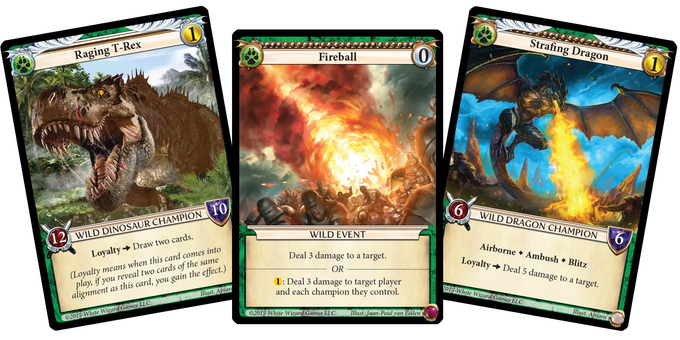
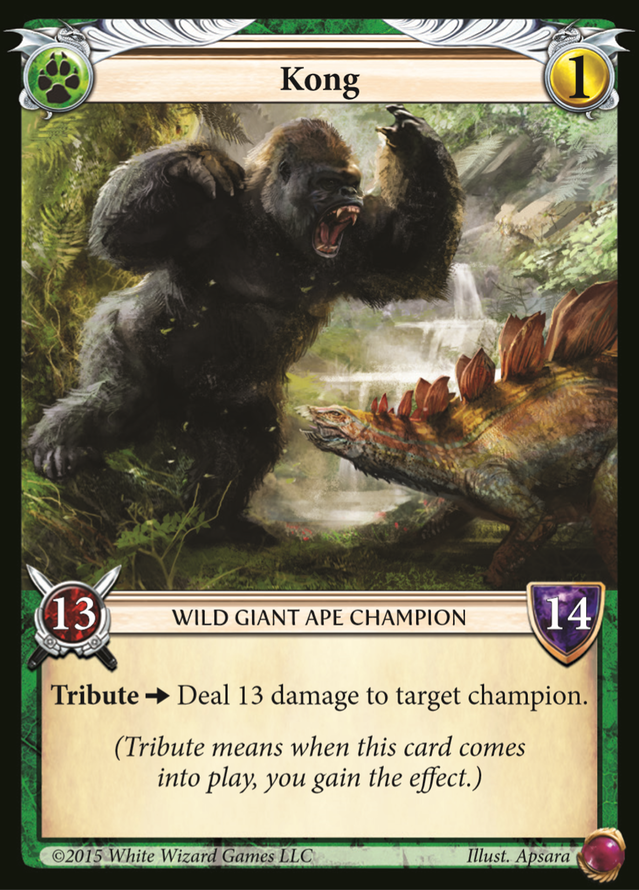
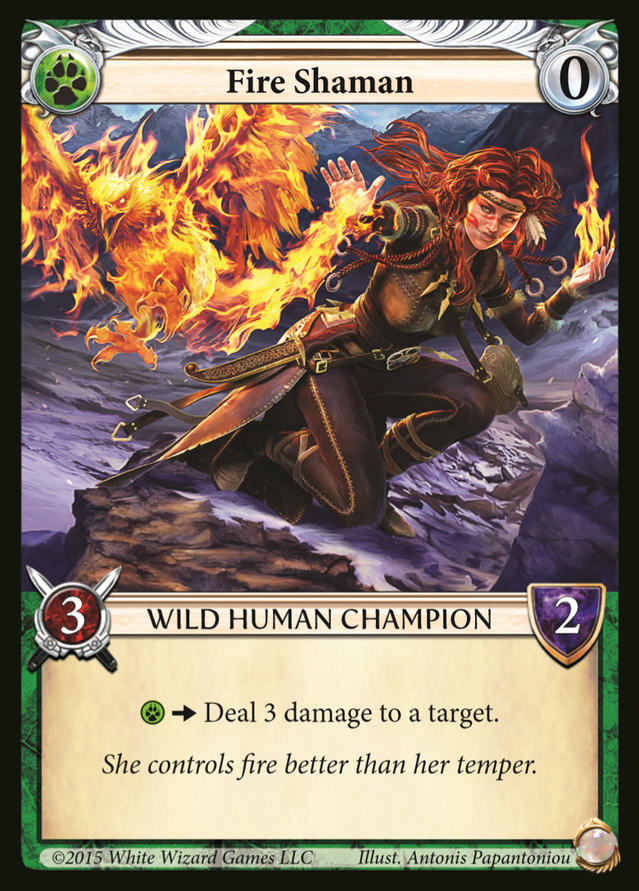

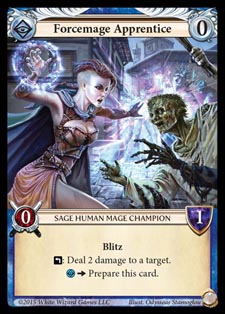
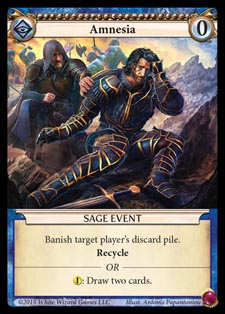
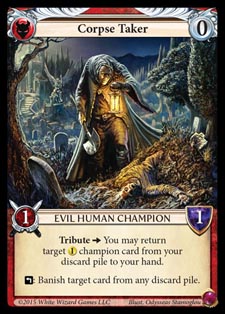
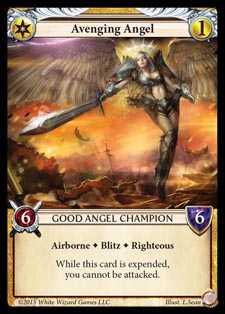
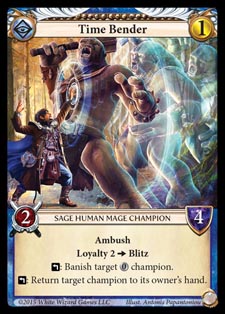
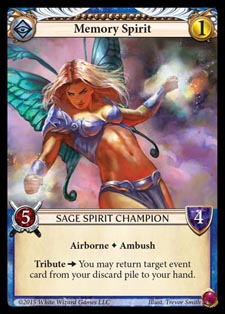
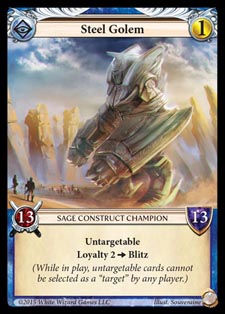
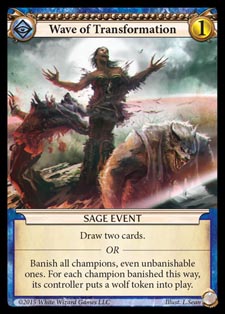
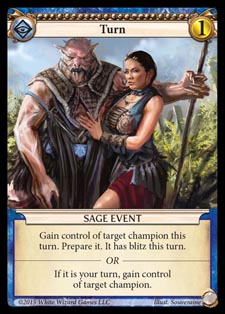

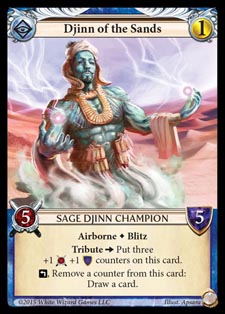
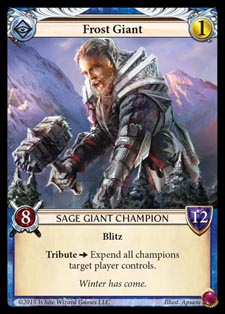
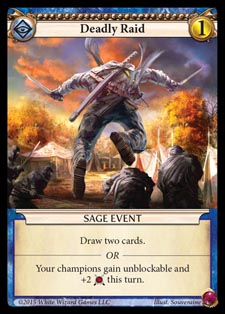
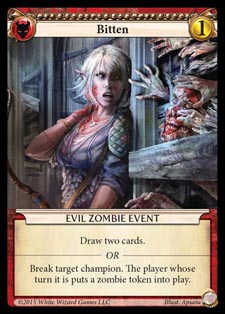
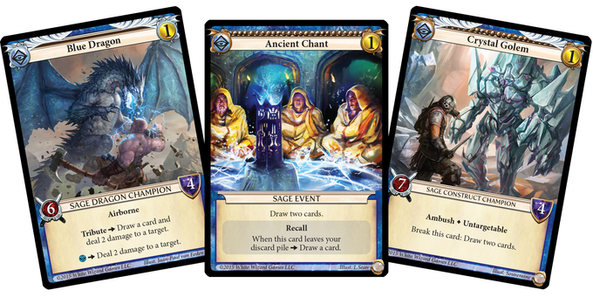

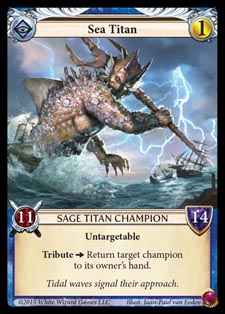
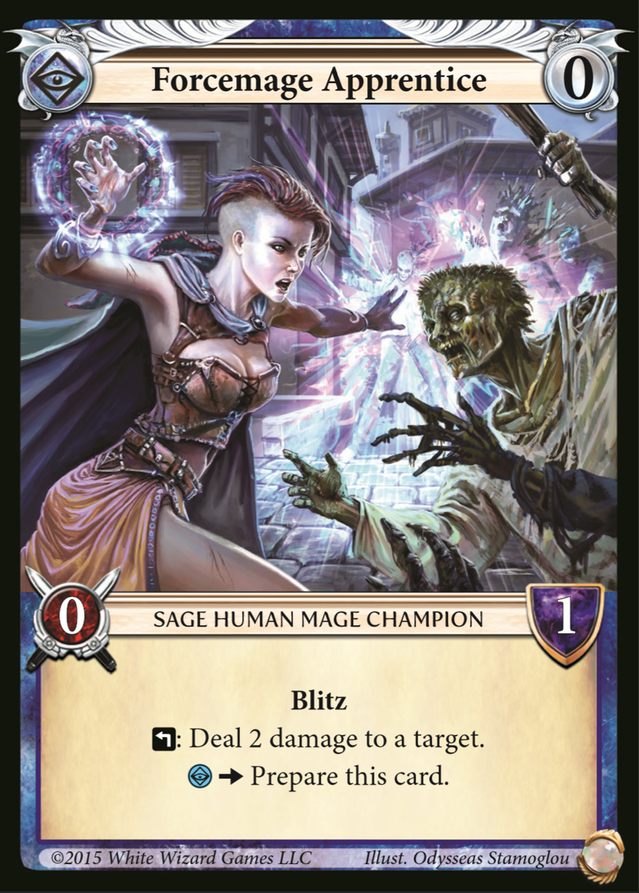


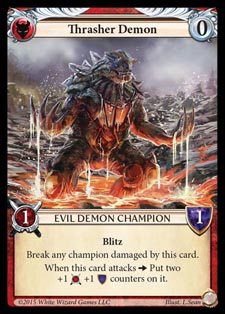
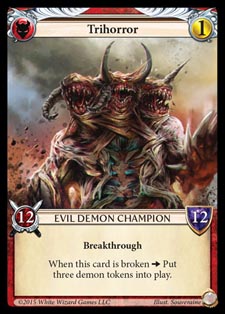
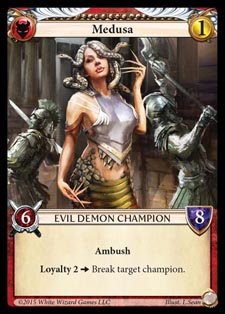
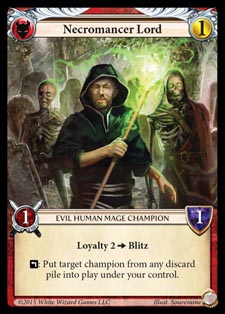
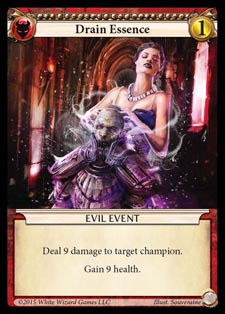
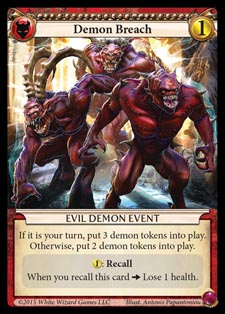
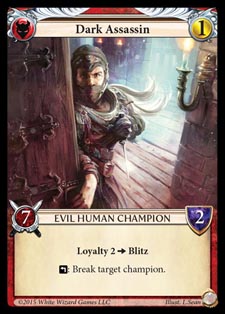
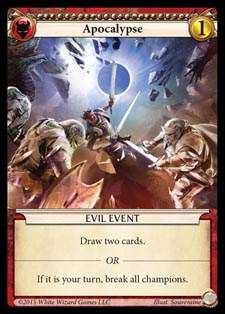
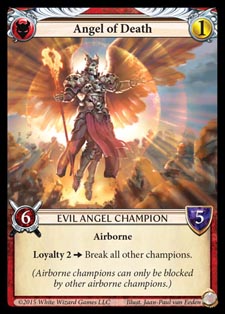
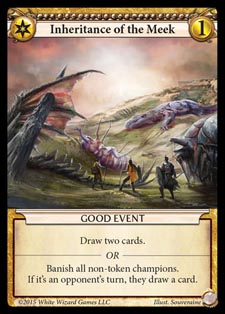
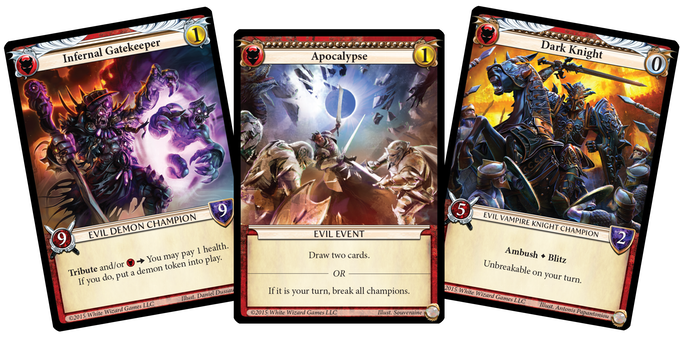

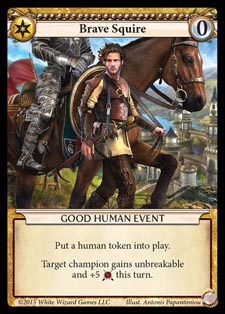


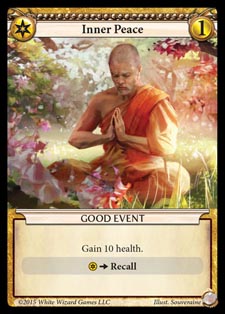
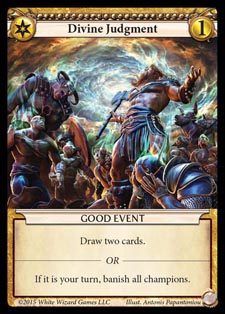
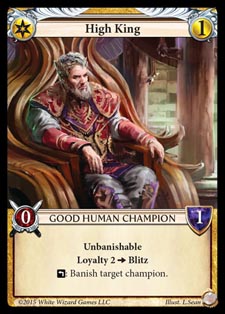
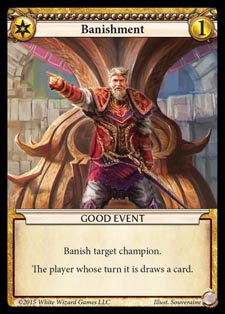

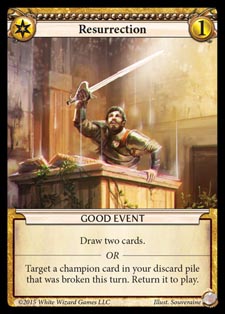
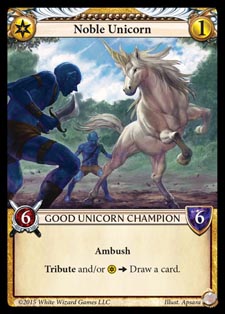
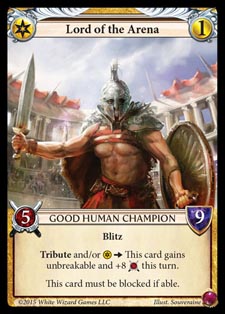
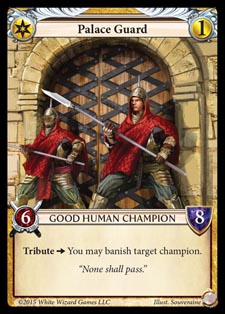
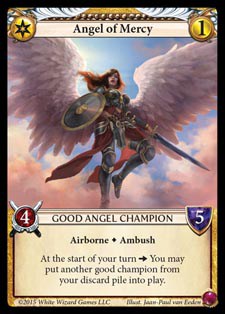


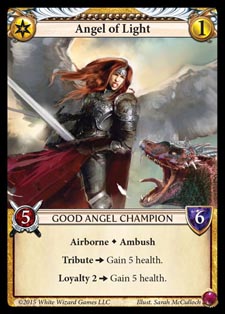
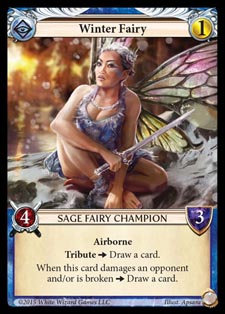